Google 代碼能夠與您使用的 Google 產品相輔相成,藉由資料分析技術來評估網站和廣告的成效。Google 代碼會將資料傳送至相連結的產品目的地,例如 Google Ads 和 Google Analytics 4。
由於網站技術 (例如 Cookie) 會隨隱私權、瀏覽器和法規變動而持續演進,採用高品質的全網站代碼,有助於取得最準確的評估結果。
本文將說明:
什麼是代碼 ID?如何找出代碼 ID?
哪裡可以找到我的 Google 代碼 ID?
您可以在 Google Ads、Google Analytics (分析) 和 Google 代碼管理工具中找到 Google 代碼設定。請登入產品,然後按照以下操作說明查看代碼 ID:
Google Ads 操作說明
Google Analytics (分析) 操作說明
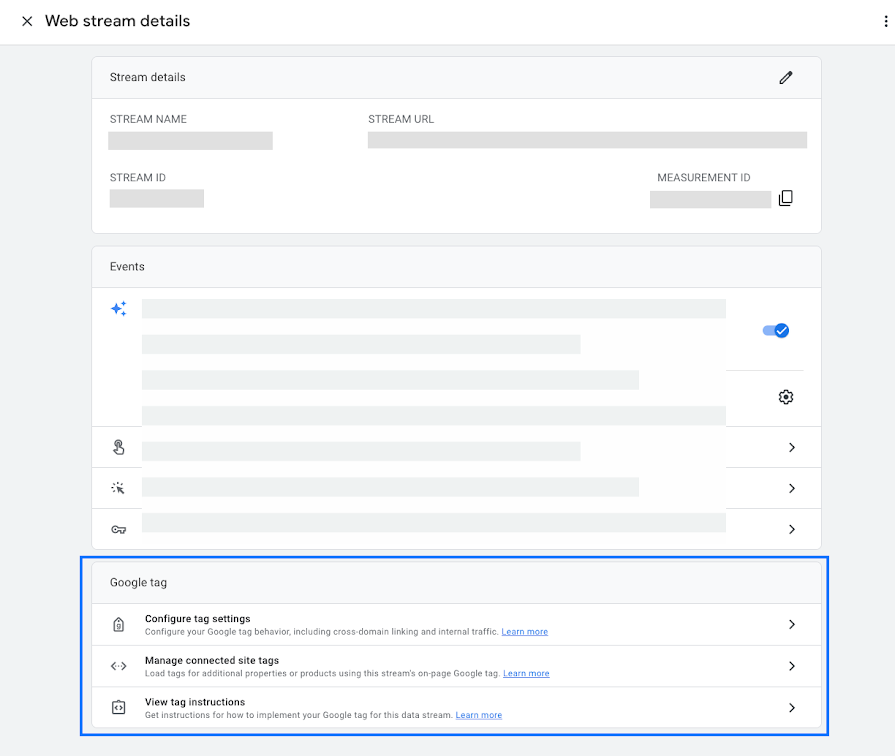
- 前往「管理」頁面,然後點選「資料收集和修改」下方的「資料串流」。
- 按一下串流查看詳細資料。
- 結果:畫面應該會顯示 Google Analytics (分析) 和 Google 代碼的設定。
Google 代碼管理工具操作說明
注意:您必須使用容器管理 Google Ads、Analytics (分析) 或 Google 代碼,才能在 Google 代碼管理工具中查看 Google 代碼 ID。
- 開啟 Google 代碼管理工具。
- 按一下「Google 代碼」分頁標籤,查看先前設定的 Google 代碼。
- 按一下代碼名稱編輯 Google 代碼設定。

什麼是目的地和目的地 ID?
什麼是目的地?
「目的地」是 Google 評估產品帳戶,採用與 Google 代碼相同的設定,且會從 Google 代碼接收資料。在 Google 代碼中新增目的地,就能在網站上重複使用 Google 代碼的設定和記錄。
目前,只有 Google Analytics (分析) 4 資源中的 Google Ads 帳戶和網站資料串流可設為目的地。
什麼是目的地 ID?
目的地 ID 用來識別目的地;「目的地」是指已連結的 Google 產品,例如 Google Ads 或 Google Analytics (分析)。Google 代碼會使用目的地 ID,載入目的地專屬設定及轉送事件。
Google Ads 目的地 ID 就是轉換追蹤 ID,例如 AW-98765。
Google Analytics (分析) 目的地 ID 就是網站資料串流的評估 ID,例如 G-12345。
在網站上安插 Google 代碼
開始評估網站和廣告成效之前,您必須先為網站上的每個網頁加入 Google 代碼。
此外,您必須選擇要使用哪一個產品來設定 Google 代碼。
如果您有更複雜的評估需求,而且也想要管理第三方代碼,請使用 Google 代碼管理工具設定 Google 代碼。
按照 Google Ads 操作說明設定 Google 代碼
- 使用網站上的 Google 代碼 (建議)
- 使用現有的 Google 代碼
- 安插 Google 代碼
使用網站上的 Google 代碼 (建議)
使用網站上偵測到的代碼完成設定,不必修改網站程式碼。帳戶的使用者會新增為代碼的使用者。進一步瞭解如何管理 Google 代碼。
- 按一下「詳情」查看代碼詳情。
- 按一下「完成」。
注意:建議您不要在網站的每個網頁中加入多個 Google 代碼。
- 代碼設定完成後,您必須配置 Google 代碼設定。
- 您可以啟動 Tag Assistant 來測試重要事件動作和資料收集。
使用現有的 Google 代碼
這個選項會顯示系統是否在您輸入的網站上偵測到該代碼。選擇標有「在網站內」字樣的代碼完成設定,不必修改網站程式碼。
請注意,如果網站流量偏低,代碼可能會顯示為「偵測不到」。如果您選擇標示為「偵測不到」的代碼,則可能需要自行安插代碼。帳戶的使用者會新增為代碼的使用者。進一步瞭解如何管理 Google 代碼
如果您對列出的代碼擁有管理員存取權,就能找到這些代碼。如果找不到所需代碼,可能是因為您沒有適當的使用者權限,無法修改該 Google 代碼。
- 按一下「選擇代碼」探索下列項目:
- 您擁有管理員存取權的代碼清單
- 代碼編號
- 偵測到代碼的位置
- 如果系統在您輸入的網站上偵測到代碼,您就可以選擇標有「在網站內」字樣的代碼來完成設定,不必修改網站程式碼。如果您選擇標示為「偵測不到」的代碼,則可能需要自行安插代碼。
- 選取要使用的 Google 代碼,然後按一下「確認」。
安插 Google 代碼
安插 Google 代碼的方式有 2 種:
- 使用網站製作工具。
- 手動
使用網站製作工具
您可以使用網站製作工具或內容管理系統 (CMS) (如 Wix 或 Duda) 部署 Google 代碼。選取所需網站製作工具,然後按照操作說明完成 Google 代碼的設定,無須變更程式碼。如果您要透過 CMS 或網站製作工具整合部署代碼,但 CMS 整合不接受 GT 代碼 ID,您可以使用 CMS 整合支援的別名 (AW-XXXXX 或 G-XXXXX)。
如果透過以下任一平台管理網站,無須變更程式碼就能完成 Google 代碼設定:
進一步瞭解如何使用網站製作工具安插 Google 代碼。
安插完成後:
- 按一下「完成」,Google 將會掃描您的網站。
- 按一下「完成」來完成 Google 代碼設定。
手動安裝
如果您是第一次在帳戶中為轉換動作設定代碼,且尚未安插 Google 代碼,請選擇這個選項。
- 如要安插代碼,請複製代碼並貼入網站每個網頁的程式碼,緊接在
<head>元素後方。每個網頁只能加入一個 Google 代碼。在以下的 Google 代碼範例中,「TAG_ID」代表 Google Ads 帳戶專用的代碼 ID:
<script async

            src="https://www.googletagmanager.com/gtag/js?id=TAG_ID"></script>

            <script>

            window.dataLayer = window.dataLayer || [];

            function gtag(){dataLayer.push(arguments);}

            gtag('js', new Date());

            gtag('config', 'TAG_ID');

</script> - (選用) 按照自己的需求修改 Google 代碼:
- 如果您不希望 Google 代碼在網頁初次載入時,將網站訪客加進再行銷名單,請將下方醒目顯示的部分加進 Google 代碼的 'config' 指令中:
gtag('config',' TAG_ID',{'send_page_view': false}); - 如果不希望 Google 代碼在網站網域上設定第一方 Cookie,請將下方醒目顯示的部分加進 Google 代碼的 'config' 指令中:
gtag('config',' TAG_ID',{'conversion_linker': false});- 注意:我們不建議這麼做,因為這會導致轉換評估的準確度降低。如要停用再行銷資料收集功能,請將下方醒目顯示的
gtag('set')指令加進 Google 代碼中gtag('js')指令的上方,這樣就能讓所有已設定的 Google Ads 帳戶停止蒐集再行銷資料。
<script async

                    src="https://www.googletagmanager.com/gtag/js?id=TAG_ID"></script>

                    <script>

                    window.dataLayer = window.dataLayer || [];

                    function gtag(){dataLayer.push(arguments);}

                    gtag('set', 'allow_ad_personalization_signals', false);

                    gtag('js', new Date());

                    gtag('config', 'TAG_ID');

                    </script>
- 注意:我們不建議這麼做,因為這會導致轉換評估的準確度降低。如要停用再行銷資料收集功能,請將下方醒目顯示的
- 如果您不希望 Google 代碼在網頁初次載入時,將網站訪客加進再行銷名單,請將下方醒目顯示的部分加進 Google 代碼的 'config' 指令中:
- 複製 Google 代碼並加進您的網站。
- 找出客戶在網站上完成轉換後到達的網頁 (例如「感謝購買」頁),並開啟該頁的 HTML 程式碼。這類網頁也就是所謂的「轉換頁」。
- 在網頁的 head 代碼 (
<head></head>) 之間貼上全域網站代碼,接著貼上適用該網頁的任何事件程式碼片段。 - 儲存您對網頁所做的變更。
- 按一下 [完成]。
- 按一下「安插事件代碼」。
- 在「事件程式碼片段」旁,選擇要追蹤網頁載入還是點擊所帶來的轉換。
- 網頁載入:在客戶造訪轉換頁 (如購物或註冊確認頁) 時計算轉換。這是預設選項,也是最常用的選項。進一步瞭解 Google 安全性標準。
- 點擊:在客戶點選按鈕或連結 (例如「立即購買」按鈕) 時計算轉換。
- 複製事件程式碼片段,然後按照操作說明將程式碼片段加進網站;如果想稍後再加入,請點選「下載程式碼片段」。
- 如果您追蹤的是網頁載入轉換,請將事件程式碼片段加進要追蹤的網頁。
- 如果您追蹤的是點擊轉換,請將事件程式碼片段加進要追蹤點擊的按鈕或連結所在的網頁。
- 點選「下一步」。
- 按一下「完成」。
- 按一下 [Finish],如果您是追蹤網站上的點擊轉換,請按照「追蹤網站點擊轉換」一文的操作說明,將另一段程式碼加入要追蹤的按鈕或連結中。您必須採取這個步驟,轉換追蹤功能才會運作。
 在以下的 Google 代碼範例中,「TAG_ID」代表 Google Ads 帳戶專用的代碼 ID:
代碼設定完成後,請務必確認 Google 代碼是否正常運作。
按照 Google Analytics 操作說明設定 Google 代碼
您在 Google Analytics 中設定 Google 代碼的方法取決於:您是否第一次在網站上設定 Analytics;或者您是否要在已有通用 Analytics 的網站中加入 Google Analytics 4 資源。
如果是第一次設定 Google Analytics
- 登入 Google Analytics (分析) 帳戶。
- 按一下「管理」。
- 使用「資源」欄頂端的下拉式選取器,選擇要在哪個資源設定資料串流的 Google 代碼。
- 在「資源」欄中,按一下「資料串流」。
- 按一下要編輯的資料串流。
- 在「Google 代碼」下方,按一下「進行代碼設定」。
- 在「您的 Google 代碼」部分,按一下「安裝操作說明」。
- 在「安裝操作說明」頁面中,選取「使用網站製作工具進行安插作業」或「手動安插」:
- 如果您使用網站製作工具 (即 Wix 或 Wordpress 這類「CMS 平台」) 管理網站,請採用「使用網站製作工具進行安插作業」。選取所需網站製作工具,然後按照操作說明完成 Google 代碼的設定,無須變更程式碼。
- 如果您選擇手動安插,請前往「手動安插」部分。畫面上會顯示帳戶 Google 代碼的 JavaScript 程式碼片段。如要連結您的網站與 Google Analytics,請複製整段 Google 代碼,然後貼到網站的每個網頁,緊接在
<head>元素後方。Google 代碼是指系統顯示的一整段程式碼,開頭為:
<!-- 全域代碼 (gtag.js) -->
且結尾為
</script>
系統最多可能需要 30 分鐘才會開始收集資料。接著,您可以查看即時報表,檢查資料是否已開始傳入。
代碼設定完成後,請確認 Google 代碼是否正常運作。
如要在已有通用 Analytics 的網站中加入 Google Analytics 4 資源
您可以使用 GA4 設定輔助程式,在已有通用 Analytics 的網站中加入 Google Analytics 4 資源。您必須具備 Analytics 帳戶的編輯者角色權限。請按照以下操作說明建立 GA4 資源。無論您的網頁有 Google Analytics 代碼 (gtag.js 或 analytics.js)、Google Ads 代碼 (gtag.js) 還是 Google 代碼管理工具容器,都可以使用這個精靈。
- 在 Google Analytics (分析) 中,按一下左下方的
「管理」。
- 在「帳戶」欄中,確認您已選取需要的帳戶 (如果您只有一個 Google Analytics (分析) 帳戶,系統會預先選取該帳戶)。
- 在「資源」欄中,選取目前用來收集網站資料的通用 Analytics (分析) 資源。
- 在「資源」欄中,按一下「GA4 設定輔助程式」(「資源」欄的第一個選項)。
- 在「我想要建立新的 Google Analytics (分析) 4 資源」下方,點選「開始使用」。
- 「建立新的 Google Analytics (分析) 4 資源」彈出式視窗會根據您目前標記網站的方式,顯示下列其中一個選項:
- 建立並繼續。按一下這個按鈕,可繼續操作並前往「設定 Google 代碼」頁面 (步驟 7)。
- 建立資源。如果看到這個選項,表示 Analytics (分析) 可將現有的通用 Analytics (分析) 標記重複使用於 GA4 資源。Analytics (分析) 會在通用 Analytics (分析) 和 GA4 資源之間,建立相連結的網站代碼。選取這個選項,然後跳到下方「新 GA4 資源的後續步驟」一節。
進階使用者注意事項:這個選項會導入 GA4 資源適用的標準資料收集功能。如果您已導入通用 Analytics (分析) 資源適用的任何自訂代碼,請查看這些額外步驟注意事項。
- 在「設定 Google 代碼」頁面,選取最符合自身情況的選項,然後按照操作說明完成新建 GA4 資源的程序:
使用網站上的 Google 代碼 (建議)
選取這個選項,即可使用網站上偵測到的 Google 代碼完成設定,無須修改網站程式碼。
視需要按一下「詳細資料」查看代碼詳情。
按一下「確認」完成新建 GA4 資源的程序。
資源的使用者將新增為 Google 代碼使用者。進一步瞭解如何管理 Google 代碼。
使用現有的 Google 代碼
選取這個選項,即可重複使用您已有管理員存取權的 Google 代碼。
按一下「選擇代碼」可查看下列資訊:
- 您擁有管理員存取權的代碼清單 (如找不到需要的代碼,表示您可能沒有適當的使用者權限,無法變更該 Google 代碼)。
- 代碼 ID
- 系統是否在您的網站上偵測到代碼。選擇標有「在網站內」的代碼,完成後續設定,不必另外修改網站程式碼。假如您選用標示為「偵測不到」的代碼,則可能需要自行安插代碼 (請注意,如果網站流量偏低,代碼可能會顯示為「偵測不到」)。
- 與代碼建立關聯的目的地
選取要使用的 Google 代碼,然後按一下「確認」完成新建 GA4 資源的程序。
資源的使用者將新增為代碼使用者。進一步瞭解如何管理 Google 代碼
安插 Google 代碼
如果您的網站未安插 Google 代碼,請選取這個選項。
- 點選「下一步」,在網站上安插新的 Google 代碼。
- 「安插操作說明」頁面會顯示以下 2 個選項:
- 使用網站製作工具進行安插作業:如果您使用網站製作工具 (即 Wix 或 Wordpress 這類「CMS 平台」) 管理網站,則無須修改程式碼就能完成 Google 代碼設定。
- 手動安插:符合下列任一條件時請採用此做法:
- 您的網站製作工具/CMS 尚未支援 Google 代碼 (gtag.js)
- 您或網頁程式開發人員要手動在網站中加入代碼
- 您的網站已採用 analytics.js 代碼
- 您使用 Google 代碼管理工具
選項 1:使用網站製作工具或 CMS 進行安插作業
如果您使用下列任一平台管理網站,請選取該平台,然後按照操作說明完成 Google 代碼設定,不必修改程式碼。
Google 代碼安插完成後,按一下「完成」即完成新建 GA4 資源的程序。
如果您的平台尚未支援 Google 代碼,可以採用下方的手動安插選項。
我們會持續更新 CMS 操作說明,盡可能讓您輕鬆設定 Google 代碼。如果「安插操作說明」頁面未列出您的平台,您還是可以將 Google 代碼 ID 貼入網站製作工具或 CMS。手動安插前請先在這份清單中查看是否有您的平台進一步瞭解如何使用網站製作工具安插 Google 代碼。
選項 2:手動安插
符合下列任一條件時請採用此做法:
- 您的網站製作工具/CMS 尚未支援 Google 代碼 (gtag.js)。請注意,您需要使用平台的自訂 HTML 功能
- 您或網頁程式開發人員要手動在網站中加入代碼
- 您的網站已採用 analytics.js 代碼
如何手動安插 Google 代碼
「手動安插」分頁會顯示 Google 代碼的 JavaScript 程式碼片段。如要連結您的網站與 Google Analytics (分析),請複製整段 Google 代碼,然後貼到網站上每個網頁的程式碼中,緊接在
<head>元素後方。每個網頁只加入一個 Google 代碼。如果您使用的網站製作工具/CMS 尚未支援 Google 代碼,請複製整段 Google 代碼並貼到平台的自訂 HTML 欄位。
Google 代碼是指系統顯示的一整段程式碼,開頭為:
<!-- Google tag (gtag.js) -->
且結尾為
</script>在網站上安插好 Google 代碼後,按一下「完成」即完成新建 GA4 資源的程序。代碼設定完成後,接著需要配置 Google 代碼設定
如果您的網站已採用 analytics.js 代碼 (手動或透過 CMS 完成)如已手動在網站中加入 analytics.js 代碼,新增上述 Google 代碼時,請勿移除舊的 analytics.js 代碼。該代碼會繼續為通用 Analytics (分析) 資源收集資料,而您新增的 Google 代碼 (gtag.js) 則會為新的 GA4 資源收集資料。
如果使用的網站製作工具/CMS 會在網頁中加入 analytics.js 代碼,您可以使用自訂 HTML 功能,在網頁中加入 Google 代碼。請保留 analytics.js 代碼,Analytics (分析) 才能繼續傳送資料至通用 Analytics (分析) 資源。
下表列出使用 analytics.js 的網站製作工具和 CMS,您需要用自訂 HTML 的方式新增 Google 代碼,在網站上加入這兩種代碼。
在 Google 代碼管理工具中設定 Google 代碼
如果使用 Google 代碼管理工具,您可以部署及管理 Google 代碼,也可管理所有其他代碼。
事前準備
如要在代碼管理工具中設定 Google 代碼,您需要有 Google 代碼 ID。如果不確定代碼的位置,請參閱「哪裡可以找到我的 Google 代碼 ID?」一節。
如果網站已有 Google 代碼片段,且您想升級為僅使用代碼管理工具,請按照遷移指南中的步驟操作。
步驟 1:建立 Google 代碼
請先建立 Google 代碼,設定評估方式。
- 開啟 Google 代碼管理工具
- 選取要設定的容器,並開啟
 「代碼」選單。
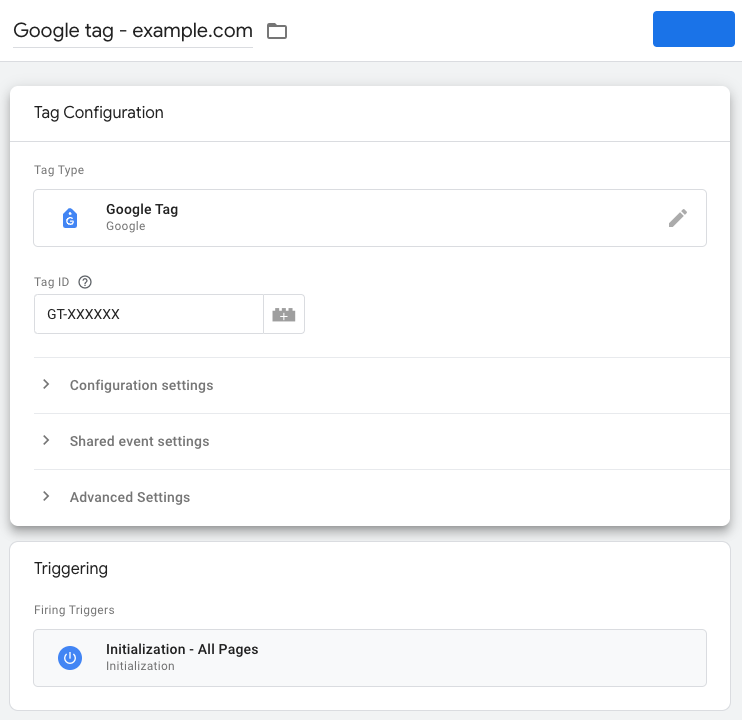
 - 建立新的代碼。在頂端輸入代碼名稱 (例如「Google 代碼設定 - example.com」)。
- 在「代碼設定」方塊中,選取
 「Google 代碼」。
 - 設定代碼。在「代碼 ID」欄位中輸入 Google 代碼 ID。
哪裡可以找到我的 Google 代碼 ID?
您可以在 Google Ads、Google Analytics (分析) 和 Google 代碼管理工具中找到 Google 代碼設定。請登入產品,然後按照以下操作說明查看代碼 ID:
Google Ads 操作說明
開啟 Google 代碼設定。Google Analytics (分析) 操作說明
- 前往「管理」頁面,然後點選「資料收集和修改」下方的「資料串流」。
- 按一下串流查看詳細資料。
- 結果:畫面應該會顯示 Google Analytics (分析) 和 Google 代碼的設定。
Google 代碼管理工具操作說明
注意:您必須使用容器管理 Google Ads、Analytics (分析) 或 Google 代碼,才能在 Google 代碼管理工具中查看 Google 代碼 ID。
- 開啟 Google 代碼管理工具。
- 按一下「Google 代碼」分頁標籤,查看先前設定的 Google 代碼。
- 按一下代碼名稱編輯 Google 代碼設定。
- 選用:您可以設定其他配置選項,控管 Google 代碼與目的地的通訊方式。如果您已設定 Google 代碼,並想保留所有預設設定,現在可跳至「步驟 2:建立觸發條件」。
 「代碼」選單。
 「Google 代碼」。
選用設定
全域參數設定
如需在多個 Google 代碼中建立共通內容,您可以直接在網站上使用 gtag.js 指定全域參數。
如想進一步瞭解如何在多個代碼中重複使用參數,請參閱開發人員說明文件。
共用事件設定
您可以指定與每個事件一起傳送的額外參數,例如價格的 currency (幣別)。事件參數僅適用於參數所在的代碼。
如要在 Google 代碼中重複使用事件設定,請建立「Google 代碼事件設定」變數。使用建議事件參數名稱,Google Analytics (分析) 就能為您填入維度和指標。
將資料傳送至標記伺服器
使用伺服器端代碼設定,將部分代碼從網站/應用程式移至伺服器,有助於提升成效。進一步瞭解伺服器端代碼。
如要將所有事件傳送至代碼管理工具的伺服器容器 (而非 Google Analytics (分析)),請設定下列參數:
- 開啟「配置設定」選單。
- 新增設定參數,完成伺服器容器網址設定:
- 名稱:
server_container_url - 值:設為代碼管理工具伺服器容器的網址
- 名稱:
結果:設定參數應如下所示:

設定使用者屬性
使用者屬性是用來描述使用者族群的屬性,例如語言偏好設定或地理位置。您可以使用使用者屬性來定義目標對象。
舉例來說,您可以設定名為 favorite_food 的使用者屬性,用於記錄每位使用者喜愛的食物。您可以使用這項資料,根據使用者喜愛的食物區隔使用者。
Analytics (分析) 會自動收集部分使用者維度,因此您不必定義這些維度的使用者屬性。每項 Google Analytics (分析) 4 資源最多可額外設定 25 項使用者屬性。
如要評估自訂使用者屬性,請建立一個新的「Google 代碼事件設定」變數,然後指派給 Google 代碼。
7. 儲存 Google 代碼。
步驟 2:建立觸發條件
接下來請設定觸發條件,在有人載入網站時觸發 Google 代碼。
- 為確保 Google 代碼在其他觸發條件之前觸發,請按一下「觸發條件」,然後使用「初始化 - 所有網頁」做為觸發條件。進一步瞭解網頁觸發條件。
- 輸入代碼名稱並儲存代碼設定。
結果
代碼設定應該會如下所示:
步驟 3:發布容器
如要將最新的變更內容套用至網站,請按一下右上方的「提交」按鈕。
結果
代碼設定完成後,請確認 Google 代碼是否正常運作。
如要在代碼管理工具中設定更多代碼,請參閱 Google 代碼管理工具指南。
確認代碼可傳送資料
- 開啟 Google Tag Assistant
- 輸入您網站的網址。
- Tag Assistant 會在上方顯示所有偵測到的代碼。檢查您的 Google 代碼
 是否顯示。
是否顯示。 - 在「摘要」分頁中,查看代碼是否傳送任何事件。
- ✅ 代碼可記錄和發送事件,表示 Google 代碼設定正確無誤。
- ❌ 如未看到 Google 代碼或代碼並未收集請求,請參閱以下各節瞭解詳情。
 是否顯示。
是否顯示。請記得在每個要傳送資料的網站上設定 Google 代碼。如要查看 Google 代碼的位置,請參閱「代碼涵蓋範圍」摘要。
找不到代碼
如果 Tag Assistant 找不到您的 Google 代碼,請確認以下幾點:
- 您新增的評估 ID 正確無誤
- 代碼已啟用。您可以使用瀏覽器的開發人員工具查看哪些程式碼已載入。
目的地未收到資料
如果 Tag Assistant 顯示網頁上有 Google 代碼,但您仍未看到任何資料,可能是因為 Google 代碼未連結到目的地。
在此情況下,您開啟 Google 代碼頁面時會收到通知訊息。此時,您可以選擇將目的地連結至現有的 Google 代碼,或建立新的 Google 代碼。
後續步驟
Google 代碼設定完成後,請務必進行配置,才能傳送需要的資料。