To target a location, add a column to your feed that contains a list of canonical names from the Google Ads API for the locations you want to target. When you set up the feed rules in your profile, you'll select Proximity Targeting, and set a radius around the location. You can choose one of the default radius settings or set a custom radius from a minimum of 1 km to a maximum of 2,000 km.
When the ad is served, the server will select matching feed content within that radius. If there's more than one match, feed rows will be selected in order from nearest to farthest.
Create your feed
- Start with a feed template. See this sample feed to use as a starting point.
- Fill out the feed. Learn more
- Add the geo-targeting column. Add a column to the feed to hold canonical names from the Google Ads API. Enter the appropriate geographic value for each row of content. Make sure to format values exactly as they appear in the Google Ads API. See formatting guidelines for more details.
- Create one or more rows with broader geographic targeting to show to people who are outside your targeted areas. For example, if you're targeting a list of airports in Canada, you can include a content row meant for anyone in Canada.
- Set one or more of these rows as default rows. If you do not set a default row, anyone that is not within your radius distance to the center point of a location in your feed will not be considered a match for any of your feed content, and will see a default ad. In the example above, if you don't set the Canada content row as a default row, and your radius is 10 km, anyone that is more than 10 km from all of the airports and more than 10 km from the geographic center of Canada would see a default ad.
Create your Studio profile
- Upload the feed to your Studio profile.
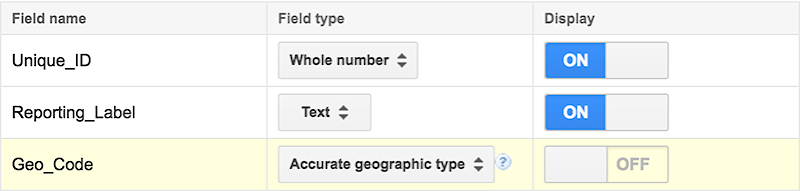
- Go to Step 2: Manage Data. In the Data types and filters section, select the appropriate field type for each of the columns in the feed. For the column containing canonical names, select Accurate geographic type.
- In the Special fields section, find the "Proximity targeting" field. Select the column containing canonical names (the same column name from step 2).
- Go to Step 3: Manage Rules. Confirm that the rule type is set to "Proximity Targeting" and the Summary displays "Proximity targeting rule". Optimized is the only rotation type supported for proximity targeting.
- Click Manage to set the radius to target around each location in the feed.
- Select a radius.
- (Optional) If you need more precise control, select Custom radius.
- Select your preferred units (kilometers or miles).
- Enter a distance greater than 1 mile (or 1 km) and less than 1,242 miles (or 2,000 km). Round to the nearest whole number (decimals are not allowed).
- Click OK.
- In Step 4: Generate Code, the dynamic code is generated.
- If you're using Google Web Designer, this code is not needed, just connect your Studio profile to bind data in your creative.
- If you're using another HTML editor, add the dynamic code into the creative files.
- Publish from Google Web Designer or upload your completed creative to Studio.
- Publish your profile. Proximity targeting can't be previewed while the profile is in draft.

Preview your creative and profile
Keep in mind the following limitations when previewing profiles that use proximity targeting:
- Proximity targeting only works in published profiles. Before you preview, make sure your profile is published.
- Proximity targeting only supports the preview type "Filter by dynamic criteria".
Preview your published profile
- Go to Step 5: Preview
- In the preview settings panel, select Filter by dynamic critieria for the preview type.
- Select or enter a location to filter by, then click Apply. You can also choose a city or postal code within the defined radius and make sure the correct content is shown. For example, if one of your locations is Paris Charles de Gaulle Airport, add Roissy-en-France as a location, and you should see Charles de Gaulle airport content.
Frequently asked questions
Are latitude and longitude coordinates supported?
Can I randomly rotate creative content with proximity targeting?
In my test report, each location showed the same content despite multiple available content variations per location. What happened?
Optimized rotation will take a couple of weeks to kick in for proximity targeting campaigns (depending on number of impressions). In the beginning, you might see the same row for each location selected in ad serving and reporting. After the creatives have served for a while, the server starts selecting random rows. Later, the server selects the row with the best performance.
If you want randomization to appear sooner, use dependent selection with two feeds. For example, use a parent feed with proximity targeting to select an airport. Then, use a child feed with a column that matches that airport to select random content for that airport.