Native ads allow you to customize the look and feel of the ads that appear in your app. You decide how and where they’re placed, so the layout is more consistent your app’s design.
There are two steps to create a native ad:
Native ads best practices and policies
For subtitles in your language, turn on YouTube captions. Select the settings icon at the bottom of the video player, then select "Subtitles/CC" and choose your language.
Step 1: Create a native ad unit
Complete the following steps to create a native ad unit for an existing app.
- Sign in to your AdMob account at https://admob.google.com.
- Click Apps in the sidebar.
- Select the name of the app you're creating this ad unit for. If you can't find it in the list of recent apps, you can click Add app to add a new app or click View all apps to search a list of all of the apps you've added to AdMob.
- Click Ad units in the sidebar.
- Click Add ad unit.
- Click Select for the Native ad format.
-
Enter a name for this ad unit. Tip: Include relevant information, such as ad format and location in your app to make it easier to identify later.
- (optional) Complete the advanced settings for this ad unit:
- Media type: Choose the native media type you want to allow in this ad unit. You can choose one of the options. Note: Animated images (.GIF) are not supported for native ads.
- Image: Only image ads will be shown.
- Video: Only video ads will be shown.
-
eCPM floor: You can set an eCPM floor (also known as a minimum eCPM) for each ad unit you create. This instructs the AdMob Network not to serve ads to this ad unit with eCPM values below the minimum eCPM you’ve set. Select how you want to set the eCPM floor:
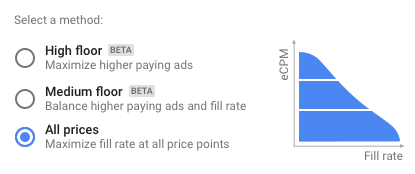
- Google optimized: Google dynamically sets your floors based on your users’ geographic locations, ad unit’s traffic, and historical data. Using Google optimized eCPM floors can help you maximize total revenue. You can choose how Google optimizes your eCPM floor by selecting one of the following methods:
- High floor (Beta): Google will maximize the higher paying ads.
- Medium floor (Beta): Google will balance higher paying ads and fill rate.
- All prices: Google will maximize fill rate at all price points.
- Manual floor: You manually set the value of the minimum eCPM for each ad unit. The AdMob Network won’t serve ads with an eCPM below the minimum eCPM you’ve set to the ad unit.
- Disabled: There is no eCPM floor on this ad unit.
Note: This eCPM floor only applies to the AdMob Network. It does not apply to third-party ad networks and custom events configured as ad sources in a mediation group. - Google optimized: Google dynamically sets your floors based on your users’ geographic locations, ad unit’s traffic, and historical data. Using Google optimized eCPM floors can help you maximize total revenue. You can choose how Google optimizes your eCPM floor by selecting one of the following methods:
-
(optional) Country-specific floors: If you've selected Manual floor as the eCPM floor in the previous step, you can click Add country-specific floors to add country-specific eCPM floors for this ad unit. Country-specific eCPM floors will override this ad unit’s global eCPM value only when ad requests originate from the selected country.
- Select a country for which you want to set a specific floor. It will be added to the list of selected countries. You can select whole regions, or expand each section to view the individual countries within a region.
- Click Edit beside the country or region you selected and enter an eCPM floor value.
- Click Set to save the eCPM value.
- Repeat these steps as required.
- Media type: Choose the native media type you want to allow in this ad unit. You can choose one of the options. Note: Animated images (.GIF) are not supported for native ads.
- Click Create ad unit.
- Follow the Google Developers instructions for Android, iOS, or Unity to implement native ad units in your app code. You will need your app ID and ad unit ID during implementation.
This ad unit won't show ads until you've completed this step. If you're not ready to implement the ad unit, you can click Email this to send the instructions by email or click Done to exit the page.
Step 2: Design and implement a native ad
Once you’ve created the native ad unit, you’ll need to implement a native design. There are two ways to design a native ad:
- Use a template: You can download customizable native ad templates that are ready to use for Android or iOS. Using a native template is an easy way to get started with native ad implementations. You can use a template or customize it to fit your needs.
- Design from scratch: To design your own native ad implementation, follow the instructions for Android or iOS.