Geo-targeting increases ad relevancy by selecting creative content to show based on the viewer's geographic location. Using the same geo-lookup technology that powers Google Maps, you can dynamically update an ad's images, text, videos, and more. For example, you may want to highlight a new business location opening in Paris for viewers in that area.
There are two categories of geo-targeting available:
Before you get started
Make sure your ads comply with Google Ads Policies, including the personalized advertising policy.
Create your feed
- Start with a feed template Refer this sample feed as a starting point.
- Fill out the feed Follow these general feed instructions to begin populating the feed.
- Add the geo-targeting column After following the general feed instructions, make sure to add a column for geo-targeting (e.g. city, state, region, etc.). Enter the appropriate geographic value for which each row of content that is targeted. Follow these formatting instructions when populating the geo-targeting column.
To avoid content selection problems, make sure the geographic values you're using in your feed are available in the Google Ads geographical targets list.
Create your Studio profile
After uploading the feed to the Studio profile, follow the below steps that are specific to geo-targeted strategies:
-
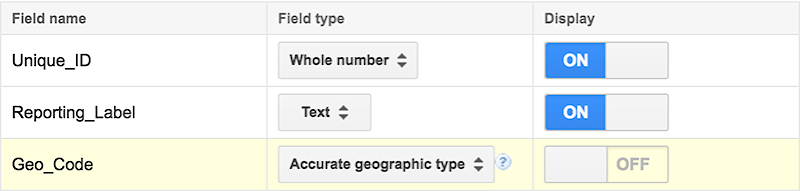
Navigate to Step 2: Manage Data. In the Data types and filters section, select the appropriate field type for each of the columns in the feed. For the geo columns, select the appropriate geo type:
-
For Standard geo-targeting, select the name of the location type: Metro code (DMA) or Country code.
- For Google Ads API geo-targeting, select Accurate geographic type.
-
-
Navigate to Step 3: Manage Rules. Confirm that the "Type" drop-down is set to Auto-Filter and the "Summary displays" Filtering on: Geo_Code (or whatever the geo column is called). If necessary, click Manage to update the filtering column.
-
Connect your Studio profile with the creative. Choose the option below depending on your HTML editor:
-
(For Google Web Designer users) Open Google Web Designer and connect your Studio profile.
-
(For HTML editors other than Google Web Designer) In Step 4: Generate Code, the dynamic code is generated. Follow these steps to incorporate the dynamic code into the creative asset files and upload the final assets to Studio.
-
-
In Step 5: Preview, preview the creative by entering the name of the appropriate location into the parameter field and clicking Launch/update preview.
Note that geo codes aren't supported in dynamic preview.
-
Publish your profile.