If you have a camera issue in a meeting, here's how you can fix it:
- Allow Google Meet to access your camera
- Allow Google Chrome to access your camera
- Allow camera access on a browser other than Chrome
- Allow your system or device to access your camera
- Learn why you have a black screen or crossed out camera icon
Check your camera before your meeting
- Make sure that your camera is connected, on and faces towards you.
- Choose the correct camera, not a screen or other devices. Learn how to connect your video and audio.
- Test your camera in another app.
- Close other apps that use the camera, then reload Meet.
- Check your Internet connection. Slow connections can cause video-quality problems. Learn how to improve your Wi-Fi or network performance.
- Make sure that your browser is updated.
Allow camera access for Meet
You must allow camera access the first time you join a meeting.
- On your computer, open meet.google.com.
- Join a video meeting.
- In the address bar, click Camera.
- Turn on the camera.
- Click Allow on every visit.
Allow camera access in Google Chrome
Check your site permissions
Important:
- The 'Camera failed' error often means that your browser can't access the camera.
- You can allow all websites to use your camera or only a specific website.
To allow your browser to use your camera:
- On your computer, in the address bar, enter
chrome://settings/content/camera. - Under 'Default behaviour', select Sites can ask to use your camera.
- Turn off Ask before accessing.
- If you've allowed camera access for Meet before:
- Under 'Allowed to use your camera', next to 'https://meet.google.com:443', click Delete.
- Next to 'https://meet.google.com:443', click Expand
.
- Under 'Permissions', click Camera
Allow camera access.
Allow camera access on other browsers
Allow camera access on your computer or device
Important: Check that your camera is on and accessible by your computer and browser.
On a Chromebook- On your Chromebook, at the bottom right, click Time
.
- On the left, select Privacy and security
- Turn on Camera access.
On a macOS Mojave (version 10.14) or later, allow the browser to use your camera so that Meet can use the camera.
- On your macOS device, go to System settings
- Select Camera.
- Tick the box for the app that uses Google Meet.
- For example: The app may be Google Chrome, Firefox, Safari or Edge.
- On your computer, click Start
- Select Privacy and security
- Turn on Camera access
Tip: This setting lets users decide whether apps can use the camera.
Troubleshoot a black screen or crossed-out camera icon
Check for camera hardware problems- On your device, open the built-in camera app, like Camera or Photo Booth.
- If your camera's self-preview shows your image but Meet doesn't, make sure that Meet can access your camera:
- If your camera doesn't show your image, check and adjust the camera cover or privacy switch.
Important: Not all devices have a camera cover or privacy switch. If yours does:
- The cover or switch might be at the top or side of your device.
- Some models use an orange, red or amber light when the privacy switch is on.
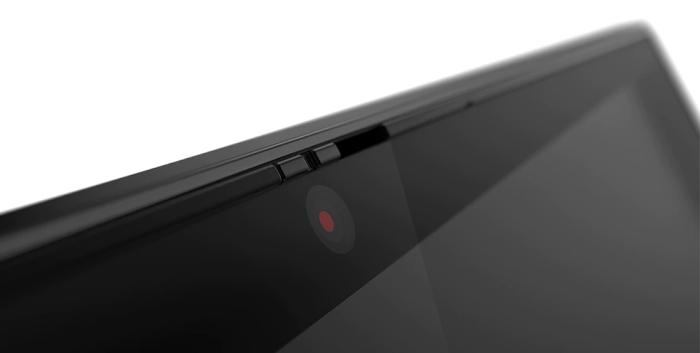
- To find the camera cover, at the top of the camera lens, check for a slider.
- For most devices, the camera cover is a physical slider above the lens.
- For example, on Lenovo devices, the camera lens is blocked by the slider.
- For example, on Lenovo devices, the camera lens is blocked by the slider.
- For most devices, the camera cover is a physical slider above the lens.
- If there's no slider above the lens, check for a physical switch on either side of your device.
- Some devices use a privacy switch instead of a camera cover.
- For example, the HP Chromebook has a camera privacy switch.
- For example, the HP Chromebook has a camera privacy switch.
- Some devices use a privacy switch instead of a camera cover.
- To unblock the camera lens, move the slider or switch to the off position.
- Test the camera with the built-in camera app or with Google Meet.

Tip: If the camera's self preview doesn't show:
- For Chromebook, try the steps to reset your Chromebook hardware.
- For devices other than Chromebook, try more troubleshooting steps.
Important: Some devices have a software privacy switch.
- On your device, go to Settings.
- Find your camera settings.
- Turn off the software-based privacy switch.
Tip: The instructions might be different on your device.
Example of Chrome and Firefox browsers that shows the camera lens blocked by a software privacy switch.
If there's no camera cover or switch and the camera still doesn't work:
- Reset your Chromebook hardware.
- Test the camera with the built-in camera app or with Google Meet.