To get the most out of Google Home, choose your Help Center: U.S. Help Center, U.K Help Center, Canada Help Center, Australia Help Center

Google Nest × Yale ロックと Google Nest Detect が Google Nest Hub Max に接続できなくなります

2022 年 7 月下旬より、Google Nest Hub Max デバイスには、Matter に対応できるようにするためのソフトウェア アップデートが提供されます。 Matter はスマートホームの新しい標準規格で、スマート デバイスの幅広い互換性を確保することを目的としています。

Google Nest × Yale ロックと Google Nest Detect はアップデート後の規格に対応していないため、このアップデートにより、家の Wi-Fi へのブリッジとして、またはレンジ エクステンダーとして、Google Nest Hub Max を使用できなくなります。近くに Google Nest Connect または Google Nest Guard がある場合、Google Nest × Yale ロックや Google Nest Detect のブリッジまたはレンジ エクステンダーとして機能するため、何もしなくてもデバイスは引き続き正常に動作します。

Google Nest は、Google Nest × Yale ロックをご利用のお客様のうち、Google Nest Connect または Google Nest Guard を所有しておらず、Wi-Fi アクセス用のブリッジとして Google Nest Hub Max のみを使用している方に対して、Google Nest Connect を提供する予定です。Google Nest Connect をセットアップすると、Google Nest × Yale ロックは Google Nest Hub Max ではなく Google Nest Connect をブリッジとして使用するようになります。Google Nest Connect の詳細をご覧ください

重要: Nest アプリで家に Google Nest Connect や Google Nest Guard を登録または追加していない場合、ロックと Google Nest Detect の接続が切断され、オフラインになります。

アップデート前にロックまたは Google Nest Detect の接続を維持するための準備を行う

ロックまたは Google Nest Detect の接続を維持するには、ソフトウェア アップデートの前に、Google Nest Connect または Google Nest Guard を Nest アプリに追加し、Google Nest × Yale ロックまたは Google Nest Detect の範囲内に設置する必要があります。そうすることで、Google Nest Hub Max のソフトウェア アップデートが行われても、ロックは Wi-Fi および Nest アプリとの接続を維持できます。

Google Nest Connect や Google Nest Guard などの既存のブリッジがある場合は、その一つをロックまたは Google Nest Detect の近くに移動してください。通常は、ロックまたは Google Nest Detect を見通せる場所に設置する必要があります。そうした場所に設置できない場合は、新しい Google Nest Connect を入手し、Nest アプリを使用して設置する必要があります。現在 Google Nest Connect または Google Nest Guard をお持ちでない場合や、このアップデートについてサポートが必要な場合は、Nest サポートにお問い合わせください

注: Google Nest Detect は Google Nest Guard から最大 15 m 離れた場所に設置できますが、その距離は家の構造や電波干渉などの要因によって変わる場合があります。設置後に 1 つ以上の Google Nest Detect が Google Nest Guard に接続できない場合は、アプリにオフラインと表示されます。その場合は Google Nest Connect を追加して接続範囲を補うことができます。

Google Nest Connect を使用すると、Google Nest Guard と Google Nest Detect 間の接続範囲が広がります。これにより、Google Nest Guard から 15 m 以上離れた場所に Google Nest Detect を設置できるようになります。

Google Nest Connect を設置する

If you have other Nest products in your home already, make
sure they’re nearby when you try to add your Nest Connect to
the Nest app. Your Nest Connect will connect to them during
pairing and they’ll need to be in range.

  1. Open the Nest app Nest app.
  2. Tap Settings Nest settings icon 次に Add product .
  3. Scan the QR code Nest QR code image.  on the back of your Connect.
  4. Follow the in-app instructions for setup.
  5. Plug your Nest Connect into a wall outlet between your Nest
    products to help extend the range.
 Nest connect being plugged into a wall outlet

If you have both Nest Secure and the Nest × Yale Lock, you can use the same Nest Connect to extend the range of your alarm system and allow your lock to connect to Wi-Fi. In some cases, you may need more than one Nest Connect if your lock and Guard are installed far away from each other.

Thread と Matter のアップデート後にロックまたは Google Nest Detect を再接続する

Google Nest × Yale ロックまたは Google Nest Detect の接続が失われた場合は、Google Nest Hub Max の「オペレーティング システムのバージョン」が「F7」以降で始まっているどうかを確かめることで、上記のソフトウェア アップデートに関連する問題かどうかを確認できます。「F7」以降で始まっている場合は、既存の Google Nest Connect または Google Nest Guard をロックまたは Google Nest Detect の近くに移動するか、新しい Google Nest Connect を追加する必要があります。Google Nest Hub Max が F7 以降で始まっていない場合は、別の問題によって接続が切断されている可能性があります。ロックの接続が切断された場合の解決方法、および Google Nest Detect の接続が切断された場合の解決方法をご覧ください。

既存の Google Nest Connect または Google Nest Guard を移動する

最新版の Google Nest Hub Max と既存の Google Nest Connect または Google Nest Guard がすでに Nest アプリで同じ家にセットアップされている場合は、ロックまたは Google Nest Detect の近くに移動して接続が完了するのを待ちます。一般に、Google Nest Connect や Google Nest Guard は、ロックまたは Google Nest Detect を見通せる場所に設置された場合、それらに接続できるはずです。問題が発生した場合は、干渉源を確認してください。

Google Nest Detect は Google Nest Guard から最大 15 m 離れた場所に設置できますが、その距離は家の構造や電波干渉などの要因によって変わる場合があります。設置後に 1 つ以上の Google Nest Detect が Google Nest Guard に接続できない場合は、アプリにオフラインと表示されます。

Google Nest × Yale ロック用に新しい Google Nest Connect を追加する

既存の Google Nest Connect または Google Nest Guard がない場合は、次の手順に沿って新しい Google Nest Connect を追加して、ロックをオンラインに戻してください。

1. Google Nest × Yale ロックを出荷時の設定にリセットする

You may need to factory reset the Google Nest × Yale Lock to resolve some issues like an unresponsive keypad, connectivity issues, or a forgotten master passcode. If you're moving the lock to another door or home, you'll also need to do a factory reset.

When the lock is reset to factory defaults, all user passcodes including the master passcode are deleted and all programming features return to original default settings.

How to reset your Nest × Yale Lock

  1. Remove the battery cover and batteries.

    To remove the battery cover, you’ll need either the battery cover key that came in the box with your Nest × Yale Lock or a thumbtack. A small allen or hex wrench may also work.

    1. Insert the key or thumbtack into the hole on top of the battery compartment and press down firmly.
    2. Grip the cover near the top and pull it off while you continue to press with the key or thumbtack.
    3. Remove all the batteries.
  2. Unscrew the 2 bolts holding the indoor lock.
  3. Remove the indoor lock to reveal the reset button, which is located on the left side of the cable connector. 
  4. Hold down the reset button while you put in the batteries.
  5. Keep holding down on the reset button until the light turns red and the lock says “Just a moment, erasing all settings.”
  6. Release the reset button.
  7. Take out one battery each from the left and right side of the lock to expose the screw holes.
  8. Place the indoor lock on your door and line up the screw holes.
  9. Screw in the 2 bolts holding the indoor lock.
  10. Put the 2 batteries back in.
  11. The Nest × Yale Lock will say “Hi, from Yale and Nest” when the reset is complete.
  12. Replace the battery cover.

    To replace the cover, insert the 2 tabs on the bottom of the cover into the holes in the lock, then push the cover until the tab at the top locks it on.

Note: After you reset the lock, you must create a master passcode on the lock before you set it up with the Nest app.

Default settings when not connected to the Nest app

Feature

Default setting

Available settings

Master passcode

Required

N/A

Auto-Lock

Disabled

Enable, Disable

Auto-Lock door after

30 seconds

N/A

One touch locking

Enabled

Enable, Disable

Volume setting

Low

Silent, Low, High

Wrong code entry limit

5 times

N/A

Shutdown time

90 seconds

N/A

Default settings when connected to the Nest app

Feature

Default setting

Available settings

Master passcode

N/A

N/A

Auto-Lock

Disabled

Home/Away Assist: On,Off
Home: Auto-lock on or off
Away: Auto-lock on

Auto-Lock door after

1 minute

10 seconds, 1 minute,
5 minutes

One touch locking

Enabled

Enable, Disable

Volume setting

Low

Silent, Low, High

Wrong code entry limit

5 times

N/A

Shutdown time

90 seconds

N/A

How do I confirm the lock has been removed from the Nest app after resetting the lock?

On the lock, press the white indicator light button inside your home. If the light pulses blue and the lock says “Ready. Use your Nest app to add the lock to your account,” then it has been removed from your account. If the lock says “Privacy mode is on” or “Privacy mode is off,” the lock is still paired with your account.

To remove the lock from your account, on the Nest app home screen, select your lock 次へ tap Settings Nest settings icon 次へRemove lock.

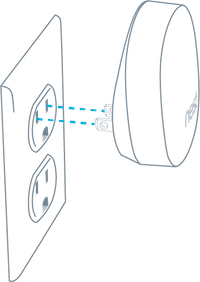
2. Nest アプリを使用して Google Nest Connect を設置する

If you have other Nest products in your home already, make
sure they’re nearby when you try to add your Nest Connect to
the Nest app. Your Nest Connect will connect to them during
pairing and they’ll need to be in range.

  1. Open the Nest app Nest app.
  2. Tap Settings Nest settings icon 次に Add product .
  3. Scan the QR code Nest QR code image.  on the back of your Connect.
  4. Follow the in-app instructions for setup.
  5. Plug your Nest Connect into a wall outlet between your Nest
    products to help extend the range.
 Nest connect being plugged into a wall outlet

If you have both Nest Secure and the Nest × Yale Lock, you can use the same Nest Connect to extend the range of your alarm system and allow your lock to connect to Wi-Fi. In some cases, you may need more than one Nest Connect if your lock and Guard are installed far away from each other.

3. Nest アプリにロックを接続する

1. アカウントにログインする

Google Nest を初めて使用する場合は、Apple App Store または Google Play にアクセスして Nest アプリをダウンロードし、アカウントを作成してください。

Google Nest 製品をすでにお持ちの場合は、まだログインしていなければアプリでログインします。

注: アカウントに複数の家を登録している場合は、カメラを設置する Nest のある家を選択していることをご確認ください。家を変更するには、ホーム画面の左上にあるメニュー アイコン 下向き矢印 をタップします。

2. Google Nest Connect または Google Nest Guard をセットアップしておく

Google Nest × Yale ロックは、インターネットに接続するために Google Nest Connect または Google Nest Guard を必要とします。Wi-Fi には直接接続しません。

Google Nest × Yale ロックを追加するには、いずれかのデバイスを Nest アプリに接続している必要があります。接続していない場合は、Nest アプリを使用してセットアップしてください。

Google Nest Connect または Google Nest Guard をセットアップしたら、ロックの設定を続行できます。

3. QR コードをスキャンする

QR code lock

まず、Nest アプリを開く 次に 設定アイコン Nest settings icon をタップ 次に [Add product] を選択します。

  1. 製品の QR コードをスキャンするよう求められます。これにより、アプリは設置するデバイスの種類を特定できます。Google Nest × Yale ロックのコードは電池収納部にあります。

  2. 30 cm ほど離れた距離から、スマートフォンをゆっくりとコードに近づけます。スキャン時にアプリ内のボックスに入力する必要はありません。

ヒント: コードをスキャンする際は、明るさが十分で、コードに影がかかっていないことをご確認ください。

  1. それでもコードをスキャンできない場合は、[Continue Without Scanning] をタップし、QR コードの上部にある番号を入力します。

  2. 設置しようとしているデバイスがアプリに認識されたら、アプリのガイドに沿って残りの手順を進めてください。

4. ロックをアプリに接続する

  1. ロックを取り付けた場所をアプリに指定します。アプリは通知の送信時にこの場所を使用するため、適切な場所を選択します。

  2. アプリは、ロックが接続できる別の Google Nest 製品(Google Nest Guard、Google Nest Connect、Google Nest Hub Max のいずれか)を探します。

  3. 製品が見つかったら、ロックのサムターンの上にある白いボタンを長押しして、ロックをその製品に接続します。

トラブルシューティングのヒント: ロックが接続できない場合は、Google Nest Guard、Google Nest Connect、または Google Nest Hub Max をロックに近づけます。数センチまたは数十センチの差でも大きな違いが生じることがあります。

5. Google Nest パスコードを作成する

アプリで Google Nest パスコードを作成します。このパスコードにより、ロックで作成したマスター パスコードが置き換えられます。

Nest のある家へのアクセスを共有している他のユーザーのパスコードを作成するかどうかを尋ねられます。また、新しいユーザーを招待してアクセスを共有したり、他のユーザーが家に入れる時間帯を制限したりすることもできます。

ロックを取り付けてセットアップしたので、Google Nest × Yale ロックの使用を開始できます。

Google Nest Detect 用に新しい Google Nest Connect を追加する

Google Nest Hub Max のアップデート後に Google Nest Detect がオフラインになり、Google Nest Guard または Google Nest Connect を近くに移動できない場合は、Nest アプリを使用して Google Nest Detect および Google Nest Guard と同じ家に新しい Google Nest Connect を設置できます。

Google Nest Connect を設置する

If you have other Nest products in your home already, make
sure they’re nearby when you try to add your Nest Connect to
the Nest app. Your Nest Connect will connect to them during
pairing and they’ll need to be in range.

  1. Open the Nest app Nest app.
  2. Tap Settings Nest settings icon 次に Add product .
  3. Scan the QR code Nest QR code image.  on the back of your Connect.
  4. Follow the in-app instructions for setup.
  5. Plug your Nest Connect into a wall outlet between your Nest
    products to help extend the range.
 Nest connect being plugged into a wall outlet

If you have both Nest Secure and the Nest × Yale Lock, you can use the same Nest Connect to extend the range of your alarm system and allow your lock to connect to Wi-Fi. In some cases, you may need more than one Nest Connect if your lock and Guard are installed far away from each other.

詳しくは、Google Nest Detect の接続が切断された場合の解決方法をご覧ください。


この情報は役に立ちましたか?
改善できる点がありましたらお聞かせください。

さらにサポートが必要な場合

次の手順をお試しください。

検索
検索をクリア
検索を終了
Google アプリ
メインメニュー
ヘルプセンターを検索
true
true
true
true
true
1633396