Beginning in late July 2022, Nest Hub Max devices will receive a software update to prepare Nest Hub Max for Matter compatibility. Matter is a new smart home standard that will make smart devices more universally compatible.
This update will cause Nest x Yale locks to no longer be able to use Nest Hub Max as a bridge to the Wi-Fi in your home or as a range extender as they aren’t compatible with the updated standard. If you already have a Nest Connect nearby, they can function as a bridge or range extender for your Nest x Yale lock, so you won’t need to do anything for your devices to continue working normally.
For a limited time, Nest is offering a Nest Connect to Nest x Yale lock customers that don't own a Nest Connect and have been relying solely on a Nest Hub Max as a bridge for their lock to access Wi-Fi. Once set up, your Nest x Yale lock will use the Nest Connect as a bridge instead of your Nest Hub Max. Learn more about Nest Connect.
Important: If you don’t have or add a Nest Connect to your home in the Nest app, your lock will lose connectivity and become offline.
Reconnect your lock after Thread-Matter update
If your Nest x Yale lock has lost connectivity, you can confirm that the issue is related to the software update above by checking that your Nest Hub Max’s 'operating system version' begins with 'F7' or above. If it does, you’ll need to either move an existing Nest Connect closer to your lock or add a new Nest Connect. If your Nest Hub Max doesn’t begin with F7 or higher, then the lost connection may be caused by another issue. Learn how to fix disconnected locks.
Move existing Nest Connect
If you have the updated version of Nest Hub Max and an existing Nest Connect already set up in the Nest app in the same home, move it closer to your lock and wait for it to connect. Generally, if a Nest Connect is within a line of sight of your lock, it should be able to make a connection. If you have issues, check for sources of interference.
Add a new Nest Connect for Nest x Yale lock
If you don’t have an existing Nest Connect, follow these steps to add a new Nest Connect to get your lock back online.
1. Factory reset the Nest x Yale lock
You may need to factory reset the Google Nest × Yale lock to resolve some issues, like an unresponsive keypad, connectivity issues or a forgotten master passcode. If you're moving the lock to another door or home, you'll also need to do a factory reset.
When the lock is reset to factory defaults, all user passcodes, including the master passcode, are deleted and all programming features return to the original default settings.
How to reset your Nest × Yale Lock
-
Remove the battery cover and batteries.
To remove the battery cover, you’ll need either the battery cover key that came in the box with your Nest × Yale lock or a drawing pin. A small Allen key may also work.
- Insert the key or drawing pin into the hole on top of the battery compartment and press down firmly.
- Grip the cover near the top and pull it off while you continue to press with the key or drawing pin.
- Remove all batteries.
- Unscrew the two bolts holding the indoor lock.
- Remove the indoor lock to reveal the reset button, which is located on the left side of the cable connector.
- Hold down the reset button while you put in the batteries.
- Keep holding down on the reset button until the light turns red and the lock says 'Just a moment, erasing all settings'.
- Release the reset button.
- Take out one battery each from the left and right side of the lock to expose the screw holes.
- Place the indoor lock on your door and line up the screw holes.
- Screw in the two bolts holding the indoor lock.
- Put the two batteries back in.
- The Nest × Yale lock will say 'Hi, from Yale and Nest' when the reset is complete.
-
Replace the battery cover.
To replace the cover, insert the two tabs on the bottom of the cover into the holes in the lock, then push the cover until the tab at the top locks it on.
Note: After you reset the lock, you must create a master passcode on the lock before you set it up with the Nest app.
Default settings when not connected to the Nest app
|
Feature |
Default setting |
Available settings |
|
Master passcode |
Required |
N/A |
|
Auto-lock |
Disabled |
Enable, Disable |
|
Auto-lock door after |
30 seconds |
N/A |
|
One-touch locking |
Enabled |
Enable, Disable |
|
Volume setting |
Low |
Silent, Low, High |
|
Wrong code entry limit |
5 times |
N/A |
|
Shutdown time |
90 seconds |
N/A |
Default settings when connected to the Nest app
|
Feature |
Default setting |
Available settings |
|
Master passcode |
N/A |
N/A |
|
Auto-lock |
Disabled |
Home/Away Assist: On, Off |
|
Auto-lock door after |
1 minute |
10 seconds, 1 minute, |
|
One-touch locking |
Enabled |
Enable, Disable |
|
Volume setting |
Low |
Silent, Low, High |
|
Wrong code entry limit |
5 times |
N/A |
|
Shutdown time |
90 seconds |
N/A |
How do I confirm that the lock has been removed from the Nest app after resetting the lock?
On the lock, press the white indicator light button inside your home. If the light pulses blue and the lock says 'Ready. Use your Nest app to add the lock to your account', then it has been removed from your account. If the lock says 'Privacy mode is on' or 'Privacy mode is off', the lock is still paired with your account.
To remove the lock from your account, on the Nest app home screen, select your lock tap Settings
Remove lock.
2. Install Nest Connect with the Nest app
|
If you have other Nest products in your home already, make
|
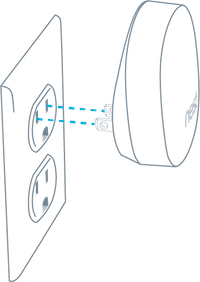 |
 on the back of your Connect.
3. Connect your lock to the Nest app
1. Sign in to your account
If you're new to Nest, go to the Apple App Store or Google Play to download the Nest app and create an account.
If you already own a Nest product, sign in to your account on the app, if you aren't already.
Note: If you have more than one home in your account, make sure that you first select the Nest home where you want to install your camera. Tap the Menu in the top left of the home screen to change homes.
2. Set up Nest Connect
Your Nest × Yale lock doesn't connect directly to Wi-Fi. To connect it to the Internet and add it to the Nest app, first set up your Nest Connect. Then, continue to set up your lock.
3. Scan QR code

To begin, open the Nest app tap Settings
select Add product.
-
The app should ask you to scan the QR code on your product so that it knows what device you want to install. The Nest × Yale lock code is in the battery compartment.
-
Start with your phone about 30 cm away and slowly move it closer to the code. It doesn't need to fill the box in the app to scan.
Tip: As you scan the code, make sure that you have good lighting and that there's no shadow covering the code.
-
If you still can't scan the code, tap Continue without scanning and type in the numbers at the top of the QR code.
-
Once the app knows what device you're trying to install, it should guide you through all the steps.
4. Connect your lock to the app
-
Tell the app where your lock is installed. The app will use this location when it sends you notifications, so choose one that makes sense to you.
-
The app should start to look for your Nest Connect.
-
When the app finds it, press and hold the white button above your lock's thumb turn to connect your lock and Nest Connect.
5. Create Nest passcodes
Create a Nest passcode with the app. This passcode will replace the master passcode that you created on the lock.
The app should ask if you want to create passcodes for other people who share access to your Nest home. You can also invite new people to share access, and you can set a schedule that limits when a person can enter your home.
Now that your lock is installed and set up, you can get started using your Nest × Yale lock.