These instructions are how to configure ChromeOS devices for TLS inspection (also known as SSL inspection) with Zscaler. These may not work with your installation, depending on how it's configured. For general instructions, see Set up TLS (or SSL) inspection on ChromeOS Devices. For instructions on how to configure Chromebooks with Barracuda Web Security Gateway, see the section How to Get and Configure the Barracuda Chromebook Security Extension on their help site.
Step 1: Set up IP based authentication on Zscaler
- In Zscaler, go to Administration > Internet Gateways & SSL and make sure the egress IPs are listed for SSL scanning.
Step 2: Set up hostname allowlist
-
This step is required to allow ChromeOS devices to communicate with a very small set of hosts without SSL interception. This is a mandatory requirement for ChromeOS to work in any environment with SSL interception. These hosts are specifically used by the device to fetch policies and other critical system information and updates.
-
Under Manage > Manage URL Categories, create a new filter rule under User-defined rules and add the allowlisted domains. Save it and make sure you Activate the changes. All of these hosts need to be included in the allowlist.

Step 3: Disable SSL content inspection for allowlisted hosts
- Also under Internet Gateways & SSL > SSL Settings update URL categories and custom domains for which SSL transactions will not be decrypted. Overrides per-location SSL scanning configuration. Insert the URL Category which you want to skip SSL decryption from step 2.
Step 4: Find the Custom CA cert which needs to be pushed to the clients.
- In the same page under SSL Configuration there is a Link to Cloud Service CA Certificate which Zscaler wants organizations to inject into their browsers. Download this cert and keep it for a later step.
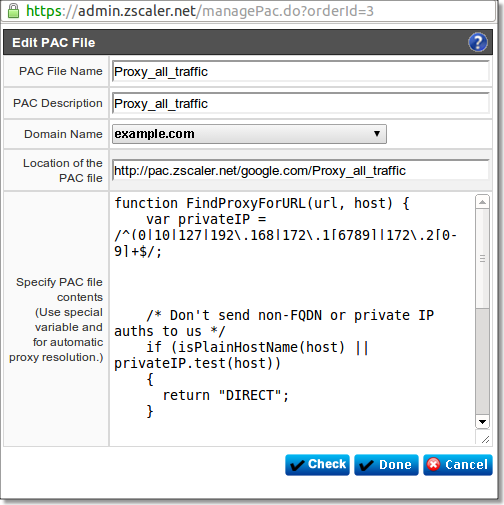
Step 5 (Optional): Create a PAC file for your environment. Note: a PAC file is only needed when GRE tunneling is not in use. For businesses using GREs, PAC files are only needed for when devices go offsite (home). In the example below, all traffic except RFC1918 to go through Zscaler.
- Take note of the PAC file name, you will need it in the next step
Step 6: Configure settings in the Google Admin console
- Sign in to your Google Admin console and go to Device management > Chrome management > Network > Manage Certificates > Add Certificate.
- Upload the certificate, which should be a .crt file on your computer.
- Click "Use this certificate as an HTTPS certificate authority".
Step 7: Test your SSL configuration
- Use a user device that hasn't been enrolled in your domain yet.
- Setup proxy manually the first time (since the device is not enrolled).
- Enroll the device in your domain.
- After you've enrolled, sign in and open Chrome to browse to websites to test your SSL filtering.
- You should notice the certificate CA belongs to the one from Zscaler.
Sample PAC file:
function FindProxyForURL(url, host) {

var privateIP =

/^(0|10|127|192\.168|172\.1[6789]|172\.2[0-9]|172\.3[01]|169\.254|192\.88\.99)\.[0-9.]+$/;

/* Don't send non-FQDN or private IP auths to us */

if (isPlainHostName(host) || privateIP.test(host))

{return "DIRECT";}


/* Updates are directly accessible */

if (localHostOrDomainIs(host, "trust.zscaler.com")) return "DIRECT";


/* Default Traffic Forwarding. Forwarding to Zen on port 80, but you can use port 9400 also */

return "PROXY ${GATEWAY}:80; PROXY ${SECONDARY_GATEWAY}:80; DIRECT";

}