這項功能目前仍為 Beta 版。
插頁式獎勵廣告單元會自動在應用程式中顯示全版廣告,為觀看廣告的使用者提供獎勵。廣告會在應用程式介面的空檔或轉場時刊登,例如在遊戲應用程式過關後顯示。
與獎勵廣告不同的是,插頁式獎勵廣告不需要等使用者確定選擇觀看即可放送。插頁式獎勵廣告單元可顯示互動式和影片廣告。
How to implement rewarded interstitial ads
注意:插頁式獎勵廣告單元只能放送可略過的廣告。這項功能目前包含來自 AdMob 和 Meta Audience Network 的需求。目前尚未支援其他廣告聯播網的中介服務,但日後或許會新增。
您可以按照下方步驟在 AdMob 帳戶中建立新廣告單元,然後導入到應用程式的程式碼中。這些步驟必須全部完成,廣告才能開始在該廣告單元中顯示。
注意:在應用程式中導入插頁式獎勵廣告單元時,請務必詳閱提供獎勵的廣告單元相關政策和插頁式廣告指南,瞭解導入插頁式廣告時不允許的做法和建議做法。
- 前往 https://apps.admob.com 登入 AdMob 帳戶。
- 按一下側欄中的 [應用程式]。
- 選取要使用這個廣告單元的應用程式名稱。如果「最近使用的應用程式」清單中沒有您要的應用程式,請按一下「新增應用程式」新增應用程式,或是按一下「查看所有應用程式」搜尋您已加進 AdMob 的所有應用程式。
- 按一下側欄中的 [廣告單元]。
- 按一下 [開始使用]。如果您已為這個應用程式建立了廣告單元,請按一下「新增廣告單元」。
- 針對獎勵廣告格式按一下 [選取]。
-
為這個廣告單元命名。提示:在應用程式中加入相關資訊 (例如廣告格式和地區),以便日後辨別。
- 完成這個廣告單元的獎勵設定:
- 獎勵數量:輸入使用者可獲得的獎勵項目數量 (必須為整數)。
- 獎勵道具:輸入使用者可獲得的獎勵道具名稱,例如錢幣或額外生命。
- 核取方塊:覆寫第三方廣告聯播網所提供的獎勵設定;預設為勾選。
- (選擇性) 完成這個廣告單元的進階設定:
-
廣告類型:請選擇這個廣告單元可顯示的廣告類型。 勾選的方塊沒有數量限制,您可以任意選擇所需的廣告類型。未勾選任一方塊會發生錯誤,因此請務必為每個廣告單元選擇至少一種廣告類型。提示:為盡量提高這個廣告單元的收益,建議您勾選所有方塊。
-
伺服器端驗證:(SSV) 為應用程式的獎勵廣告瀏覽計算增加另一層驗證,這項驗證是在標準用戶端回呼之外使用。
- 按一下伺服器端驗證旁的「設定並驗證回呼網址」。
- 完成下列伺服器端驗證設定:
- 回呼網址:當使用者看完獎勵廣告時,您希望 AdMob 傳送給您的完整網址 (例如 https://example.com/sample_ssv)。
- 使用者 ID (選用):僅供測試使用。使用者 ID 是指每位使用者的專屬識別碼,可讓您知道哪一位使用者已看完廣告而應獲得獎勵。如要使用,請在 SDK 中設定 user_id 參數。
- 自訂資料 (選用):「僅提供測試使用。」使用者看完廣告後,系統會在回呼中收到自訂資料。舉例來說,您可以納入一項參數來瞭解使用者所在的層級。如要使用,請在 SDK 中設定 custom_data 參數。
- 按一下「驗證網址」。
注意:您必須先驗證網址,才能完成 SSV 設定。
- 按一下 [使用通過驗證的網址]。
-
展示頻率上限:可用來限制廣告對同一位使用者顯示的次數。
- 按一下切換按鈕來啟用或停用展示頻率上限。
- 設定展示頻率上限:
- 啟用展示頻率上限後,請為這個應用程式內所有的插頁式、獎勵或應用程式開啟頁面廣告單元,輸入廣告向每位使用者曝光的次數上限並選取時間範圍 (以分鐘、小時或天為單位)。舉例來說,您可以將展示頻率上限設為每 30 分鐘最多曝光 2 次。
-
有效千次曝光限價:您可以為每個已建立的廣告單元設定有效千次曝光限價 (又稱「最低有效千次曝光出價」),這樣 AdMob 聯播網就不會在廣告單元中放送未達限價的廣告。選擇設定有效千次曝光限價的方式:
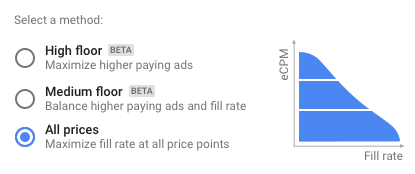
- Google 最佳化:讓 Google 根據使用者的地理位置、廣告單元流量及歷來資料,靈活設定限價。採用 Google 最佳化有效千次曝光限價有助於提高總收益。您可以選取下列其中一個方法,指定 Google 將有效千次曝光限價最佳化的方式:
- 高限價 (Beta 版):Google 會盡量爭取高出價的廣告。
- 中等限價 (Beta 版):Google 會在爭取高出價廣告與供應率之間取得平衡。
- 所有價格:Google 會盡量提高所有價格點的廣告供應率。
- 手動限價:由您手動為各個廣告單元設定最低有效千次曝光出價。如果廣告的有效千次曝光出價低於您為廣告單元設定的最低有效千次曝光出價,AdMob 聯播網就不會放送該廣告。
- 已停用:這個廣告單元並未設定有效千次曝光限價。
注意:這個有效千次曝光限價僅適用於 AdMob 聯播網,不適用於第三方廣告聯播網,以及在中介服務群組中設為廣告來源的自訂事件。 - Google 最佳化:讓 Google 根據使用者的地理位置、廣告單元流量及歷來資料,靈活設定限價。採用 Google 最佳化有效千次曝光限價有助於提高總收益。您可以選取下列其中一個方法,指定 Google 將有效千次曝光限價最佳化的方式:
-
- 按一下 [建立廣告單元]。
-
請按照 Android、iOS 或 Unity 版的 Google Developers 操作說明,在應用程式程式碼中導入插頁式獎勵廣告單元。導入時,您需要提供應用程式 ID 和廣告單元 ID。
在您完成這個步驟後,這個廣告單元才會開始顯示廣告。如果您還沒準備好導入該廣告單元,可以按一下「以電子郵件寄送」透過電子郵件寄送操作說明,也可以按一下「完成」離開頁面。