What is ownership verification?
Ownership verification means proving to Search Console that you own a specific website. A verified owner has the highest degree of permissions in Search Console.
Verify site ownership
- Either add a new property or choose an unverified property from your property selector.
- Choose one of the verification methods listed below and follow the instructions. The verification page will list which methods are available and recommended for your site.
- If you are unable to verify site ownership for some reason, ask a current owner to grant you access to the property in Search Console.
Using multiple verification methods
You can add multiple verification methods in your property's verification settings page. You might want to add more than one verification method in case one of your existing verification methods fails (for example, if you verified using a Google Analytics tracking code, and someone changes a template on your website that omits the tag).
To add an additional verification method, visit the Settings page for the property and click Ownership verification
Multiple people can verify ownership of the same website property, using the same or different verification methods. If you use the same verification method, just be sure that you don't overwrite the verification tokens of any other owners.
Verifying child properties
Once you have verified a property, any child properties that you add will be auto-verified using the same verification method as the parent. That is, if you verified ownership of example.com using the HTML file upload method, any child properties that you create (m.example.com or https://example.com/some/path) will be auto-verified using the same HTML file upload.
How long does verification last?
Verification lasts as long as Search Console can confirm the presence and validity of your verification token. Search Console periodically checks if your verification token is still present and valid. If verification can no longer be confirmed, you will be notified. If the issue is not fixed, your permissions on that property will expire after a certain grace period.
If all verified owners lose access to a property, all users will lose access to the Search Console property.
Google uses the Google Site Verifier user agent to perform site verification.
When will I start to see data?
Data is collected for a property as soon as anyone adds it in Search Console, even before verification occurs. However, it takes a few days for data to start to accrue for the property.
We lost our only verified site owner!
If the only verified owner of your site leaves your team, you should verify ownership to maintain (or regain) access to the property.
If you are taking over a site from another owner, after you verify ownership you can unverify previous owners by removing their verification token (for example, removing the HTML tag from the site, for HTML-tag-verified owners). See Add or remove owners for more information.
Choosing a verification method
Search Console supports several different verification methods. See the table below to help choose a method that works best for you.
| Method | Notes |
|---|---|
| HTML file upload | Relatively simple, but requires the ability to upload a file and publish it on your site at a specific URL. Might not be possible on a site hosting platform. |
| HTML tag | Relatively simple, but requires the ability to edit the HTML source code of your site's homepage. Might not be possible on a site hosting platform. |
| Google Analytics tracking code | Simple, if the page already has a Google Analytics tracking code for a Google Analytics account that you can access. If the page does not have a tracking code, you must must add one (which may require creating a Google Analytics account if you don't already have one). |
| Google Tag Manager | Simple if the page already has a Google Tag Manager snippet for a Google Tag Manager account that you can access. If the page does not have a snippet, you must must add one (which may require creating a Tag Manager account if you don't already have one). |
| Google Sites or Blogger account | Use the recommended method for each platform. |
| Domain name provider | More complex, but is the only way to verify a Domain property. If your domain provider is listed in the verification wizard, then this is a simple process. Domain properties are useful because they include data for all protocol (http/https) and subdomain variations of your property. |
Verification method details
- Search your site host's documentation for Search Console verification information. For example: "Wix Search Console verification" or "Weebly Search Console verification" or "Shopify Search Console".
- Search for plugins on your platform that can handle verification for you. For example, Site Kit for WordPress can handle verification for you, and also provide simplified views of your Search Console data. Note that Site Kit is the only plugin that is officially sponsored by Google, so do a little research on any plugin before you install it.
HTML file upload for site ownership verification - Google Search Console Training
Overview
Verify ownership of a site by uploading a special HTML file to a specific location on your site. This file is tied to a specific user. Follow the instructions on the verification details page. Removing this verification file from your site will cause you to lose verification for the site.
⚠️ Requirements
- The file cannot require authentication. The directory where you upload your HTML file must be available to non-logged-in users. You can test this by trying to visit your file in an incognito window in your browser.
- You must be able to upload a file to the root directory of your website, where it will be available to web browsers. If you do not have permissions to do this, try another verification method. If you are using a website hosting platform, you might need to search your service's help pages to see if this is possible.
- HTML file upload can be used for URL-prefix properties, but not Domain properties.
Steps
To verify ownership using an HTML file:
- If you are using a website hosting platform, search your service's help pages for custom instructions to verify your site on Search Console. If you don't find any information, then continue on to the next steps.
- Read the requirements for this verification technique.
- Choose the HTML file upload method on the Ownership verification page for your property.
- Download the provided verification file. This file is unique to you; it cannot be used to identify anyone else, and is associated with your Gmail account.
- Upload the verification file to your website so that it will be available at the address specified in the verification details page. This is typically the root directory for your property. (That is, if you defined your property as https://example.com, and the file provided is named 1234.txt, then the file should be browsable at https://example.com/1234.txt.) Search Console does not follow redirects when looking for this file. You can add newlines at the end of the file body, if required, but do not otherwise modify the file name or content.
- Confirm that you can see the file by visiting it in your browser in the location specified by the Search Console verification wizard. If the file isn't available to your browser at that URL, Google won't be able to find for verification purposes. TIP: Use an incognito window in your browser to confirm that you don't need to log in to access it.
- Complete verification by clicking Verify in the verification details page.
- If verification fails, see Potential errors below to troubleshoot the issue.
Troubleshooting
The following errors can occur with HTML file upload verification:
- Your verification file was not found in the required location
Search Console couldn't find your personal verification file at your property's root location. Upload the provided verification file to the specified location on your site without any modifications. If the file name or content does not match the HTML file provided, we won't be able to verify your site ownership. You can verify whether the file is present by trying to visit it in your browser. - Your verification file has the wrong content
The verification file that Search Console provides must be used exactly as provided, without modifying the name or content of the file. If the file name or content does not match the file provided by Search Console for the logged in user, we can't verify ownership. Please use the verification file provided by Search Console, and upload it to the specified location without any modifications. - Hacked verification file.
Your verification attempt failed in a way that indicates that your site might have been hacked. Learn more about detecting and fixing hacked sites. - Your verification file redirects to a disallowed location
Search Console won't follow redirects to another domain for verification files, but will follow redirects within the same domain. Browse to your file and see whether you have been redirected to a new domain. If your site redirects all traffic to another site, we recommend using HTML tag verification instead. Some examples of supported and unsupported redirects:http://example.comtohttp://www.example.com— Supported- http://example.com to https://example.com -- Supported; redirects to a new protocol (http/https) are supported.
- example.com to foo.com -- not supported, different domains.
- m.example.com to example.com --
- example.com to m.example.com --
- Additional common verification problems are listed below.
HTML tag for site ownership verification - Google Search Console Training
Overview
Verify your ownership of a site by adding a <meta> tag to the HTML of a specified page. We'll verify that the meta tag exists on that page. If we can't find the tag, we'll give you information about the error we encountered. This tag is tied to a specific user. Search Console will periodically check for the presence of this tag.
⚠️ Requirements
- Your homepage cannot require authentication. The site homepage must be available to non-logged-in users.
- You must be able to edit the HTML source code of the site's homepage directly. Specifically, you must be able to insert a tag into the <head> tag on your homepage. If you do not have permissions to do this, try another verification method. If you are using a website hosting platform, you might need to search your service's help pages to see if this is possible.
- The tag must be included less than 2MB into the file. External resources such as scripts are not counted as part of the size. (This restriction should affect very few websites.)
- Can be used for URL-prefix properties, but not Domain properties.
Steps
To verify ownership using an HTML tag:
- If you are using a website hosting platform, search your service's help pages for custom instructions to verify your site on Search Console. If you don't find any information, then continue on to the next steps.
- Read the requirements for this verification technique.
- Choose the HTML tag method on the Ownership verification page for your property.
- Copy the tag from the Search Console verification wizard into the <head> section in the HTML of your site's non-logged-in home page (see note). Example:
<head>

        <title>Example.com homepage</title>

        <meta name="google-site-verification" content="......." />

        </head>
This tag is unique to you; it cannot be used to identify anyone else, and is associated with your Gmail account. - Save your page. Confirm that the tag is present in your live page by visiting the page and looking for the tag in the page source code. (Press Control + F then search for "google-site-verification" in the page source to find the tag.)
- Complete verification by clicking Verify in the verification details page.
- If verification fails, see Potential errors below to troubleshoot the issue.
Troubleshooting
The following verification errors can occur with HTML tag verification:
- Meta tag not found/in the wrong location. The verification meta tag must be within the
<head>section of the page. If you see these errors, check the following:-
Is the meta tag on the correct page? We look for it in the rendered source of your site's home page. This is the page where your browser goes when you visit the URL that defines your Search Console property.
- Is the meta tag in the correct place on the page? We look for it in the page's
<head>section. An example of correct placement is shown here:<html> <head> <title>Your Page Title</title> <meta name="google-site-verification" content="your verification string"> </head> <body> ... - If you're using a web editor or a WYSIWYG editor to edit your page, make sure you're editing the HTML of the live page, not just the local copy on your computer.
-
- Your meta tag is incorrect
We found the verification meta tag, but the contents were incorrect. To avoid errors, copy and paste the meta tag provided on the Verification page of Search Console. If another user's verification tag was already present in the page, you might get this error; confirm that the exact tag given to you in the Search Console verification wizard is present in the page HTML. - Your meta tag is not formatted correctly
We found the meta tag on your page, but there seems to be a syntax error for it. Copy and paste the tag exactly as provided by Search Console in the source HTML of your page. (Note that you shouldn't see the tag in your browser when you're visiting this page; you will only see it when looking at the HTML that generates the page.) - Additional common verification problems are listed below.
DNS record for site ownership verification - Google Search Console Training
Overview
Add a DNS record to your domain provider's record list to prove ownership. This is required only for Domain property, (example.com) not URL-prefix properties (https://example.com). If you use this method on a URL-prefix property, you will also be auto-verified for the Domain property.
For some domains, Google can add the record for you; for other domains you will need to insert the record yourself.
You can verify ownership of root domains (example.com) or subdomains (m.example.com). Verifying ownership of a root domain automatically verifies ownership of all subdomains, but verifying ownership of a subdomain does not verify ownership of a parent domain. For example: verifying ownership of m.example.com also verifies ownership of pets.m.example.com, but does not verify ownership of example.com.
⚠️ Requirements
- You must have a custom domain name, or control your domain name.
- You must be able to log into your domain name provider's administration page.
Steps
To verify ownership via your domain name provider (the company that you purchased your domain name from):
- If you are using a website hosting platform, search your service's help pages for any custom instructions on verifying your site on Search Console. (Tips for finding your DNS provider, if you don't know who it is.) If you don't find a custom solution on your provider's page, then continue on to the next steps.
- Choose the Domain name provider method on the Ownership verification page for your property in Search Console. (This will be chosen automatically when you create a Domain property.)
-
- If Search Console provides a TXT record, follow Manual domain name provider instructions > TXT DNS record instructions below.
- If Search Console shows your domain name provider in a list, choose your provider and click Start verification, then follow the instructions provided. You will be required to log in to your domain name provider, after which verification should occur immediately.
- If Search Console shows you a domain name provider that isn't yours, choose Any DNS provider from the list and follow the manual domain name provider instructions below.
Manual domain name provider instructionsIf Search Console doesn't list your domain name provider in the Domain name verification dialog, you will need to manually add a DNS record to your provider's records. This DNS record is a name/value pair provided by Search Console. Let's get started:
- Determine which DNS record format to use. You must choose between a TXT record and a CNAME record depending on how your site is configured. Here is how to determine which to use:
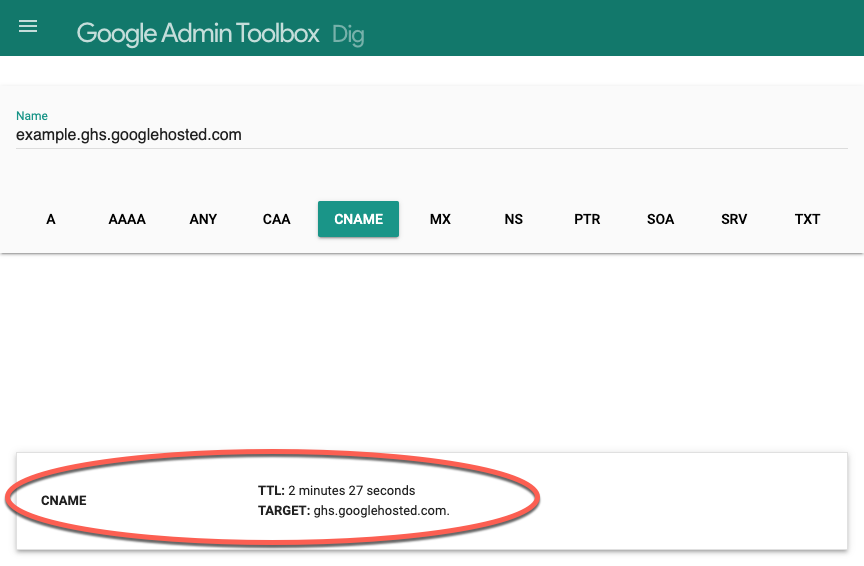
- Open the Google Admin Toolbox in the CNAME tab
- Enter your property's domain name. This is the part after "https://". For the property "https://www.example.com/" the domain name would be "www.example.com".
- Look at the output in the CNAME tab
- [Most common case] No record found: If no CNAME record is found, then follow the TXT record instructions.
- Record found: If a CNAME record is found, and the Target value is a parent domain of the domain that you entered, then you should follow the CNAME record instructions. If the name is not a parent domain, use the TXT record instructions.
- [Most common case] No record found: If no CNAME record is found, then follow the TXT record instructions.
- Follow the appropriate instructions for your TXT or CNAME record below.
TXT DNS record instructions- Generate a unique TXT verification record: When asked to verify your Domain property in Search Console, choose TXT for Select record type in in the Search Console verification popup. Search Console will give you a string value TXT record to use in the next step.
- Add your DNS record to your domain provider: Add the TXT record that Search Console gave you in the previous step to your domain provider's records by following these steps:
- Open the Google Workspace documentation for your provider.
- Ignore Google Workspace step 1 (Get your unique verification record) because you got your TXT record in Search Console.
- Sign in to your domain host (typically Google Workspace Step 2).
- Add your Search Console TXT record to your domain's DNS records (typically Google Workspace Step 3):
- For the Host/Name property, either leave this blank, or set as "@", as described in the documentation for your DNS provider.
- For the Value property, provide the Search Console TXT record string that you generated earlier.
- Ignore Google Workspace step 4 (the verification step) and continue with step 4 below.
CNAME DNS record instructions- Generate a unique CNAME verification record: In the verification flow for your Domain property, choose CNAME for Select record type in in the Search Console verification popup. You will be given two values (one called "name" or "label" or "host", the other called "destination" or "target" depending on the context) to use in the next step.
- Add the DNS record values to your domain provider:
- Open the Google Workspace documentation for your provider.
- Ignore Google Workspace step 1 (Get your unique verification record) because you got your CNAME record in Search Console.
- Sign in to your domain host (typically Google Workspace Step 2).
- Add your CNAME verification record to your domain's DNS records (typically Google Workspace Step 3) using the record values that you got previously in Search Console. Provide both values in the appropriate fields on your DNS provider's site. You can use the default TTL value suggested by your provider.
- Ignore Google Workspace step 4 (the verification step) and continue with step 4 below.
- Determine which DNS record format to use. You must choose between a TXT record and a CNAME record depending on how your site is configured. Here is how to determine which to use:
- Complete your ownership verification by clicking Verify in the Search Console verification details page. IMPORTANT: For manually installed records, it can take up to two or three days for your provider to start serving the record. If you have followed the Manual domain name provider instructions above and verification fails, wait a day or two and try again. See the Potential errors section for troubleshooting, or to learn how to see whether your domain name provider is serving your record yet.
Troubleshooting
To see which records are served by your domain name provider:
- Visit the Google Admin Toolbox
- Type your domain name into the box at the top, without the protocol or any slashes (that is, enter example.com, not https://example.com).
- Click either TXT or CNAME, depending on what record type you are using for verification. (Most sites use TXT records for domain verification.)
- All DNS records of the selected type found on your provider will be shown at the bottom with a label describing the record type (typically, either CNAME or TXT).
- Look in the list of records for the DNS record issued to you by Search Console.
- For TXT records, a Search Console verification record looks something like
google-site-verification=<<some number>>. - For CNAME records, the verification record is a name/value pair where the name includes your property domain, and the value includes
dv.googlehosted.com.
- For TXT records, a Search Console verification record looks something like
- If you don't see your credentials listed, wait a day or two, then try again.
To see your DNS record after you've verified your property using the DNS method:
- Open Search Console.
- Click your property name in the list of properties to see a list of verification methods for the property.
- Next to either DNS TXT record or DNS CNAME record, click Details to see your record value.
- If you like, you can also see all records being served by your domain name provider using the Google Admin Toolbox as described above.
The following verification errors can occur with DNS record verification:
- Your verification DNS TXT record was not found
Your verification TXT record was not found. It can take a few minutes or even days after posting the record for it to be visible to Google; wait a day or two then try again. - Your verification record did not match
No verification records on your DNS provider matched the value given to you by Search Console. Be sure to use the record provided by the verification page. For a TXT record, you should leave the name/host field blank and use your TXT string in the DNS record's value field. For a CNAME record, you are given a name/value pair to use in your DNS record's name/value fields. - Additional common verification problems are listed below.
Google Analytics for site ownership verification - Google Search Console Training
Overview
If you use Google Analytics to track your site's traffic and you have edit permission in the account, you can verify your site using the Google Analytics tracking code used on your site. You must be logged into Search Console with the same Google Account used to manage Google Analytics.
⚠️ Requirements
- Your homepage cannot require authentication. The site homepage must be available to non-logged-in users for verification. Additionally, any pages that require authentication to reach probably won't appear in Search often, and so they won't accrue significant Search data.
- You must have "edit" rights for the Google Analytics account used by that page. In Google Analytics 4, the verification code is associated with a Google Analytics stream. For earlier versions of Google Analytics, the verification code is associated with a Google Analytics Web Property.
- You must use the same Google account for both Search Console and Google Analytics.
- Your non-logged-in homepage (see note) must contain either the analytics.js or gtag.js snippet. The tracking code must be in the
<head>section, not the<body>section, of your page. To confirm the presence of this tag, visit the page in your browser, view the page source, and search for the snippet. - Use the Google Analytics code exactly as provided; do not modify it. If you modify it, verification will fail.
- The tag must be included less than 2MB into the file. External resources such as scripts are not counted as part of the size. (This restriction should affect very few websites.)
- Can be used for URL-prefix properties, but not Domain properties.
Steps
To verify ownership using your Google Analytics tag:
- Read the requirements for this verification technique.
- Open Search Console using the same Google account that has edit access to your property in Google Analytics, and add or select the property to verify.
- Choose Google Analytics in the verification details page for your site and click Verify.
- If verification fails, see Potential errors below to troubleshoot the issue.
Troubleshooting
The following verification errors can occur with Google Analytics tracking code verification:
- No Analytics code found ("We could not find any Google Analytics tracking codes on the index page of your site")
No Google Analytics tracking code was found on the property's homepage.- Did you put the Analytics snippet in the right location of the home page? Does the non-logged-in homepage contain your snippet?
- View the rendered source for your homepage and look for Google Analytics tracking code on the page. If not present, your site doesn't use (or hasn't properly administered) Google Analytics.
- Malformed code ("The Google Analytics tracking code on your site looks malformed")
Code that seems to be Google Analytics tracking code is found on the page, but it seems to be malformed. Be sure to use the Analytics tracking code exactly as provided. - Old Google Analytics snippet found ("The Google Analytics tracking code on your site uses the traditional snippet")
An older version of the Analytics code is present on the homepage; Search Console supports only the latest version of the Google Analytics snippet. An older snippet contains either_gat.or_getTracker|urchin.jsin the snippet. - Google Tag Manager code found ("We found a Google Tag Manager snippet in your site")
Search Console found a Google Tag Manager snippet on the page, but no Google Analytics snippet. Try verifying this property using the Google Analytics method. - Wrong snippet type ("We found a third party tag manager snippet in your site")
Be sure that you are using a Google Analytics snippet on the page. - Snippet in wrong location ("The Google Analytics tracking code on your site is in the wrong location on the page)
The snippet must be in the<head>section of your home page. You can verify this by viewing the rendered source for your homepage. - You don't have a Google Analytics account ("You have not yet created an account in Google Analytics")
You must have a valid Google Analytics account, the account must be used on the site, you must be signed in to Search Console using the Google account used to access that Google Analytics account, and you must have Edit permissions on that Google Analytics account. - No views created ("You have not yet created any website views in Google Analytics")
You have a Google Analytics property without any views. You must create a view in this property before you can use Google Analytics to verify site ownership. - Insufficient permission ("You must have "edit" rights in this Analytics web property to use this verification method")
You need to have edit rights on the Google Analytics property used in this website. Be sure that you're logged in to Search Console with an account that has edit rights in Google Analytics. - Additional common verification problems are listed below.
Google Tag Manager for site ownership verification - Google Search Console Training
Overview
If you have a Google Tag Manager account active on your site and you have Publish or Admin permission, you can verify ownership of your site using your Google Tag Manager container snippet code. You must be logged into Search Console with the same Google Account used to manage Tag Manager.
⚠️ Requirements
- Your homepage cannot require authentication. The site homepage must be available to non-logged-in users for verification. Additionally, any pages that require authentication to reach probably won't appear in Search often, and so they won't accrue significant Search data.
- You must have Publish or Admin permission for the Google Tag Manager container on the page.
- You must use the same Google account for both Search Console and Google Tag Manager.
- Your non-logged-in homepage (see note) must contain the correct tag in the correct location. The
<noscript>portion of the Tag Manager code must be placed immediately after the opening<body>tag of your page. If it is not, verification will fail. You cannot insert a data layer (or anything other than HTML comments) between the<body>tag and the Tag Manager code. To confirm the presence of this tag, visit the page in your browser, view the page source, and search for the snippet. - Use the code exactly as provided; do not modify it. If you modify it, verification will fail.
- The tag must be included less than 2MB into the file. External resources such as scripts are not counted as part of the size. (This restriction should affect very few websites.)
- Can be used for URL-prefix properties, but not Domain properties.
Steps
To verify ownership using a Google Tag Manager tag:
- Open Search Console using the same Google account that has edit access in Google Tag Manager.
- Read the requirements for this verification technique.
- Choose Google Tag Manager in the verification details page for your site, and follow the instructions shown.
- If verification fails, see Potential errors below to troubleshoot the issue.
Troubleshooting
The following verification errors can occur with Google Tag Manager verification:
- Tag not found (We could not find a Google Tag Manager container ID on the homepage of your site)
Search console couldn't find any Google Tag Manager code on the homepage of your site.- Did you put the snippet in the right location of the home page? Does the non-logged-in homepage contain your snippet?
- View the rendered source for your homepage and look for a "Google Tag Manager" or your tag manager snippet. If not present, your site doesn't use (or hasn't properly administered) Google Tag Manager.
- Insufficient permissions (You must have "publish" or "admin" rights in this Tag Manager container to use this verification
method)
You need Publish or Admin permission on your Google Tag Manager container in order to use this verification method. - Wrong tag (The container ID used by your site is not associated with your Tag Manager account)
Tag Manager code was found on the homepage, but you are not logged in to Search Console with an account that is granted proper permissions for that Tag Manager container. Be sure that you're using Search Console with a Google account that has proper permissions in this Tag Manager container. - No tag manager container (You have not yet created any containers in Google Tag Manager)
You haven't created any containers in your Tag Manager account for the Google account that you're currently using. Verify that you have created a Tag Manager container, and that you're accessing Search Console with the Google account that has proper permissions in that container. - Tag in wrong location (We could not find a Google Tag Manager container ID on the homepage of your site)
The tag either isn't present on the homepage, or is present but not in the required location in the page code (inside the<head>element). Be sure to put the tag on the proper page and location, as described in the Tag Manager documentation. - Additional common verification problems are listed below.
Google Sites ownership verification - Google Search Console Training
Overview
If you own a Google Sites website, if you log in to Search Console using the same Google Account, your ownership for that Google Sites property will be verified automatically.
⚠️ Requirements
- Your Google Site must be created using the same Google Account you use for Search Console.
- You must be logged in to Search Console with the same account used to manage your Google Site.
Steps
- To verify a new style Google Site (created since 2017) without a custom domain URL, you must use the Google Analytics Tracking Code method to verify your site.
- If you are using classic Google Sites (created before 2017) or a site with a custom domain URL, use the HTML tag method.
Blogger for site ownership verification - Google Search Console Training
Overview
New blogs that you create in Blogger should be added and verified automatically in your Search Console account. If your blog doesn't appear automatically on the Search Console home page, add the property and it should be verified automatically.
⚠️ Requirements
- Older blogs are not automatically verified, and should be verified using the HTML tag method.
- Be sure that you are logged in to Search Console with the same account used to manage your blog.
Where should I put my verification tag?
If you are using a tag-based verification method (Google Analytics, Google Tag Manager, or the HTML <meta> tag methods), Search Console will look for your verification tag in the page to which a non-logged-in user is redirected when visiting the URL that defines your property.
Example
If you define your property as https://example.com, and any non-logged in user who types that URL in their browser is redirected to https://example.com/home, then Search Console will look for your verification tag in the page https://example.com/home.
For other verification methods, such as the file upload method, redirects are not followed.
Common verification errors
In addition to any method-specific verification errors, the following verification errors are possible in most verification methods:
- Incorrect tag/snippet/file errors
Be sure to use the exact tag, code snippet, or file provided to you when beginning verification. - The connection to your server timed out.
We were unable to verify your file because we received a server timeout. This could be because your server is down or is busy and responding slowly. Make sure that your server is responding and try again. - We encountered an error looking up your site's domain name.
We tried to access your verification file, but were unable to access your domain due to a DNS error. This could be because your server is down, or there is an issue with the DNS routing to your domain. Make sure that your domain is resolving correctly and try again. - The download request was redirected too many times.
Check the URL for potential issues, such as an infinite loop. - Your server returned an invalid response.
This can happen if your site is requires password authentication, or if we cannot access it for other reasons. - We were unable to connect to your server.
Make sure that your server is not down, and that your domain is resolving correctly, and try again. - An internal error occurred.
If this problem persists, check the Search Central Help Forum for updates. - Timeout
Either your site or the domain server stopped responding to our requests (depending on the verification method used). Confirm that your site is responding, and then try again. - Could not find your domain
We tried to resolve the site URL that you gave us, but it is unknown to the DNS service. Check that you are providing the correct URL for your property.
