Note: Pixelbook is no longer sold by Google.
Congrats on your new Pixelbook. Let’s take a quick tour and get you set up.
Get to know the basics
First, get familiar with your new Pixelbook.
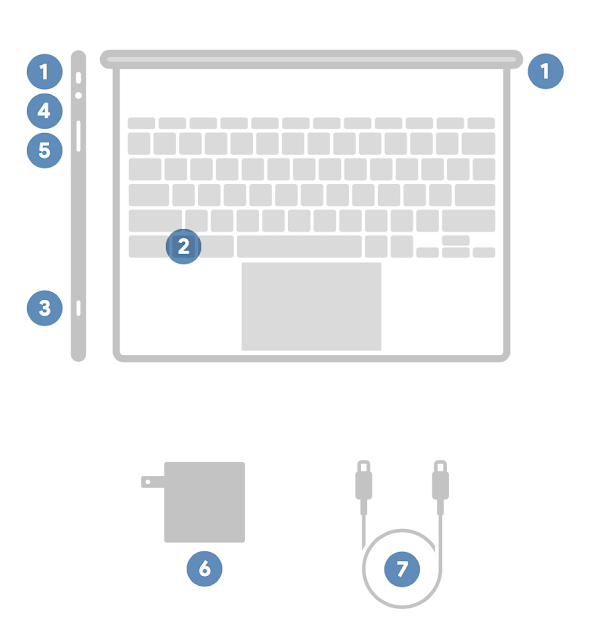
1) USB Type-C ports
There's one port on each side of your Pixelbook. Use these to connect to power or other external devices.
Press to start a conversation with your Google Assistant in laptop mode. See other ways to access the Google Assistant.
Press to turn power on. Press and hold for about 1 second to lock your Pixelbook. Press and hold for approximately 3 seconds to power off.
Plug your headphones or other audio device into the jack located on the left side of your Pixelbook.
To increase volume in laptop mode, press the side of the volume button that's closest to the audio jack. Press the other side to decrease volume. When in tablet mode, the direction is reversed, so the higher side increases volume. You can also adjust volume in laptop mode using the speaker keys on the top row of the keyboard. Change volume from the touchscreen by tapping the time at the bottom right and moving the slider for the speaker .
To charge your Pixelbook, attach the power adapter to your power cable, then plug the adapter into a power outlet.
Plug one end into the power adapter and the other into one of the USB Type-C ports on your Pixelbook.
Note: The Pixelbook keyboard functions in laptop mode only. When in tablet mode, you’ll use the touchscreen keyboard.
What you need to get started with Pixelbook
- A Google account.
- An internet connection.
- Access to a wireless network. If the network requires a password, make sure you have it handy.
Switching from a Mac or Windows computer? Learn how to easily backup your files and photos so you can access them on your new Pixelbook.
Note: If your Google Account was set up through a K-12 school or non-profit group, or you have an .edu email address, you won't be able to use "Ok Google" on your device.
Learn how to use Pixelbook with work or school accounts.
If your Pixelbook is a personal device (not issued by your organization), you can also just sign in to your Pixelbook through your personal account, rather than your work or school account. Just note that any Android apps you download will be available only when you’re signed in to your personal account.
For Family Link users: If the parent declines Voice Match enrollment during device setup, the Voice Match enrollment option in Settings will be grayed out. If the parent wants to turn on Voice Match, they need to reset the device and choose it during Voice Match enrollment.
Set up your Pixelbook
Step 1: Connect your Pixelbook to power- Connect the power cable and power adapter that came with your Pixelbook.
- Plug the power adapter into a wall outlet.
- Connect the power cable into one of the USB-C ports on the side of your Pixelbook.
- Open your Pixelbook to turn it on.
- Choose your language and keyboard from the dropdowns.
- Select OK.
- Select the toggle next to the accessibility settings you want to enable. You can always turn these on later.
- Select OK.
- Use a compatible Wi-Fi network to connect your Pixelbook to the Internet.
- Once connected, select Next.
Pixelbook automatically checks for software updates so you're device is always up to date.
Review the Google Chrome OS terms and conditions, then select Accept and Continue.
- Enter the email address for your Google Account and click Next.
- Enter your password and click Next.
- If requested, select one of the verification methods and follow steps.
If you're having trouble signing in with your Google Account, use the sign-in troubleshooter.
Don't have a Google Account? Tap Create account to begin.
- Review information about Chrome sync and personalizing Google services. To adjust sync settings after setup, check the box.
- Tap Accept & continue.
Set up a PIN to quickly unlock your device. Then tap Next. If you skip this step, you can always do it later.
To download Android apps and digital content to your Pixelbook, you'll need access to Google Play. Once you've read the terms, select Agree.
Are you using a work account?
- You might need to ask your organization's admin to turn on settings that will allow you to use the Google Assistant and download Android apps from the Google Play Store.
- You can also just sign in to your Pixelbook through your personal account, rather than your work or school account. Just note that Android apps are linked to the account you used to install them, so you may have separate apps in your personal and work accounts.
If you have Android apps optimized for Chrome OS on other devices connected to your account, you can install them on Pixelbook now. If you skip this step, you can always visit the Google Play Store to add them later.
- Choose the apps you want, than select Install & Continue.
- Once the apps are installed, select Continue setup.
The Google Assistant is integrated into your Pixelbook and can help you get more done faster and smarter.
To turn on the Assistant:
- Tap Yes, I'm in. (If you don't turn on these settings, you can still get a limited Assistant experience.)
- Review options for Google Partners, then tap Continue.
- Review additional options for "Ok Google" voice activation, and email updates about Assistant features, then tap Done.
- When your Assistant is ready, tap Done.
Available languages: The Google Assistant currently supports English (U.S., U.K., CA) and French (Canada) for Pixelbook. If your Pixelbook is set to an unsupported language, you won't be able to set up the Google Assistant.
Note for work and school accounts:
If you're using Pixelbook through work, you might need to ask your admin to turn on Search & Assistant services and Web & App Activity to use Google Assistant. You can also just sign in to your device through your personal account, rather than your work account.
If your Google Account was set up through a K–12 school or non-profit group, or you have an .EDU email address, you won't be able to use the Google Assistant.
If you have an Android phone, you can seamlessly connect it to your Pixelbook to do things like:
- Sign in to or unlock your Pixelbook when your Android phone is nearby
- Share your phone's internet connection
- Send and receive text messages on Pixelbook
To begin:
- Select Accept & continue. (If you skip this step, you can always do it later.)
- When completed, select Next.
Using a work account? Your organization's admin might need to enable these settings first.
- Select the toggles to get the latest Pixelbook tips, updates on Google products, and recommendations on Play Store apps.
- Select All set.
Nicely done! Now, explore all the ways to get your Pixelbook set up just the way you want it.
Key areas of your Pixelbook
Get to your apps fast from your home screen
Find apps or search the web right from your home screen. To get there, select the Launcher in the bottom left corner of your screen, or press the Launcher key if you’re using a keyboard.
From your home screen, you can see suggestions based on your activity (such as recently used apps and websites), use shortcuts to take actions in some apps (such as "Compose" in Gmail), and even see articles you started reading on your phone when both devices with the Chrome browser are signed in to the same Google Account.
Note: To turn Caps Lock on or off, press Alt + Search.
Manage connections, updates, and settings in the status area
To open the status area in laptop mode, press the key.
To open the status area in tablet mode, tap the time at the bottom right.
Get quick access to your Google Assistant
You can launch Google Assistant by saying "Ok Google" or "Hey Google." You can also click or tap the Launcher and then the Assistant icon
to access Google Assistant.
On the Pixelbook keyboard, you can press the Assistant key.
Other external keyboards:
- Chrome OS-compatible keyboard: Press
+ a
- Windows or Mac keyboard: Command/Windows + a
Related articles