レスポンシブ対応の Multiplex 広告ユニットを特定のレイアウトで表示したい場合は、広告コードにパラメータを追加します。ここでは、Multiplex 広告ユニットのレイアウトなどを変更し、ユニット内に表示する広告の行数と列数を指定するためのパラメータをご紹介します。
これらのパラメータを使用すると、モバイルと PC にそれぞれ異なるレイアウトを設定することもできます。たとえば、レイアウト パラメータに値を 1 つだけ指定した場合、モバイルでも PC でも、同じレイアウトで Multiplex 広告ユニットが表示されます。一方、レイアウト パラメータに値を 2 つ指定すると、最初の値はモバイル、2 番目の値は PC に適用され、それぞれ異なるレイアウトで Multiplex 広告ユニットが表示されます。
この設定方法を使用できるのは、Multiplex 広告ユニットがレスポンシブ対応の場合のみです。また、Multiplex 広告ユニットをカスタマイズするには、すべてのパラメータを設定する必要があることにご注意ください。広告コードを変更したら、各種デバイスやさまざまなサイズの画面で Multiplex 広告ユニットをテストし、正しく表示されることを確認してください。
Multiplex 広告ユニットのレイアウトを変更する
Multiplex 広告ユニットにテキストと画像をどのように配置するかを指定するには、レイアウト パラメータ(data-matched-content-ui-type)を使用します。たとえば、画像とテキストを横に並べて表示したり、テキストの上に画像を表示したりすることができます。
指定可能なレイアウトは次のとおりです。
画像とテキストを横に並べて表示するレイアウトです。このレイアウトを選択するには、広告コードに data-matched-content-ui-type="image_sidebyside" パラメータを追加します。
<script async src="https://pagead2.googlesyndication.com/pagead/js/adsbygoogle.js?client=ca-pub-1234567890123456" crossorigin="anonymous"></script>

      <!-- pbad -->

      <ins class="adsbygoogle"

           style="display:block"

           data-ad-client="ca-pub-1234567890123456"

           data-ad-slot="1234567890"

           data-matched-content-ui-type="image_sidebyside"

           data-matched-content-rows-num="4"

           data-matched-content-columns-num="1"

           data-ad-format="autorelaxed"></ins>

      <script>

      (adsbygoogle = window.adsbygoogle || []).push({});

      </script>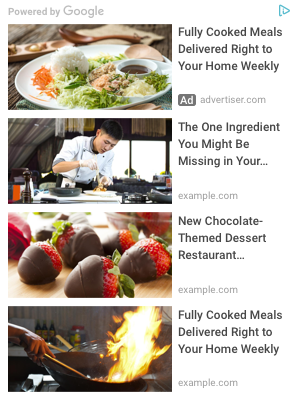
画像とテキストを横に並べてカード内に表示するレイアウトです。このレイアウトを選択するには、広告コードに data-matched-content-ui-type="image_card_sidebyside" パラメータを追加します。
<script async src="https://pagead2.googlesyndication.com/pagead/js/adsbygoogle.js?client=ca-pub-1234567890123456" crossorigin="anonymous"></script>

      <!-- pbad -->

      <ins class="adsbygoogle"

           style="display:block"

           data-ad-client="ca-pub-1234567890123456"

           data-ad-slot="1234567890"

           data-matched-content-ui-type="image_card_sidebyside"

           data-matched-content-rows-num="4"

           data-matched-content-columns-num="1"

           data-ad-format="autorelaxed"></ins>

      <script>

      (adsbygoogle = window.adsbygoogle || []).push({});

      </script>
テキストの上に画像を配置するレイアウトです。このレイアウトを選択するには、広告コードに data-matched-content-ui-type="image_stacked" パラメータを追加します。
<script async src="https://pagead2.googlesyndication.com/pagead/js/adsbygoogle.js?client=ca-pub-1234567890123456" crossorigin="anonymous"></script>

      <!-- pbad -->

      <ins class="adsbygoogle"

           style="display:block"

           data-ad-client="ca-pub-1234567890123456"

           data-ad-slot="1234567890"

           data-matched-content-ui-type="image_stacked"

           data-matched-content-rows-num="3"

           data-matched-content-columns-num="1"

           data-ad-format="autorelaxed"></ins>

      <script>

      (adsbygoogle = window.adsbygoogle || []).push({});

      </script>
テキストの上に画像を配置し、カード内に表示するレイアウトです。このレイアウトを選択するには、広告コードに data-matched-content-ui-type="image_card_stacked" パラメータを追加します。
<script async src="https://pagead2.googlesyndication.com/pagead/js/adsbygoogle.js?client=ca-pub-1234567890123456" crossorigin="anonymous"></script>

      <!-- pbad -->

      <ins class="adsbygoogle"

           style="display:block"

           data-ad-client="ca-pub-1234567890123456"

           data-ad-slot="1234567890"

           data-matched-content-ui-type="image_card_stacked"

           data-matched-content-rows-num="3"

           data-matched-content-columns-num="1"

           data-ad-format="autorelaxed"></ins>

      <script>

      (adsbygoogle = window.adsbygoogle || []).push({});

      </script>
画像を表示しない、テキストのみのレイアウトです。このレイアウトを選択するには、広告コードに data-matched-content-ui-type="text" パラメータを追加します。
<script async src="https://pagead2.googlesyndication.com/pagead/js/adsbygoogle.js?client=ca-pub-1234567890123456" crossorigin="anonymous"></script>

      <!-- pbad -->

      <ins class="adsbygoogle"

           style="display:block"

           data-ad-client="ca-pub-1234567890123456"

           data-ad-slot="1234567890"

           data-matched-content-ui-type="text"

           data-matched-content-rows-num="4"

           data-matched-content-columns-num="1"

           data-ad-format="autorelaxed"></ins>

      <script>

      (adsbygoogle = window.adsbygoogle || []).push({});

      </script>
カード内にテキストのみを表示するレイアウトです。このレイアウトを選択するには、広告コードに data-matched-content-ui-type="text_card" パラメータを追加します。
<script async src="https://pagead2.googlesyndication.com/pagead/js/adsbygoogle.js?client=ca-pub-1234567890123456" crossorigin="anonymous"></script>

      <!-- pbad -->

      <ins class="adsbygoogle"

           style="display:block"

           data-ad-client="ca-pub-1234567890123456"

           data-ad-slot="1234567890"

           data-matched-content-ui-type="text_card"

           data-matched-content-rows-num="4"

           data-matched-content-columns-num="1"

           data-ad-format="autorelaxed"></ins>

      <script>

      (adsbygoogle = window.adsbygoogle || []).push({});

      </script>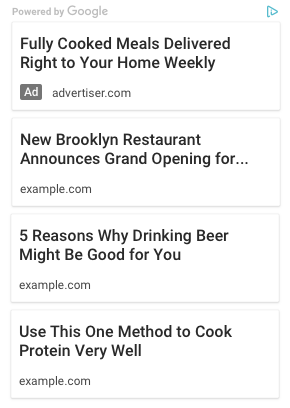
Multiplex 広告ユニットの行数と列数を指定する
Multiplex 広告ユニットには、広告が縦横に並んで表示されます。パラメータを使用すると、Multiplex 広告ユニット内の行数と列数を指定できます。たとえば、2×2 の正方形にしたり、4×1 の縦型コラムにしたりすることが可能です。
行数を設定するには data-matched-content-rows-num パラメータを使用し、列数を設定するには data-matched-content-columns-num パラメータを使用します。この 2 つのパラメータ両方と data-matched-content-ui-type を一緒に設定する必要があります。
- 行数と列数の設定にはいくつかの制約があります。Multiplex 広告ユニットに表示できる広告の合計数は 1~30 個です。表示しようとしている広告の数が 1 個より少ない場合や 30 個より多い場合は、Multiplex 広告ユニットには何も表示されません。
- 状況によっては、指定した数の行と列を表示できないことがあります。たとえば、指定した列数が多いにもかかわらず、Multiplex 広告ユニットの幅が狭い場合は、ユーザー エクスペリエンスを損なうことなく、そのスペース内に広告が適切に表示されるよう、行数や列数が自動的に調整されます。
行と列の設定例
このサンプルコードでは、4 行 1 列、合計 4 件の広告を表示する Multiplex 広告ユニットを作成します。
<script async src="https://pagead2.googlesyndication.com/pagead/js/adsbygoogle.js?client=ca-pub-1234567890123456" crossorigin="anonymous"></script>

        <!-- pbad -->

        <ins class="adsbygoogle"

             style="display:block"

             data-ad-client="ca-pub-1234567890123456"

             data-ad-slot="1234567890"

             data-matched-content-rows-num="4"

             data-matched-content-columns-num="1"

             data-matched-content-ui-type="image_stacked"

             data-ad-format="autorelaxed"></ins>

        <script>

        (adsbygoogle = window.adsbygoogle || []).push({});

        </script>
このサンプルコードでは、2 行 2 列、合計 4 件の広告を表示する Multiplex 広告ユニットを作成します。
<script async src="https://pagead2.googlesyndication.com/pagead/js/adsbygoogle.js?client=ca-pub-1234567890123456" crossorigin="anonymous"></script>

        <!-- pbad -->

        <ins class="adsbygoogle"

             style="display:block"

             data-ad-client="ca-pub-1234567890123456"

             data-ad-slot="1234567890"

             data-matched-content-rows-num="2"

             data-matched-content-columns-num="2"

             data-matched-content-ui-type="image_stacked"

             data-ad-format="autorelaxed"></ins>

        <script>

        (adsbygoogle = window.adsbygoogle || []).push({});

        </script>
このサンプルコードでは、3 行 3 列、合計 9 件の広告を表示する Multiplex 広告ユニットを作成します。
<script async src="https://pagead2.googlesyndication.com/pagead/js/adsbygoogle.js?client=ca-pub-1234567890123456" crossorigin="anonymous"></script>

        <!-- pbad -->

        <ins class="adsbygoogle"

             style="display:block"

             data-ad-client="ca-pub-1234567890123456"

             data-ad-slot="1234567890"

             data-matched-content-rows-num="3"

             data-matched-content-columns-num="3"

             data-matched-content-ui-type="image_stacked"

             data-ad-format="autorelaxed"></ins>

        <script>

        (adsbygoogle = window.adsbygoogle || []).push({});

        </script>
このコードでは、4 行 1 列(モバイル)または 2 行 2 列(パソコン)の Multiplex 広告ユニットを作成します。サイトがレスポンシブ対応の場合は、この設定を使用することをおすすめします。
<script async src="https://pagead2.googlesyndication.com/pagead/js/adsbygoogle.js?client=ca-pub-1234567890123456" crossorigin="anonymous"></script>

        <!-- pbad -->

        <ins class="adsbygoogle"

             style="display:block"

             data-ad-client="ca-pub-1234567890123456"

             data-ad-slot="1234567890"

             data-matched-content-rows-num="4,2"

             data-matched-content-columns-num="1,2"

             data-matched-content-ui-type="image_stacked,image_stacked"

             data-ad-format="autorelaxed"></ins>

        <script>

        (adsbygoogle = window.adsbygoogle || []).push({});

        </script>
トラブルシューティング
Multiplex 広告ユニットをカスタマイズした後、広告が期待どおりに表示されない場合もあります。ここでは、Multiplex 広告ユニットに関する一般的な問題とその解決方法をご紹介します。
次の 2 つの理由が考えられます。
- Multiplex 広告ユニットに表示しようとしている広告の数が 1 個より少ない、または 30 個より多い。Multiplex 広告ユニットの行数と列数を変更し、表示する広告の合計数が 1~30 個になるようにしてください。
- 設定した広告数に比べて、Multiplex 広告ユニットが大きすぎる。この場合、Multiplex 広告ユニットの幅を小さくしてください。
コンソールを使って Multiplex 広告ユニットのエラーを見つける
Multiplex 広告のコードを修正したら、それが適切かどうかをブラウザのコンソールで確認できます。たとえば、広告コードに必要なパラメータが設定されていない、パラメータに無効な値が含まれているなどのエラーを見つけることができます。
Chrome をお使いの場合、DevTools コンソールで広告コードをテストする方法は次のとおりです。
- Multiplex 広告ユニットが追加されているページを開きます。
- Ctrl + Shift + J(Windows / Linux)または Cmd + Opt + J(Mac)を押します。
- [Console] パネルでエラー メッセージを確認します。
