જો તમારા રિસ્પૉન્સિવ Multiplex જાહેરાત યુનિટ માટે તમારી કોઈ ચોક્કસ જરૂરિયાતો હોય, તો તમે તમારા જાહેરાતના કોડમાં પેરામીટર ઉમેરીને તેમનો દેખાવ કસ્ટમાઇઝ કરી શકો છો. આ પેરામીટર તમને તમારા Multiplex જાહેરાત યુનિટના લેઆઉટ જેવી બાબતોમાં ફેરફાર કરવાની અને તેમની અંદર તમે પંક્તિઓ અને કૉલમની કેવી રીતે ગોઠવણી કરવાનું પસંદ કરો છો તે ઉલ્લેખિત કરવાની મંજૂરી આપે છે.
તમે મોબાઇલ વિ. ડેસ્કટૉપ માટે જુદા-જુદા સેટિંગ સેટ કરવા માટે પણ આ પેરામીટરનો ઉપયોગ કરી શકો છો. ઉદાહરણ તરીકે, જો તમે લેઆઉટ પેરામીટરને એકલ મૂલ્ય આપો છો, તો તમારું Multiplex જાહેરાત યુનિટ પણ મોબાઇલ અને ડેસ્કટૉપ પર એ જ સમાન લેઆઉટ ધરાવશે. જ્યારે, જો તમે લેઆઉટ પેરામીટરને બે મૂલ્યો આપો છો, તો પછી તમારું Multiplex જાહેરાત યુનિટ એક લેઆઉટ મોબાઇલ (પહેલું મૂલ્ય) પર અને એક અલગ લેઆઉટ ડેસ્કટૉપ (બીજું મૂલ્ય) પર ધરાવશે.
નોંધ લો કે આ વિકલ્પો ફક્ત રિસ્પૉન્સિવ Multiplex જાહેરાત યુનિટ માટે ઉપલબ્ધ છે અને કસ્ટમાઇઝેશન કામ કરે તે માટે બધા પેરામીટર જરૂરી છે. તમે તમારા જાહેરાત કોડમાં ફેરફાર કરો પછી, ખાતરી કરો કે તમારા Multiplex જાહેરાત યુનિટ જુદા-જુદા ડિવાઇસ અને સ્ક્રીન પર સાચી રીતે કાર્ય કરે છે તેની ખાતરી કરવા માટે તમે તેમનું પરીક્ષણ કરો છો.
તમારા Multiplex જાહેરાત યુનિટનું લેઆઉટ બદલો
લેઆઉટ પેરામીટર (data-matched-content-ui-type) તમને તમારા Multiplex જાહેરાત યુનિટમાં ટેક્સ્ટ અને છબીઓની ગોઠવણીને નિયંત્રિત કરવાની મંજૂરી આપે છે. ઉદાહરણ તરીકે, તમે ટેક્સ્ટ અને છબી એકબીજાની આજુબાજુમાં, ટેક્સ્ટની ઉપર છબી, વગેરે જેવી ગોઠવણી પસંદ કરી શકો છો.
નીચેના લેઆઉટ વિકલ્પો ઉપલબ્ધ છે:
આ લેઆઉટમાં, છબી અને ટેક્સ્ટ એકબીજાની આજુબાજુમાં દેખાય છે. આ લેઆઉટ પસંદ કરવા માટે, તમારા જાહેરાતના કોડમાં data-matched-content-ui-type="image_sidebyside" પેરામીટર ઉમેરો.
<script async src="https://pagead2.googlesyndication.com/pagead/js/adsbygoogle.js?client=ca-pub-1234567890123456" crossorigin="anonymous"></script>

      <!-- pbad -->

      <ins class="adsbygoogle"

           style="display:block"

           data-ad-client="ca-pub-1234567890123456"

           data-ad-slot="1234567890"

           data-matched-content-ui-type="image_sidebyside"

           data-matched-content-rows-num="4"

           data-matched-content-columns-num="1"

           data-ad-format="autorelaxed"></ins>

      <script>

      (adsbygoogle = window.adsbygoogle || []).push({});

      </script>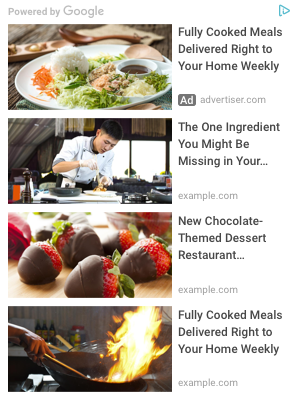
આ લેઆઉટમાં, છબી અને ટેક્સ્ટ કાર્ડની સાથે એકબીજાની આજુબાજુમાં દેખાય છે. આ લેઆઉટ પસંદ કરવા માટે, તમારા જાહેરાતના કોડમાં data-matched-content-ui-type="image_card_sidebyside" પેરામીટર ઉમેરો.
<script async src="https://pagead2.googlesyndication.com/pagead/js/adsbygoogle.js?client=ca-pub-1234567890123456" crossorigin="anonymous"></script>

      <!-- pbad -->

      <ins class="adsbygoogle"

           style="display:block"

           data-ad-client="ca-pub-1234567890123456"

           data-ad-slot="1234567890"

           data-matched-content-ui-type="image_card_sidebyside"

           data-matched-content-rows-num="4"

           data-matched-content-columns-num="1"

           data-ad-format="autorelaxed"></ins>

      <script>

      (adsbygoogle = window.adsbygoogle || []).push({});

      </script>
આ લેઆઉટમાં, છબી અને ટેક્સ્ટ એકબીજાની ઉપર ગોઠવવામાં આવે છે. આ લેઆઉટ પસંદ કરવા માટે, તમારા જાહેરાતના કોડમાં data-matched-content-ui-type="image_stacked" પેરામીટર ઉમેરો.
<script async src="https://pagead2.googlesyndication.com/pagead/js/adsbygoogle.js?client=ca-pub-1234567890123456" crossorigin="anonymous"></script>

      <!-- pbad -->

      <ins class="adsbygoogle"

           style="display:block"

           data-ad-client="ca-pub-1234567890123456"

           data-ad-slot="1234567890"

           data-matched-content-ui-type="image_stacked"

           data-matched-content-rows-num="3"

           data-matched-content-columns-num="1"

           data-ad-format="autorelaxed"></ins>

      <script>

      (adsbygoogle = window.adsbygoogle || []).push({});

      </script>
આ લેઆઉટમાં, કાર્ડની અંદર છબી અને ટેક્સ્ટ એકબીજાની ઉપર ગોઠવવામાં આવે છે. આ લેઆઉટ પસંદ કરવા માટે, તમારા જાહેરાતના કોડમાં data-matched-content-ui-type="image_card_stacked" પેરામીટર ઉમેરો.
<script async src="https://pagead2.googlesyndication.com/pagead/js/adsbygoogle.js?client=ca-pub-1234567890123456" crossorigin="anonymous"></script>

      <!-- pbad -->

      <ins class="adsbygoogle"

           style="display:block"

           data-ad-client="ca-pub-1234567890123456"

           data-ad-slot="1234567890"

           data-matched-content-ui-type="image_card_stacked"

           data-matched-content-rows-num="3"

           data-matched-content-columns-num="1"

           data-ad-format="autorelaxed"></ins>

      <script>

      (adsbygoogle = window.adsbygoogle || []).push({});

      </script>
છબી વિનાનું ફક્ત ટેક્સ્ટવાળું લેઆઉટ. આ લેઆઉટ પસંદ કરવા માટે, તમારા જાહેરાતના કોડમાં data-matched-content-ui-type="text" પેરામીટર ઉમેરો.
<script async src="https://pagead2.googlesyndication.com/pagead/js/adsbygoogle.js?client=ca-pub-1234567890123456" crossorigin="anonymous"></script>

      <!-- pbad -->

      <ins class="adsbygoogle"

           style="display:block"

           data-ad-client="ca-pub-1234567890123456"

           data-ad-slot="1234567890"

           data-matched-content-ui-type="text"

           data-matched-content-rows-num="4"

           data-matched-content-columns-num="1"

           data-ad-format="autorelaxed"></ins>

      <script>

      (adsbygoogle = window.adsbygoogle || []).push({});

      </script>
કાર્ડની અંદર ફક્ત ટેક્સ્ટવાળું લેઆઉટ. આ લેઆઉટ પસંદ કરવા માટે, તમારા જાહેરાતના કોડમાં data-matched-content-ui-type="text_card" પેરામીટર ઉમેરો.
<script async src="https://pagead2.googlesyndication.com/pagead/js/adsbygoogle.js?client=ca-pub-1234567890123456" crossorigin="anonymous"></script>

      <!-- pbad -->

      <ins class="adsbygoogle"

           style="display:block"

           data-ad-client="ca-pub-1234567890123456"

           data-ad-slot="1234567890"

           data-matched-content-ui-type="text_card"

           data-matched-content-rows-num="4"

           data-matched-content-columns-num="1"

           data-ad-format="autorelaxed"></ins>

      <script>

      (adsbygoogle = window.adsbygoogle || []).push({});

      </script>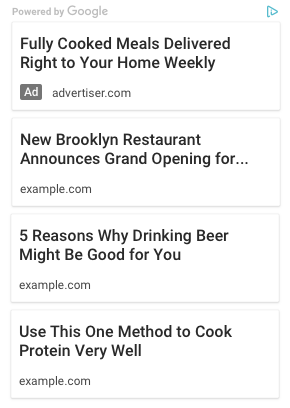
તમારા Multiplex જાહેરાત યુનિટમાં પંક્તિઓ અને કૉલમની સંખ્યાનો ઉલ્લેખ કરો
Multiplex જાહેરાત યુનિટની અંદરની જાહેરાતો ગ્રિડમાં ગોઠવવામાં આવે છે. તે ગ્રિડની અંદર તમે કેટલી પંક્તિઓ અને કૉલમ બતાવવા માગો છો, તે તમે ઉલ્લેખિત કરી શકો છો. ઉદાહરણ તરીકે, તમે તમારા Multiplex જાહેરાત યુનિટને 2x2 ચોરસ, 4x1 કૉલમ, વગેરે પર સેટ કરી શકો છો.
તમે data-matched-content-rows-num પેરામીટર વડે પંક્તિઓની સંખ્યા અને data-matched-content-columns-num પેરામીટર વડે કૉલમની સંખ્યા સેટ કરો છો. તમારી માટે બન્ને પેરામીટર અને data-matched-content-ui-type એકસાથે સેટ કરવું આવશ્યક છે.
- તમે સેટ કરી શકો તે પંક્તિઓ અને કૉલમની સંખ્યા પર અમુક પ્રતિબંધો છે. તમારા Multiplex જાહેરાત યુનિટમાં કુલ જાહેરાતોની સંખ્યા 1 અને 30 વચ્ચે હોવી આવશ્યક છે. જો તમે 1 કરતાં ઓછી કે 30 કરતાં વધારે જાહેરાતો બતાવવાનો પ્રયાસ કરશો, તો તમારું Multiplex જાહેરાત યુનિટ ખાલી દેખાશે.
- અમુક વખત અમે તમે ઉલ્લેખિત કરેલી પંક્તિઓ અને/અથવા કૉલમની સચોટ સંખ્યા કદાચ ન બતાવી શકીએ. ઉદાહરણ તરીકે, જો તમે મોટી સંખ્યામાં કૉલમની સંખ્યા સેટ કરો છો પણ તમારું Multiplex જાહેરાત યુનિટ તે બધા કૉલમને ફિટ કરવા પર્યાપ્ત રીતે પહોળું ન હોય. આ કિસ્સામાં, અમે પંક્તિઓ અને/અથવા કૉલમની સંખ્યાની ગોઠવણી કરીશું, જેથી ઉપલબ્ધ સ્પેસમાં તમારી જાહેરાતો સારી રીતે ફિટ થાય અને એક સરસ વપરાશકર્તા અનુભવ પ્રદાન કરે.
પંક્તિ અને કૉલમના ઉદાહરણો
આ ઉદાહરણ કોડ તમને કુલ ચાર જાહેરાતો બતાવતું ચાર પંક્તિ અને એક કૉલમવાળું Multiplex જાહેરાત યુનિટ જનરેટ કરવાની રીત બતાવે છે.
<script async src="https://pagead2.googlesyndication.com/pagead/js/adsbygoogle.js?client=ca-pub-1234567890123456" crossorigin="anonymous"></script>

        <!-- pbad -->

        <ins class="adsbygoogle"

             style="display:block"

             data-ad-client="ca-pub-1234567890123456"

             data-ad-slot="1234567890"

             data-matched-content-rows-num="4"

             data-matched-content-columns-num="1"

             data-matched-content-ui-type="image_stacked"

             data-ad-format="autorelaxed"></ins>

        <script>

        (adsbygoogle = window.adsbygoogle || []).push({});

        </script>
આ ઉદાહરણ કોડ તમને કુલ ચાર જાહેરાતો બતાવતું બે પંક્તિ અને બે કૉલમવાળું Multiplex જાહેરાત યુનિટ જનરેટ કરવાની રીત બતાવે છે.
<script async src="https://pagead2.googlesyndication.com/pagead/js/adsbygoogle.js?client=ca-pub-1234567890123456" crossorigin="anonymous"></script>

        <!-- pbad -->

        <ins class="adsbygoogle"

             style="display:block"

             data-ad-client="ca-pub-1234567890123456"

             data-ad-slot="1234567890"

             data-matched-content-rows-num="2"

             data-matched-content-columns-num="2"

             data-matched-content-ui-type="image_stacked"

             data-ad-format="autorelaxed"></ins>

        <script>

        (adsbygoogle = window.adsbygoogle || []).push({});

        </script>
આ ઉદાહરણ કોડ તમને કુલ ચાર જાહેરાતો બતાવતું ત્રણ પંક્તિ અને ત્રણ કૉલમવાળું Multiplex જાહેરાત યુનિટ જનરેટ કરવાની રીત બતાવે છે.
<script async src="https://pagead2.googlesyndication.com/pagead/js/adsbygoogle.js?client=ca-pub-1234567890123456" crossorigin="anonymous"></script>

        <!-- pbad -->

        <ins class="adsbygoogle"

             style="display:block"

             data-ad-client="ca-pub-1234567890123456"

             data-ad-slot="1234567890"

             data-matched-content-rows-num="3"

             data-matched-content-columns-num="3"

             data-matched-content-ui-type="image_stacked"

             data-ad-format="autorelaxed"></ins>

        <script>

        (adsbygoogle = window.adsbygoogle || []).push({});

        </script>
આ ઉદાહરણ કોડ તમને મોબાઇલ પર 4x1 ગ્રિડ અને ડેસ્કટૉપ પર 2x2 ગ્રિડવાળું Multiplex જાહેરાત યુનિટ જનરેટ કરવાની રીત બતાવે છે. જો તમારી પાસે સ્માર્ટ સાઇટ હોય, તો તમે કદાચ આ સેટઅપનો ઉપયોગ કરવાનું વિચારી શકો.
<script async src="https://pagead2.googlesyndication.com/pagead/js/adsbygoogle.js?client=ca-pub-1234567890123456" crossorigin="anonymous"></script>

        <!-- pbad -->

        <ins class="adsbygoogle"

             style="display:block"

             data-ad-client="ca-pub-1234567890123456"

             data-ad-slot="1234567890"

             data-matched-content-rows-num="4,2"

             data-matched-content-columns-num="1,2"

             data-matched-content-ui-type="image_stacked,image_stacked"

             data-ad-format="autorelaxed"></ins>

        <script>

        (adsbygoogle = window.adsbygoogle || []).push({});

        </script>
સમસ્યા નિવારણ કરવું
તમે તમારું Multiplex જાહેરાત યુનિટ કસ્ટમાઇઝ કરી લો, પછી એ શક્ય છે કે તે તમારી અપેક્ષા જેવું જ કદાચ ન પણ દેખાઈ શકે. આ રહી Multiplex જાહેરાત યુનિટમાં જોવા મળતી અમુક સામાન્ય સમસ્યાઓ અને તેમાં સુધારો કરવાની રીત:
આવું થઈ શકે તે પાછળ બે કારણો હોઈ શકે:
- તમારા Multiplex જાહેરાત યુનિટમાં કુલ જાહેરાતોની સંખ્યા 1 કરતાં ઓછી છે અથવા 30 કરતાં વધારે છે. તમારે તમારા Multiplex જાહેરાત યુનિટમાં પંક્તિઓ અને/અથવા કૉલમની સંખ્યા બદલવી જોઈએ, જેથી જાહેરાતોની કુલ સંખ્યા મર્યાદામાં આવી જાય.
- તમારું Multiplex જાહેરાત યુનિટ તમે સેટ કરેલી જાહેરાતોની સંખ્યા માટે ખૂબ જ પહોળું છે. આ કિસ્સામાં, તમારે તમારા Multiplex જાહેરાત યુનિટની પહોળાઈ ઘટાડવાનો પ્રયાસ કરવો જોઈએ.
તમારા Multiplex જાહેરાત યુનિટમાં ભૂલો શોધવા માટે કન્સોલનો ઉપયોગ કરવો
તમારા Multiplex જાહેરાત કોડમાં સાચી રીતે ફેરફાર કર્યો છે કે નહીં તે ચેક કરવા માટે તમે તમારા બ્રાઉઝરમાં કન્સોલનો ઉપયોગ કરી શકો છો. ઉદાહરણ તરીકે, જો તમારા જાહેરાત કોડમાં જરૂરી પેરામીટર ખૂટતું હોય અથવા જો પેરામીટરમાં કોઈ અમાન્ય મૂલ્ય શામેલ હોય, તો કન્સોલ તમને તે વિશે જણાવી શકે છે.
જો તમે Chromeનો ઉપયોગ કરી રહ્યાં છો, તો DevTools કન્સોલમાં તમારા જાહેરાત કોડનું પરીક્ષણ કરવા માટે તમે આ પગલાં અનુસરી શકો છો:
- તમારા Multiplex જાહેરાત યુનિટવાળા પેજની મુલાકાત લો.
- Ctrl+Shift+J (Windows / Linux) અથવા Cmd+Opt+J (Mac) દબાવો.
- ભૂલના મેસેજ માટે કન્સોલ પૅનલ ચેક કરો.
