To attribute visits and conversions to social campaigns in Search Ads 360, clicks need to be redirected to Search Ads 360 using the Search Ads 360 tracking URL (clickserver URL). Each clickserver URL has unique IDs that Search Ads 360 uses to track unique visits to your site and to attribute any conversions during a visit back to the specific campaigns and keywords that led to the visit.
If you aren't using a PMD with Facebook, follow these steps to add clickserver URLs to campaigns in social engines:
- Export your campaigns from the engine.
- Upload the campaigns to Search Ads 360.
Search Ads 360 adds its clickserver URLs to the landing page URLs in the campaigns. - Download the modified campaigns from Search Ads 360.
- Import the modified campaigns back into the engine.
1. Export campaigns from the engine
- Sign in to Facebook Ads Manager.
Learn more about Ads Manager. - At the Ad level, click the import/export icon
.
- Click Export All to download everything in your account. Make sure you choose an export format that Search Ads 360 supports.
Don't remove columns or make other changes to the exported spreadsheet. Search Ads 360 needs the information in the spreadsheet to apply tracking URLs.
Choose a supported format
Make sure you select an export format that can be then be uploaded into Search Ads 360. Here are the requirements for uploading files into Search Ads 360:
You can upload files up to 600 MB in any of the following formats:
-
XLS/XLSX: You can upload files up to a million rows with XLSX (Excel 2007 and later) files.
-
CSV: UTF-8 or UTF-16 (with BOM) file whose fields are comma separated.
Fields are optionally double quoted. For example, if your campaign names include commas, surround the Campaign field in double quotes:
Row Type,Action,Status,Campaign,Campaign start date
campaign,create,Active,"Campaign with, comma",12/30/2016 -
TSV: UTF-8 or UTF-16 (with BOM) file whose fields are delimited with a TAB character. Fields are optionally double quoted.
Supported delimiters in CSV and TSV files
In CSV files, the only supported character for separating fields is a comma.
In TSV files, the only supported character for separating fields is a TAB.
Other characters, such as pipe or colon cannot be used to separate (delimit) fields.
Include required data
To make sure the export contains all required columns, choose the Import & Export option in Facebook Power Editor when exporting ads.
Here's the list of required columns:
- Campaign ID
- Campaign name
- Campaign objective
- Ad set ID
- Ad set name
- Ad ID
- Ad name
- Creative type
- Image hash
- Link
Search Ads 360 will add its click tracking URL to the URLs in the Link column. Any landing page URL that isn't included won't redirect through Search Ads 360, and won't be reported on in Search Ads 360. - View tags
Search Ads 360 will add a viewtracker URL to this column. The viewtracker URL tracks impressions for use by Campaign Manager 360 Paid social reports and attribution reports.
Search Ads 360 ignores any other columns that may appear in the exported spreadsheet.
Column headers in the file are required to be in English. Search Ads 360 cannot process files if column headers are in other languages.
2. Upload campaign data into Search Ads 360
Before you start:
Create a social engine account in Search Ads 360 that contains the account ID from the engine you downloaded campaigns from.
Upload campaign data
Upload the campaigns into Search Ads 360 so Search Ads 360 can add its clickserver URLs to the landing page URLs in your campaigns:
-
Navigate to the advertiser that contains the social engine account.
Steps for navigating to an advertiser-
Click the navigation bar to display navigation options.
-
In the "Agency" list, click on the agency that contains the advertiser. You can search for an agency by name or scroll through the list.
-
In the "Advertiser" list, click on the advertiser.
-
Click Apply or press the Enter key.
Search Ads 360 displays the advertiser page, which contains data for all of the advertiser’s engine accounts.
-
-
In the left navigation panel, click the Uploads tab.
-
Click the Social tab.
-
Under What are you uploading?, select Campaigns downloaded from the engine.
-
From the Social engine type list, select the type of engine you downloaded campaigns from.
-
Click Upload file, select the downloaded spreadsheet from your hard drive or network, and click Open.
A progress bar appears next to the filename.Search Ads 360 processes the spreadsheet one row at a time. Search Ads 360 skips any rows that don't contain a landing page URL, such as rows that describe campaigns or ad groups.
View the results
After processing, the Status column in the reporting table reports one of the following:
- Completed: All rows that contain landing page URLs were processed successfully.
- Completed with errors: Search Ads 360 was not able to apply its clickserver URL to one or more rows that contain a landing page URL.
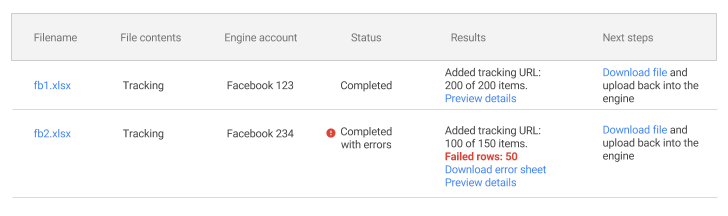
If all rows were successful
If the status column reports Completed, download the modified campaigns from Search Ads 360.
If processing completed with errors
- Before you start fixing errors, download the rows that processed successfully:
If any rows processed successfully, the Next steps column displays a Download file link.
Download these modified rows and import them into the engine. - To start fixing errors:
- In the Results column, click the Download error sheet link.
- Open the downloaded error sheet.
The error sheet contains all rows with errors (it also contains skipped rows). Each row begins with an error message. Use the information in the error message to correct the errors. You can make updates directly in the error sheet. - When you finish making corrections, upload the error sheet.
- Repeat these steps until you've successfully processed all rows.
3. Download the modified campaigns from Search Ads 360
After Search Ads 360 successfully processes the spreadsheet, the landing page URLs in the spreadsheet will include Search Ads 360 clickserver URLs.
To download the processed spreadsheet:
-
Navigate to the advertiser that contains the social engine account.
Steps for navigating to an advertiser-
Click the navigation bar to display navigation options.
-
In the "Agency" list, click on the agency that contains the advertiser. You can search for an agency by name or scroll through the list.
-
In the "Advertiser" list, click on the advertiser.
-
Click Apply or press the Enter key.
Search Ads 360 displays the advertiser page, which contains data for all of the advertiser’s engine accounts.
-
-
In the left navigation panel, click Uploads tab.
-
Click the Social tab.
-
In the Next steps column, click the Download file link.
4. Import the modified campaigns into the engine
- After downloading the modified campaigns from Search Ads 360, import the ads into Facebook.
- Before you publish the changes in Facebook, make sure that the changes appear only for ads, and that the Changes column only states UPDATED: Creative or UPDATED: Creative and Tracking.
If you see changes for campaigns or ad sets, or if you see ads being created or removed, cancel the update in Facebook and contact Search Ads 360 customer support.
Once you publish your changes, Facebook will start serving ads that redirect to Search Ads 360.
Confirm that traffic is redirecting through Search Ads 360
After you successfully import the modified campaigns into Facebook, confirm that traffic is redirecting through Search Ads 360:
-
Navigate to the advertiser that contains the social engine account.
Steps for navigating to an advertiser-
Click the navigation bar to display navigation options.
-
In the "Agency" list, click on the agency that contains the advertiser. You can search for an agency by name or scroll through the list.
-
In the "Advertiser" list, click on the advertiser.
-
Click Apply or press the Enter key.
Search Ads 360 displays the advertiser page, which contains data for all of the advertiser’s engine accounts.
-
-
In the left navigation panel, click All accounts tab.
-
Click the Engine accounts tab.
-
If traffic is redirecting through Search Ads 360, the Authorization status column contains OK.
If traffic is not redirecting through Search Ads 360, the Authorization status column contains Waiting for traffic.
If you see the Waiting for trafffic status and you're sure that you've uploaded the Search Ads 360 clickserver URLs into your engine account (and that your campaigns are generating clicks), contact Search Ads 360 customer support.
