Expanding ads start out the same size as the ad slot they're served in. Then, when the user interacts (for example, by clicking a button) the ad grows larger than the ad slot and shows more content. To create an expanding ad in Google Web Designer, start from a blank file or open a pre-built expanding template, then add your own copy, images and more.
Start from scratch
Step 1: Create a new fileTo create a new expandable with video creative in Google Web Designer:
- Open Google Web Designer and click File > New file. The 'Create new blank file' window displays.
- In the Ads list, select Expandable.
- Choose Display & Video 360 as the Environment.
- Set the dimensions for the collapsed and expanded sizes of the ad.
- Give the creative a name. This is the name of the HTML file.
- Choose the Location on your computer in which the Google Web Designer files will be saved. Enter the path to the location, or click the search icon to navigate to the location you want.
- Set the Animation Mode:
- Quick: Animate your ad scene by scene. See Create animations in Quick mode in the Google Web Designer Help Center for more information.
- Advanced: Animate individual elements on their own timeline. See Create animations in Advanced mode in the Google Web Designer Help Center for more information.
- Click OK.
Google Web Designer creates the initial collapsed and expanded pages (called Banner page and Expanded page). It automatically adds a tap area event to the collapsed page, which will expand the ad, and a close tap area to an expanded page to collapse the ad back down. The initial code needed for the ad to talk to the ad server and collect tracking metrics is also automatically added.
To set up the collapsed ad in the banner page:
- Import images by dragging them onto the stage, or drag them from the Asset Library panel.
- (Optional) Create animations or add built-in or custom components to the page.
- When your banner is complete, select the Tap Area component and click the 'Bring to top' button.
- Save.
To make the creative expand on mouse rollover:
- Open the Events panel, click the + button to add a mouseover event.
- Choose expand-button as the Target.
- Choose Mouse > mouseover as the Event.
- Choose Google Ad > Go to page as the Action.
- Choose gwd-ad as the Receiver.
Learn more about using events in Google Web Designer
- Switch to the Expanded page using the page indicator at the bottom of the stage
.
- Import images by dragging them onto the stage, or drag them from the Asset Library panel.
- (Optional) Create animations or add built-in or custom components to the page.
- Save.
Add a call to action
- Be sure your ad has a button or other clear visual call-to-action element for the user to click or touch.
- Drag the Tap Area component from the Interaction folder of the Components panel to the stage, and position it over the call to action.
- Click the new event button
in the Events panel.
- In the event dialog, select the following options:
Target The Tap Area component ( gwd-taparea_1)Event Tap Area > Touch/Click Action Google Ad > Exit ad
Note: A similar action, Exit ad (overrides URL), doesn't allow you to modify the URL outside of the creative, such as within Studio or Campaign Manager 360, and should only be used for dynamic ads.
Receiver gwd-adConfiguration - Metrics ID - A label (e.g., "CTA") to make reports easier to understand.
- URL - The exit URL.
- Collapse on exit - For expandable ads, check to collapse the ad when the user closes the ad.
- Pause media on exit - Check to stop video and audio playback when the user closes the ad.
- Collapsed page on exit - For expandable ads, the page to show when the user closes the ad.

Optional: Add a video
If you'd like to add video to your creative, use either the Video component or the YouTube component. If your video is hosted on YouTube, use the YouTube component. If not, use the Video component for these compatible HTML5 video formats:
- .MP4
- .OGG/.OGV
- .WEBM
Start from a template
Templates are pre-made ads in popular sizes, using generally popular styles and features. By replacing the images and other assets, you can quickly create a useful, working ad.
Step 1: Create a new file from a template- Select New from template... from the File menu. This opens the Template Gallery.
- To find Google Marketing Platform banner templates:
- Click Search
.
- Expand the Ad Types section, then select Expandable.
- Expand the Platforms section, then select Display & Video 360.
- Close the filters panel. A list of compatible layouts will display.
- Click Search
- Click Use Layout for the layout you want.
- If there are multiple size options, select the size you want.
- Name your new file (required).
- Optionally, change the location where the file will be saved. You can either enter the path to the location, or click the folder icon
to navigate to the location you want to use.
- Click Create.
Google Web Designer's expanding ad templates include a Banner page, which is the collapsed ad, and an Expanded page, which is the expanded ad. By default, you'll see the Banner page when you create your new file. Switch to the Expanded page using the page indicator at the bottom of the stage .
Each page includes placeholder assets and descriptive IDs for each element. Begin by replacing each generic placeholder asset with an appropriate one for your ad. Ads created from templates are completely modifiable; you can add or delete assets, components, and events as you wish to create a more customized ad.
The "Swap Image" function lets you replace an image with either an image in the Library or an image that you upload. This is especially helpful when you're replacing stock images from a template.
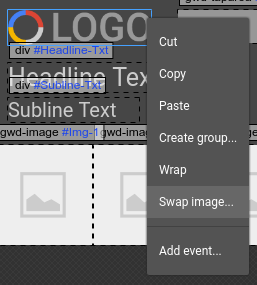
To replace an image in an ad created from a template:
- Right-click the image you want to replace.
- Select Swap image... from the pop-up menu.
- In the dialog, either select an image from the Library or click the add button
to select an image from your computer.
- Click OK.
Preview your finished creative
To preview your ad from Google Web Designer:
- Click the preview button at the bottom of the screen
. Google Web Designer recognizes the supported browsers on your system and lets you choose which of them you want to use.
- To choose the browser that you want to preview your work in, click the selection arrow to the right of the preview button, and choose the browser from the list.
- On page load, review the collapsed ad.
- Click the call to action to see the ad expand.
Optional: Set up a multi-directional expanding creative
Multi-directional expanding creatives can expand in the proper direction based on their placement on a site. Follow the steps below to make a multi-directional expanding creative.
Step 1: Increase the stage size
- Increase the size of the expanded page to allow enough room for the expanded area needed for each direction.
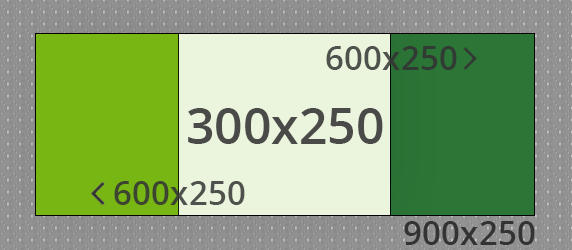
For example, if the collapsed creative size is 300x250, the expanded creative is 600x250, and the creative can expand to the right or left, set the expanded page size to 900x250.
- Use the page indicator to switch back to the Banner page
- Click the ad expansion view button
.
- Reposition the expanding viewable area so that the collapsed is in the center. Learn more about using the ad expansion view button in the Google Web Designer Help Center.
- Switch to the Expanded page using the page indicator at the bottom of the stage
- Adjust the position of your creative elements to match the new stage size.
 .
. Step 2: Add positioning code
- Click Code view.
- Scroll down to the script tag with the ID
gwd-init-code:
<script type="text/javascript" id="gwd-init-code"> - Add code to enable multi-directional expansion and add event handling. See the Studio HTML5 SDK for API methods and examples.
Example code
This example expands only to the left and right. Review the Studio HTML5 SDK for more details.
Enabler.setIsMultiDirectional(true); // Edit position of elements based on expanding direction. function expandStartHandler() { var direction = Enabler.getExpandDirection().toString(); if (direction == 'tr' || direction == 'br') { // Add code here to position elements when expanding to the right. // Change btnClose to match the ID of your close button, and modify the position. btnClose.style.left = '875px'; } else { // Add code here to position elements when expanding to the left. // Change btnClose to match the ID of your close button, and modify the position. btnClose.style.left = '10px'; } } Enabler.addEventListener(studio.events.StudioEvent.EXPAND_START, expandStartHandler); - Add code to position each creative element for each expand direction you wish to support.