Using data pass in a dynamic creative lets you update ads automatically based on data provided by Display & Video 360, another demand-side platform (DSP), or a publisher. This data is passed to the dynamic creative on impression and is used to tailor the content delivered to the ad. This means increased relevancy on every impression with content specific to the user.
There are two main categories of data that can be passed:
- First-party data: A advertiser sets up Floodlight tags on different pages of its site. A dynamic creative can then determine dynamic content and messaging based on which part of the site the user visits. For example, a financial services client may set Floodlights on the checking accounts and credit cards pages. Users that have visited the credit cards page are later displayed an ad on the newest credit card offer.
- Third-party data: An advertiser can purchase behavioral segments from a data provider to help determine which products to show based on the user's segment. For example, an advertiser might buy Bluekai segments, such as "Electronics enthusiast" and "Fashionista". Using dynamic creative, the advertiser shows TVs and cell phones to users in the "Electronics enthusiast" segment and apparel to the "Fashionista" segment.
Data pass works by passing data on the impression, using a macro that is appended to the ad tag. The macro is made up of key-value parameters. In the ad tag, the key is the indicator that there is data to be passed. The value is the actual data value that is being passed.
For example, lineitem=${CAMPAIGN_ID} is a key-value parameter with a Display & Video 360 macro that is replaced with the actual line item ID in Display & Video 360 at serving time. The key is "lineitem"; the value is the macro "${CAMPAIGN_ID}". When the impression is served, the ${CAMPAIGN_ID} macro will be replaced by the data value specific to that impression (for example, Line item ID 123456).
- The publisher and Display & Video 360 support team discuss and agree on the macro to use.
- When using Display & Video 360 for data pass, review this list to see if an already approved macro will suit your needs.
- For other publishers, check with Display & Video 360 support on whether that publisher has any approved macros.
- Add the macro to Campaign Manager 360 at the placement level.
- Navigate to each placement that will include data pass dynamic creatives.
- In the "Tag Defaults" section, enter the key-value with the full macro (for example,
lineitem=${CAMPAIGN_ID}) in the "Additional key-values" field. - Click Save.
- Generate the ad tags and send to the publisher.
- An example of an ad tag with the macro looks like this:
http://ad.doubleclick.net/adi/N7421.127121.DOUBLECLICKINC. /B7133722.2;sz=300x250;lineitem=${CAMPAIGN_ID};ord=[timestamp]? -
On impression, the publisher will replace
${CAMPAIGN_ID}with the data pass value, so the ad tag will look like this:http://ad.doubleclick.net/adi/N7421.127121.DOUBLECLICKINC. /B7133722.2;sz=300x250;lineitem=12345,98574,32421;ord=1360680333
- An example of an ad tag with the macro looks like this:
After the creative has been tested based on features and format, it is approved and sent to the assigned Campaign Manager 360 advertiser.
- Assign the dynamic data pass creative to your ads with assigned placements. Make sure the placement contains the macro (for example, a destination macro) from the publisher in the tag default section of the placement.
- Download the HTML version of the tag, which contains the macro.
- Upload the HTML file to your own server or test the tag directly in a browser.
- To test directly in a browser, replace
adjwithadiin the script portion of the tag. For example,https://ad.doubleclick.net/ddm/adi/N5789.147698OMGBLOG0/B1368048.128202206;sz=300x250;category=[placeholder];topseller=[placeholder];ord=[timestamp]
- To test directly in a browser, replace
Replace the placeholder value in the tag with a value from the feed, for example, "Munich". Test the behavior of the creative.- Check the creative for each value.
Start with a feed template Refer to this sample feed structure as a starting point. You can browse additional feed templates in the template gallery.
Fill out the feed Follow these general feed instructions to begin populating the feed.
Add the data pass column After following the general feed instructions, make sure to add a column for the data that will be passed from the publisher (for example, LineItem_ID, Travel_Destination, and so on). In the above sample feed structure, this is the "LineItem_ID" column, which will contain the data pass values. The DSP/publisher should provide all data pass values that can be passed on impression in this column. The data pass column name does not need to match the key, so feel free to name the column whatever is most logical for your campaign.
After uploading the feed to the Studio profile, follow the below steps that are specific to data pass strategies:
-
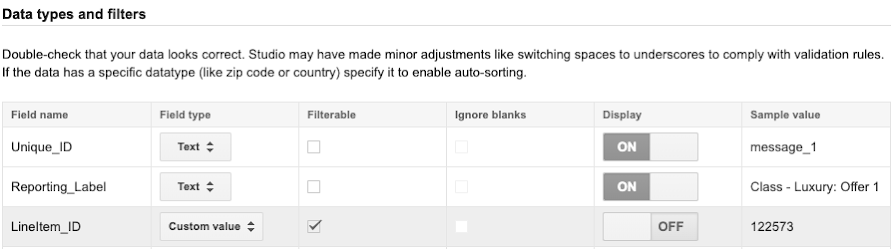
Navigate to Step 2: Manage Data. In the "Data types and filters" section, select the appropriate field type for each of the columns in the feed. For the data pass column, select Custom value as the field type.
-
Navigate to Step 3: Manage Rules. Confirm that the "Type" drop-down is set to Auto-filter and the Summary displays Filtering on: LineItem_ID (or whatever the data pass column is called). Click Manage. In the field that says Enter the request key to filter on, enter the key that will be used to pass the data upon impression (the examples above use the key: "lineitem").
-
In Step 4: Generate Code, the dynamic code is generated. Follow these steps to incorporate the dynamic code into the creative asset files and upload the final assets to Studio.
-
In Step 5: Preview, preview the creative. Enter the appropriate data pass value (for example, the line item ID "123456") into the custom value text box and click Apply.
-
When you're done previewing, publish your profile.

Read these FAQs for answers to the most common questions, plus best practices.