You can set up a creative to expand in different directions depending on where the ad is served on a page. You can program the creative to detect its position and determine which direction to expand in. For example, you can have the same creative expand to the right when it's served on the left side of the page, and expand to the left when it's on the right side of the page.
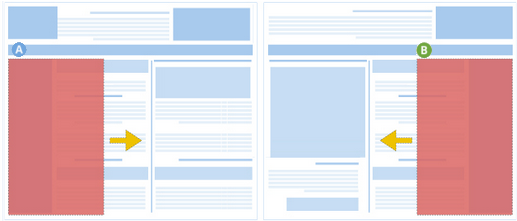
Expand right
Expand left
- In the HTML, create three panels:
- Main panel: Contains both collapsed and expanded panels, including the different expanding directions
- Collapsed panel: Contains collapsed panel contents
- Expanded panel: Contains expanded panel contents
- In the CSS, style the three objects to reflect ad position and expanding direction.
- In the JavaScript:
- Use the
setExpandingPixelOffsetsEnabler method to set offsets for the collapsed panel. This offset doesn't affect the local testing environment, but when the ad is live, the collapsed portion of the add will be shown at 0, 0. This method sets the CSS propertiesmarginLeftandmarginTopof the relative positioned body element. - Use the
setIsMultiDirectionalEnabler method to turn on multi-directional expansions. - Use the
getExpandDirectionEnabler method to determine the ad's expanding direction and dynamically modify the expanded panel's position and animation accordingly.
- Use the
Panel layout example |
700x350 - Main panel |
Create three objects in the HTML file using <div> tags, then assign IDs.
Example HTML
<body>
  <div id="main-panel">
     <div id="collapsed-panel">
       <!-- Add collapsed content here. -->
     </div>
     <div id="expanded-panel">
       <!-- Add expanded content here. -->
     </div>
   </div>
</body>
Style the objects you created in the CSS using the IDs you assigned them.
- Always position the main panel at 0,0 and make sure size dimensions are big enough to contain the collapsed panel and all possible expanded panel directions. Calculate the size of the main panel as follows:
- Main panel width = Expanded panel width + (Expanded panel width - Collapsed panel width)
- Main panel height = Expanded panel height + (Expanded panel height - Collapsed panel height)
- Example
Using image shown above:- width = 500px + (500px - 300px) = 700px
- height = 300px + (300px - 250px) = 350px
- Always position the collapsed panel area at the center of the main panel. Calculate this position as follows:
- Collapsed panel left = Expanded panel width [minus] Collapsed panel width
- Collapsed panel top = Expanded panel height [minus] Collapsed panel height
- Example
Using image shown above:- left = 500px - 300px = 200px
- top = 300px - 250px = 50px
- The position of the expanded panel depends on the expanding direction, but it must be changed dynamically using JavaScript. In this example, classes for each possible direction were added, which include left and top positions. Later, these classes are accessed in the JavaScript depending on the direction the Enabler detects.
#main-panel {
  position: absolute;
  left: 0px;
  top: 0px;
  width: 700px;
  height: 350px;
}

#collapsed-panel {
  position: absolute;
  left: 200px;
  top: 50px;
  width: 300px;
  height: 250px;
}

#expanded-panel {
  position: absolute;
  width: 500px;
  height: 300px;
}

.direction-tl {
  left: 0px;
  top: 0px;
}

.direction-tr {
  left: 100px;
  top: 0px;
}

.direction-bl {
  left: 0px;
  top: 200px;
}

.direction-br {
  left: 100px;
  top: 200px;
}
Set pixel offsets for the collapsed panel of the ad and size dimensions for the expanded panel. This helps Studio identify both the position of the ad on the site page it's serving on and its expanding direction. To do this, use the setExpandingPixelOffsets method after Enabler initialization:
Enabler.setExpandingPixelOffsets(left, top, opt_expandedWidth, opt_expandedHeight);
- As with collapsed-panel styling, the values you set for the
leftandtopparameters must position the collapsed panel area at the center of the main panel. Calculate these positions as follows:- left = Expanded panel width minus Collapsed panel width
- top = Expanded panel height minus Collapsed panel height
- Setting the values for
opt_expandedWidthandopt_expandedHeightfor MDE is different from setting the basic Expanding. Instead of setting it to match the dimensions of the expanded panel, you set the values to match the dimensions of the main panel. Calculate these values as follows:opt_expandedWidth= Expanded panel width + (Expanded panel width - Collapsed panel width)opt_expandedHeight= Expanded panel height + (Expanded panel height - Collapsed panel height)
Enabler.setExpandingPixelOffsets(
    200,  // Left offset of expanded ad
    100,  // Top offset of expanded ad
    700,  // Expanded width of ad
    350); // Expanded height of ad

// Whether to start in expanded state. The default is false.
Enabler.setStartExpanded(false);

// Enable multidirectional expand in the "best available"
// direction based on the ad's position on the page.
// The default is false.
Enabler.setIsMultiDirectional(true);

if (Enabler.isInitialized) {
  enablerInitHandler();
} else {
  Enabler.addEventListener(studio.events.StudioEvent.INIT, enablerInitHandler);
}

function enablerInitHandler() {
  // Add code to load creative elements after the Enabler
  // is initialized.
}
You must change the position of the expanded panel on the main panel depending on expansion direction. To do this, determine the expanded direction using the getExpandedDirection Enabler method and change the creative accordingly when the EXPAND_START event is triggered. In the CSS example above, different classes are set for each expanding direction. In the snippet below, a className is assigned to the expanded panel object based on the expanding direction.
function expandAd(e) {
  Enabler.requestExpand();
  Enabler.addEventListener(studio.events.StudioEvent.EXPAND_START,
      function() {
        document.getElementById('expanded-panel').className = 'direction-' + Enabler.getExpandDirection();
        // Add code for desired expansion animation.
        Enabler.finishExpand();
  });

  Enabler.addEventListener(studio.events.StudioEvent.EXPAND_FINISH,
      function() {
        // Add code to show expanded panel and load elements or
        // start animation.
  });
}

document.getElementById('expand-button').addEventListener('click', expandAd, false);
When you preview the MDE creative locally, it shows all possible expanding directions every time you expand the ad. They show in the following order:
- tl: top left
- tr: top right
- bl: bottom left
- br: bottom right
When you preview in Studio, only the direction that Studio detects is shown. To test and preview the different directions, you must position the creative in the preview tab to test each direction.