Here's how to troubleshoot if you have camera or presentation issues during a meeting. The 'Camera failed' error is often due to the browser not having access to the camera. The instructions listed here will help you to fix this issue.
Update your browser
Update your browser to get the latest software fixes. Learn how to update Google Chrome.
Access to my microphone or camera was denied
Meet needs permission to use your camera and microphone in Chrome. You will be asked to allow access the first time that you join a Meet video meeting.
You can change the setting to allow Meet to use your camera and microphone. Click on the camera icon in the address bar and select the Always allow option.
If these changes don't resolve the issue, try the options below:
- Confirm that your camera is connected.
- Make sure that no other apps are currently accessing your camera.
- If you have more than one camera installed, make sure that the camera that you want to use is set to active.
- Confirm that you have the most recent version of Google Meet.
- Enable your camera before you join the meeting.
People can't see me in the meeting
Make sure that your camera is turned on and that your computer and browser are able to access the camera so that you are visible.
Enable camera access on macOS Mojave and laterOn computers using macOS Mojave version 10.14 or later, you must allow camera access for your Chrome or Firefox® web browser. Otherwise, Meet won't include video from your device.
- Go to System preferences
Security and privacy.
- Select Privacy
- Tick the box for the application used for Meet (Google Chrome or Firefox).
On computers using Chrome, you must allow the browser to access your camera.
- Enter
chrome://settings/content/camerain the Chrome address bar. - Disable the setting 'Ask before accessing'.
- Under 'Allow', delete https://meet.google.com:443 if present.
- Refresh the Google Meet page and grant camera access when prompted.
- Check that your computer's camera is connected, turned on and pointing towards you unobstructed.
- Check if your camera functions in other apps, such as FaceTime in macOS or the camera app in Windows 10.
- Close any other application that might be using the camera, then reload Google Meet.
- Restart your computer or your Google Chrome Browser.
My camera is on but shows a black screen or a crossed out camera icon
Check if there's a camera hardware issue- On your device, open the built-in camera app, like Camera or Photo Booth.
- If the camera's self-preview shows your image but Google Meet doesn't, make sure that Google Meet can access your camera:
- If the camera's self-preview doesn't show your image, to open the camera cover or privacy switch, try the steps below.
Important:
- Not all devices have a camera cover or privacy switch.
- The cover or switch may be at the top or on the side of your device.
- Some models use an orange, red or amber light when the privacy switch is on.
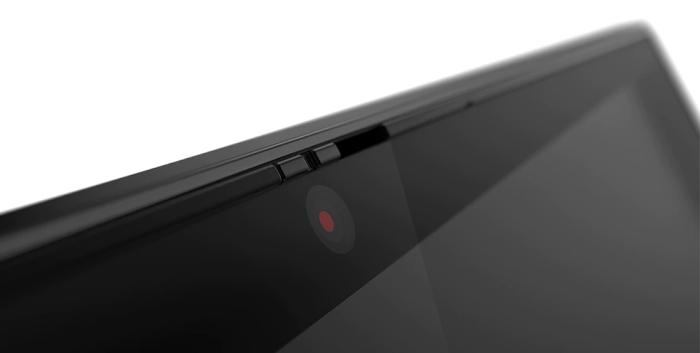
- To find the camera cover, at the top of the camera lens, check for a slider.
- For most models, the camera cover is a physical slider located just above the lens. For example:
Lenovo camera lens blocked by slider
- For most models, the camera cover is a physical slider located just above the lens. For example:
- If you can't find a slider above the lens, check for a physical switch on either side of your device.
- Some models use a privacy switch instead of a camera cover. For example:
HP Chromebook with camera privacy switch turned on
- Some models use a privacy switch instead of a camera cover. For example:
- To unblock the camera lens, move the slider or switch to the off position.
- Test the camera with the built-in camera app or with Google Meet.

Tip: If the camera's self-preview doesn't show:
- For non-Chromebook devices, try the steps to troubleshoot more.
- For Chromebook devices, try the steps to reset your Chromebook hardware.
Important: Some devices have a software privacy switch. This may be turned off in your camera or device settings.
- On your device, go to settings.
- Find your camera settings.
- Turn off the software-based privacy switch.
Tip: Instructions may be different on your device.
|
|
Example of Chrome and Firefox browsers that shows camera lens blocked by
software privacy switch
If the camera doesn't work and there's no camera cover or privacy switch:
- Reset your Chromebook hardware.
- Test the camera with the built-in camera app or with Google Meet.
Fix issues when you present
If you're not able to present in a Google Meet video meeting, you should give your browser access to record your screen.
On an Apple® Mac® computer using macOS® Catalina® version 10.15 or later, let Firefox® or the Chrome Browser access your computer's screen recording:
- Go to System preferences
- Click Privacy.
- On the left, click Screen recording.
For Mac users: at the bottom left, click the lock to make changes. In the window, enter in your password
click unlock.
- On the right, tick the Google Chrome or Firefox box.
Why is the meeting window displayed when I present?
- Select a new tab when you present or a new tab.
- If you present the meeting window, an infinite mirror can occur.