- Automatically blend selected charts
- Create blends manually
- Edit blends you've already created
- Add a table to the blend
- Move and remove tables
- Add and edit join configurations
- Set a date range for a table in the blend
- Apply a filter to a table in the blend
- Create calculated fields in a blend
- Rename a table
- Rename a blend
- Reconnect a table
- Manage blended data
You can create blends automatically or manually:
Automatically blend selected charts
- Edit your report.
- Add charts based on the data sources you want to blend. For each chart, include the fields you want to include in the blend.
- Select the charts you want to include in the blend.
- You can blend up to 5 charts.
- Right click on the selected charts, then click Blend data.
Looker Studio generates a new chart that combines the fields from the selected charts. You can use that blended chart in your reports just like any other chart.
Example: create a ratio metric
Blending 2 scorecards automatically creates a ratio metric, using the first chart you select as the numerator and the second chart as the denominator. For example, blending Costs and Clicks metrics automatically calculates your cost-per-click ratio:
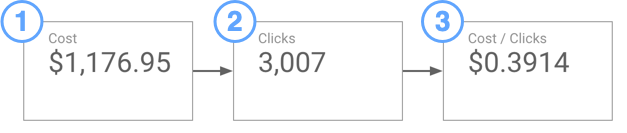
- Cost scorecard. Select this chart first.
- Clicks scorecard. Select this chart second, then right click and select Blend data.
- Blended Cost / Clicks scorecard. Change the Type to Currency and adjust the Decimal precision to 4 places.
Create blends manually
The two ways to create blends manually are:
- Select a component on the page, then in the properties panel on the right, under Data source, click +BLEND DATA.
- Open the Resources > Manage blends menu, and in the bottom left, click Add blend.
Edit blends you've already created
- Edit your report.
- Select a chart based on a blend.
- Click Edit
for that chart's data source.
You can also edit blends by clicking the Resource > Manage blended data menu option. Locate the blend in the list and click EDIT.
Add a table to the blend
- To the right of the rightmost table in the blend, click Join another table.
- Select a data source.
- Add fields to the table by clicking Add dimension or Add metric, or by dragging the field from the fields drawer. If the drawer is closed, open it by clicking
.
- To create a calculated field in the table, click Add dimension or Add metric, then click +Create field.
- Click the join configuration between the new table and the table to the left to set up the join between those tables.
Move and remove tables
Tables you add to the blend always appear on the right. To reorder the tables in the blend:
- Click More
for the table you want to move.
- Select Shift left/right.
To remove a table from the blend:
- Click More
- Select Remove.
Add and edit join configurations
Each table in the blend is joined by a set of matching fields (the join conditions) and a join operator. To add or edit this configuration:
- Click the join configuration box between 2 tables.
- Select a join operator.
- Define the join condition by adding the dimensions that contain the data you want to join on. Note that the cross join operator doesn't use a join condition.
- Click Save.
Missing fields in join conditions

Set a date range for a table in the blend
You have 2 options when setting a date range on a table in the blend:
- Auto - Use the date range of the chart that gets its data from this blend.
- Custom - Override the chart's date range with the range you select.
Apply a filter to a table in the blend
Limit the data contained in a table by applying a filter. You can create a new filter, or apply an existing filter to a table in the blend as long as that filter is based on fields that exist in the table.
Get more in-depth information about filters and date ranges in blends.
Create calculated fields in a blend
Tables in a blend can include calculated fields. This can be particularly useful as a way of creating join conditions when the data isn't perfectly compatible between tables (for example, when the join fields contain differently formatted dates or capitalized strings).
Show me how to add a calculated field
- Choose a table in the blend.
- Click Add dimension or Add metric.
- Click CREATE FIELD.
- Type in the formula in the editor window, then click APPLY.
Note: When you're creating calculated fields in a table in the blend, the formula can only reference fields found in that table. For example, a calculated field in Table 1 can't reference fields in Table 2.
To create a calculated field based on fields from different data sources, add those fields to their respective tables in the blend, then create a chart-specific calculated field.
Rename a table
Click a current table name, then type a new name.
If you have fields in the blend with duplicate names, you'll see the table name from which those fields are derived in the lists of available dimensions and metrics.
Rename a blend
On the right, above the list of fields in the blend, click the current blend name, then type a new name.
Reconnect a table
Underneath the table name, click the drop-down menu and select a new data source for this table.
Manage blended data
Use the Resource > Manage blended data menu to access all the blends contained in the current report. You can create new blends and edit, copy, or remove existing blends from this page.