You’ll need to check your current thermostat’s wires to tell if your system is Nest thermostat compatible, and which thermostat models it will work with.
Usually, you just remove your thermostat’s cover and enter the wires you find into the compatibility checker. The Nest app and Home app will also let you know if your system is compatible and give you a wiring diagram for installation.
Sometimes a thermostat’s wire connectors have two labels, which can be confusing, or no label at all. In rare cases, a wire may be in the wrong thermostat connector, which can cause your system to malfunction. In some cases, you’ll need to check your system’s control board to accurately identify the wires.
There are several ways to identify your thermostat wires:
Take a picture of your current thermostat’s wiring
Always take a picture of your current thermostat’s wires before you remove it from the wall and install a Nest thermostat. This picture will be an essential reference to identify wires and correctly install a Nest thermostat.
Check this article if you need help removing your thermostat's cover.
Contact a local HVAC system pro
A trained professional will be able to quickly tell what kind of system you have and identify the wires. They can also install and set up your Nest thermostat for you, and answer any questions you have. You can contact a local professional in your area to service your system.
Check your system’s control board
Checking your system's control board is a very reliable method for determining what an unknown wire is. The control board’s connectors typically have labels that can tell you what each wire is when other methods aren’t convenient or don’t work.
The control board is usually inside your furnace or HVAC equipment, so you'll probably have to open or remove a panel to check inside.
Important: These are advanced troubleshooting steps. Your HVAC system uses high voltage, which can be dangerous. Make sure to turn off the power to your system completely.
Contact a local professional if you need any help.
1. Turn off the main power to your system at the breaker box
Before you turn off the power, make sure each wire coming to your thermostat is a different color. If two or more wires are the same color, you won’t be able to tell them apart at the other end. You’ll need to contact a local professional.
Your system can have multiple breakers, so make sure to turn them all off before moving on. Once the power to your whole system is off, check your furnace and fan. Make sure there are no lights that might indicate your system still has power.
-
If there are still lights on your furnace or fan, your system might still have power. Turn off the main power to your home at the breaker.
2. Test that power is off
- Turn the temperature up on your thermostat at least 5 degrees to try to turn on your furnace.
- Wait at least 5 minutes to check if your system turns on (you’ll need to wait because many systems have a built-in delay).
- Turn the temperature down on your thermostat at least 5 degrees to try to turn on your AC.
- Wait at least 5 minutes to check if your system turns on.
- You’ll know that the power is off if your system doesn’t turn on. You can listen for your system to turn on, or you can feel for hot or cool air coming through the vents in your home.
3. Remove your system's panel
Once you’re sure you’ve turned off the power, look for a removable panel on your system. It may have a handle or latch, or you may need to remove some screws. Be careful not to touch any of the components inside your furnace, as some HVAC equipment is manufactured with large capacitors (electrical components that store charge like a battery).
To learn more about removing your system’s panel, consult the user guide for your HVAC system or contact a local professional in your area.4. Look for the wire connectors
When you’ve removed the panel, look for the control board. It looks like a circuit board and usually has lots of wires attached to it. You should find several sets of connectors on the control board with wires connected to them.
-
If you need help finding your HVAC system’s control board, consult the user guide for your HVAC system or contact a local professional in your area.
Look for connectors that have labels that are the same as your thermostat. For instance, you might find labels like R, W, G, Y, C or O/B. You should find wires attached to these connectors that are the same color as the wires that connect to your thermostat.
Look at the labels where these wires connect to the control board to determine what each wire attached to your thermostat should be labeled.
You may find labels like 1, 2, 3, 4, and A, B, C, D, or there may be no labels at all. These systems are incompatible with Nest thermostats. Check what your thermostat's wire labels mean.
5. Take a picture of the wire connectors
6. Close your system's panel
7. Use the Nest or Home app to get a wiring diagram
The in-box instructions will let you know which app to use for setup: the Nest app or Google Home app. When you begin setup with the app, you’ll get a custom wiring diagram. Now that you have a picture of the wires connected to the control board, you can use it as a reference to enter wires into the app and help make sure that your wiring diagram is accurate for installation.
More help with wire labels

-
Some thermostats have wire connectors with two sets of labels: one for conventional systems, one for systems with a heat pump. You need to know whether you have a heat pump or conventional system so you know which thermostat labels to enter into the Nest compatibility checker or the app during thermostat installation.
-
If you put wires into the wrong thermostat connectors during setup can, this can cause your system to malfunction or possibly damage it.
Important: The side that the wires come out of the connectors doesn’t matter. In the picture above, you might assume that this thermostat is connected to a conventional system because the wires are coming out of the conventional side of the connectors. In fact, this thermostat is actually connected to a Heat Pump system.
Use wire color as a guide
You can use most of the other methods in this article to determine which labels to use: check your system’s manual, contact a local professional, or look at your system’s control board.
While thermostat wire colors can vary, you can also sometimes use color as a guide if a wire is in your thermostat’s O/B - W terminal.
- If the wire in the O/B-W connector is orange: you probably have a heat pump. (Check the picture above.)
- If the wire in the O/B-W connector is white: you probably have a conventional system.
- Once you know what type of system you have, enter the labels for conventional system or heat pump either into the compatibility checker if you’re buying a Nest thermostat, or into the Nest app to get a custom wiring diagram for installation.
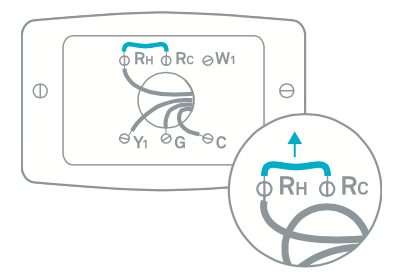
Short “jumper” wires
|
Jumper wires connect two thermostat terminals together (often Rc and Rh), but they aren’t “two label” wires. Jumpers aren’t connected to the system and don’t run back into the wall. Nest thermostats don’t use jumper wires
|
 |
If one or more wires in your current thermostat doesn’t have a label, don’t guess. You’ll need to know what wires are connected to your current thermostat before you can install your Nest thermostat.
You can use most of the other methods in this article to determine which labels to use: check your system’s manual, contact a local professional, or look at your system’s control board.
Important: Most systems don’t use all the wires in the bundle coming out of the wall. If any wires were not originally connected to your current thermostat (and don’t have a label), they typically aren’t connected to your system. Do not connect these wires to your current thermostat or Nest thermostat.Wires labeled B typically should go into a Nest thermostat's O/B connector. But for some systems the wire in the thermostat's B connector is actually a common or C wire. Common wires should go in your Nest thermostat's C connector.
Because the common wire is used to provide consistent power to the thermostat, it’s important to determine what function a wire labeled B serves before connecting it to a Nest thermostat.
WARNING: If a common wire is inserted into any connector other than C on your Nest thermostat, you may blow a fuse on your HVAC system and/or damage the thermostat. If you're uncertain what type of wire you have, it's strongly recommended that you find a local professional near you.
- Check if your thermostat has a C connector
Whether or not there is a wire attached to it, if your thermostat has a separate connector labeled C in addition to a connector labeled B, then the wire in the B connector should be connected to the Nest thermostat’s O/B connector. - If you have a heat pump
If you have a heat pump and your thermostat doesn’t have a separate wire labeled O, then the wire labeled B should be connected to the Nest thermostat's O/B connector. - Check your current thermostat’s manual
If you have the manual for your current thermostat (or can find it online), it may describe the function associated with the B connector and help you determine if it’s meant for a heat pump wire or a common wire. - Check the B wire color
The colors of thermostat wires often don’t adhere to industry standards, but they can sometimes provide a clue in certain situations. If your thermostat doesn’t have a separate connector labeled C and you’re not sure what type of system you have:- A brown wire is mostly likely a heat pump wire and should be connected to the O/B connector on the Nest thermostat.
- If the B wire is blue, it should most likely be connected to the C connector.
Note: This method is not foolproof and should be cross-checked with another method.
- Check your system’s control board
Looking at your system’s board is the most certain way to determine what the wire is. Follow the instructions in the next section.
What thermostat wire labels mean
Below are some of the wire labels you might find on your thermostat and what they do.
The app will give you a custom wiring diagram to help you install the Nest thermostat. Refer to the following article for step-by-step installation instructions.
How to install your Nest thermostat
Note: If you don’t find your wiring labels in this article, contact a local professional.
Common thermostat wires| Label | Description |
| R |
The R wire is the power wire for your heating and cooling system. If you only have one R wire (no Rh or Rc), you can connect your R wire to either Rc or Rh on the Nest thermostat. Note: Don't connect any Jumper wires to the Nest thermostat. |
| Rh |
Some HVAC systems, called dual transformer systems, use separate power sources for heating and cooling (Rc and Rh). If you have both an Rh and an Rc wire, you have a dual transformer system. If you have a dual transformer system, it's strongly recommended that you contact a local professional to prevent damage to your system. |
| Rc |
Some HVAC systems, called dual transformer systems, use separate power sources for heating and cooling (Rc and Rh). If you have both an Rh and an Rc wire, you have a dual transformer system. If you have a dual transformer system, it's strongly recommended that you contact a local professional to prevent damage to your system. |
| W or W1 | The W or W1 wire controls your heating system. |
| Y or Y1 |
In most systems, the Y or Y1 wire controls your cooling system. If you have a heat pump, your Y or Y1 wire controls your compressor. Your compressor is responsible for heating and cooling your home. |
| G or G1 | The G or G1 wire controls your fan. Your fan pushes the warm or cool air through your vents into the rooms of your home. |
| O/B |
Heat pump systems use a changeover valve controlled by the O/B wire. Your changeover valve tells your system when to switch between heating and cooling. What to do when your system is heating when it should cool Tip: O/B wires are typically orange, but you should not rely on Some systems have separate O and B wires. |
| E |
Some thermostats have an E connector. The E wire turns your emergency heat on or off. Emergency heat is usually used when it’s too cold outside for your regular heater to keep your home warm. |
| Y2 |
The Y2 wire controls the second stage of cooling in conventional systems, which can help cool your home faster. In heat pump systems, the Y2 wire controls the second stage of your compressor, which can help heat or cool your home faster. |
| AUX |
Heat pump systems sometimes have auxiliary heat to help heat your home more quickly or to help heat your home when it’s too cold outside for your heat pump to run. |
| C |
The C wire is also known as the common wire. This wire connects your system to the common ground and can help provide power to your thermostat. Note: If your system can’t provide enough consistent power to your Nest thermostat, you may need to connect a C wire or the Nest Power Connector to fix power-related issues. |
| W2 |
The W2 wire can control different types of heat based on the type of system you have. What to do when your thermostat has two labels If you have a conventional system In some cold areas, you might have a furnace with different stages of heat, low and high, to help heat your home quickly when it’s very cold outside. The wire in the W2 connector controls the second stage of heat. Learn more about multistage systems If you have a heat pump If you have a heat pump, the W2 wire may control your auxiliary heat. Auxiliary heat helps heat your home when it’s too cold outside outside for your heat pump to work efficiently. Learn more about auxiliary heat In some heat pump systems, the W2 wire may control a separate furnace to help heat your home. These types of systems are called dual fuel systems because the heat pump and the furnace use different heat sources. |
 color alone to determine the function of a wire.
If you find these wires attached to your thermostat, you may need to contact a local pro to help verify the function of your thermostat’s wiring.
In some cases, the app will let you proceed with wiring your Nest thermostat even if you have one or more of the wires listed below. But it will exclude some or all of these wires from the wiring diagram because certain features aren't supported. Don’t try to connect wires that are excluded from the app wiring diagram. Unsupported wires that are installed incorrectly can damage your thermostat or your system.
| Wire label | Description |
| S, S1, or S2 |
The Nest thermostat does not need these wires. Install your Nest thermostat without these wires. Wires labeled S or S1 can be indicator lights or sensor wires. The Nest thermostat uses its LCD display instead of an indicator light and gets sensor information, like outdoor weather conditions, over Wi-Fi. |
| L |
The Nest thermostat does not need this wire. Wires labeled L can be indicator lights. The Nest thermostat uses its LCD display instead of an indicator light. |
| G2 or GM |
Requires local professional assistance. Some heating and cooling systems have fans with multiple speeds. A G2 or GM wire will control the second speed of your system’s fan. |
| G3 or GH |
Requires local professional assistance. Some heating and cooling systems have fans with multiple speeds. A G3 or GH wire may control either the second or third speed of your system’s fan. Your pro can tell which speed this wire controls. |
| O |
May require local professional assistance if you have both an O wire and a B wire. O and B wires control when your heat pump cools or heats your home. |
| B |
May require local professional assistance if you have both an O wire and a B wire. O and B wires control when your heat pump cools or heats your home. In some installations, the common wire may be disguised as a B wire. How to tell if your B wire is a common wire Tip: Common wires are typically blue, but you should not |
| W3 |
May require local professional assistance. In some systems, the wire in the W3 connector controls your third stage of heat. This wire might also control your emergency heat. If you’re not sure what type of heating you have, contact a local professional. |
| H or HUM or HUM1 |
Requires local professional assistance. This wire will control your in-home humidifier. If your system has a humidifier wire, or more than one humidifier wire, you need a professional installation. |
| H2 or HUM2 |
Requires local professional assistance. Some humidifiers use two wires to turn on or off. Only one humidifier wire can be connected to your Nest thermostat. Your Nest pro can determine how to install your humidifier. |
| D or DH or DHUM or DEHUM1 |
Requires local professional assistance. This wire will control your in-home dehumidifier. If your system has a dehumidifier wire, or more than one dehumidifier wire, you need a professional installation. |
| DH2 or DHUM2 or DEHUM2 |
Requires local professional assistance. Some dehumidifiers use two wires to turn on or off. Only one dehumidifier wire can be connected to your Nest thermostat. Your Nest Pro can determine how to install your dehumidifier. |
| Other |
Requires local professional assistance. If you find a wire label not listed here, or you find a wire labeled Other, you need to contact a pro to check compatibility and have your thermostat installed. |
 rely on color alone to determine the function of a wire.
If you find these wires attached to your thermostat, your system is not compatible with the Nest thermostat.
Note: This is not a complete list of all incompatible wires since there are so many possibilities. You may have an incompatible system if you don’t find your current thermostat’s wire labels listed here.
| Wire Label | Description |
| Y3 | Y3 wires indicate a system that has three stages of cooling. The Nest thermostat does not support three stages of cooling. |
| 1 2 3 4 |
Wire labels such as 1 2 3 and 4 indicate a proprietary system. Proprietary systems usually only work with thermostats made by the same manufacturer. But some proprietary systems may also have the option to use standard heating system wires. Contact a local professional and have them check if your proprietary system can be rewired to be Nest compatible. |
| A B C D |
Wire labels such as A B C and D indicate a proprietary system. Proprietary systems are designed by the manufacturer so that they can’t work with other thermostats. |
| V or VR | These types of wires are not compatible with the Nest thermostat. |
| Water or H2O | These types of wires are not compatible with the Nest thermostat. |