
If you created your conversion action using a URL, you’ll see one of the following screens:
- If you’ve set up a Google tag, you’ll see a screen confirming that your conversion action is now set up. You’re now done. If you’ve chosen to dynamically track transaction-specific values, you’ll still need to modify your code.
- If you haven’t set up a Google tag, you’ll see a screen with instructions to set up your Google tag.
If you set up your conversion action manually, you’ll see one of the following screens:
- If you’ve set up a Google tag, you’ll see instructions to add an event snippet.
- If you haven't set up Google tag, you’ll see instructions to add both a Google tag and an event snippet for this conversion action.
Installing the Google tag
The Google tag adds website visitors to your 'All visitors' data segments (if you've set up your data) and sets new cookies on your domain, which will store information about the ad click that brought someone to your site. When your Google tag is linked to your Google Ads account, it uses click information to attribute a conversion to your Google Ads campaigns. Please ensure you're providing users with clear and comprehensive information about data collection and obtaining consent where legally required.
You must install the Google tag on every page of your website, but you need only one Google tag for each Google Ads account.
Choose between two ways to install your tag
Option 1: Set up the Google tag for your website
Under the 'Set up a Google tag', select the option that best describes your situation and follow the instructions for installing the tag:
Use the Google tag found on your website (recommended)
1. Click Details to view your tag details.
2. Click Confirm.
Learn more about setting up your Google tag
- When you've set up your tag, you need to configure your Google tag settings.
- You can launch Tag Assistant to your test conversion action or data collection.
Use a Google tag that you already have
This option shows whether the tag was detected on the site that you entered. Choose a tag labelled 'On site' to complete setup without making changes to your site's code.
Note: If your site has low traffic volume, your tag may be listed as 'Not detected'. If you choose a tag labelled 'Not detected', you may need to install it. Users for your account will be added as users on the tag. Learn more about managing your Google tag
If you have admin access to the tags listed, you should be able to find them. If you can't find the tag that you're looking for, you may not have the appropriate user permissions to make changes to that Google tag.
1. Click Choose a tag to discover:- A list of tags that you have admin access to
- Tag IDs
- Where the tag was detected.
- If the tag is detected on the site that you entered, you can choose a tag labelled 'On site' to complete setup without making changes to your site's code. If you choose a tag labelled 'Not detected', you may need to install it.
Install a Google tag
- Using a website builder
- Manually
Install using a website builder
You can use a website builder or content management system (CMS) such as Wix or Duda to deploy your Google tag. Select your website builder and follow the instructions to finish setting up your Google tag without making changes to your code. If you're trying to deploy a tag via a CMS or website builder integration, but the CMS integration doesn’t accept a GT- tag ID, you can use an alias (AW-XXXXX or G-XXXXX) that's supported by the CMS integration.
You can finish setting up your Google tag without making changes to your code if you manage your site using one of these platforms:
- Drupal
- Duda
- MonsterInsights for WordPress
- One.com
- Shopify
- Squarespace
- Typo3
- Wix
- WordPress
- WooCommerce
Learn more about installing your Google tag with a website builder
When you’re finished with your installation, click Done and we'll scan your website.
Click Done to finish your Google tag setup.
Install manually
Choose this option if it’s your first time setting up the tag for a conversion action in your account and you haven’t installed the Google tag. To install the tag, copy and paste it in the code of every page of your website, immediately after the <head> element. Don’t add more than one Google tag to each page.
Here’s an example of a Google tag, where 'TAG_ID' stands for the tag ID that’s unique to your Google Ads account:
<script async

            src="https://www.googletagmanager.com/gtag/js?id=TAG
_ID"></script>
<script>
window.dataLayer = window.dataLayer || [];
function gtag(){dataLayer.push(arguments);}
gtag('js', new Date());
gtag('config', 'TAG_ID');
</script>
2. (Optional) Modify the Google tag based on your preferences:
- If you don’t want the Google tag to add website visitors to your remarketing lists on initial page load, add the highlighted portion below to your Google tag’s 'config' command:
gtag('config',' TAG_ID',{'send_page_view': false}); - If you don’t want the Google tag to set first-party cookies on your site’s domain, add the highlighted portion below to your Google tag’s 'config' command:
gtag('config',' TAG_ID',{'conversion_linker': false});
Note: We don’t recommend doing this as it will lead to less accurate conversion measurement.
If you want to disable the collection of remarketing data, add the highlighted gtag('set') command to your Google tag above the gtag('js') command. This will disable the collection of remarketing data for all configured Google Ads accounts.
<script async
src="https://www.googletagmanager.com/gtag/js?id=TAG_ID"></script>
<script>
window.dataLayer = window.dataLayer || [];
function gtag(){dataLayer.push(arguments);}
gtag('set', 'allow_ad_personalization_signals', false);
gtag('js', new Date());
gtag('config', 'TAG_ID');
</script>
3. Copy the Google tag, then add it to your website.
4. Open the HTML for the page your customers reach on your website after they've completed a conversion, for example, the 'Thank you for your order'. This is called the conversion page.
5. Between the head tags (<head></head>) of the page, paste your global site tag, then, any event snippets that apply to the page.
6. Save the changes to your web page.
7. Click Done.
8. Click Install event tag.
9. Next to 'Event snippet', select whether to track conversions on a page load or click.
- Page load: Count conversions when customers visit the conversion page, such as a confirmation page for a purchase or sign-up. This is the default and most common option. Learn more about Google's security standards.
- Click: Count conversions when customers click a button or link (such as a 'Buy Now' button).

10. Copy the event snippet, then follow the instructions to add it to your website, or click Download snippet to add it later.
- If you're tracking conversions by page load, add the event snippet to the page that you're tracking.
- If you’re tracking conversions by click, add the event snippet to the page that has the button or link that you’d like to track for clicks.
11. Click Next.
12. Click Done.
13. Click Finish. If you’re tracking clicks on your website as conversions, follow the instructions in Track clicks on your website as conversions to add an additional piece of code to the button or link that you’d like to track. This step is required for conversion tracking to work.
Option 2: Use Google Tag Manager
Google Tag Manager is a tag management system that allows you to quickly and easily update tags and code snippets on your website. Use Google Tag Manager to install your Google tag and your conversion tracking tag.
Set up the Google tag
If you set up a conversion action using a URL, you need to create a Google tag in Tag manager.
Step 1: Create a new Google tag
- Open Google Tag Manager
- Select the container that you want to configure. Open the
 Tags menu.
 - Create a New tag. Enter a name for the tag at the top (e.g. 'Google tag configuration – example.com').
- In the Tag configuration box, select
 Google tag.
 - Configure your tag. In the field Tag ID, enter your Google tag ID.
Where is my Google tag ID?
You can find your Google tag settings within Google Ads, Google Analytics and Google Tag Manager. Log in to a product and follow the instructions to view your tag ID:
Google Ads instructions
Open the Google tag settings.Google Analytics instructions
- In Admin, under Data collection and modification, select Data streams.
- Click on a stream to see details.
- Result: Your screen should show you the Google Analytics settings and the Google tag settings.
Google Tag Manager instructions
Note: To see Google tag IDs in Google Tag Manager, you need to manage a Google Ads, Analytics or Google tag in a container.
- Open Google Tag Manager.
- Click on the tab Google tags to see Google tags that you've previously set up.
- Click on the tag name to edit the Google tag settings.
- Optional: You can set up additional configuration options to govern how your Google tag communicates with its destinations. If you set up the Google tag and want to keep all its default settings, you can now skip to Step 2: Create a trigger.
 Tags menu.
 Google tag.
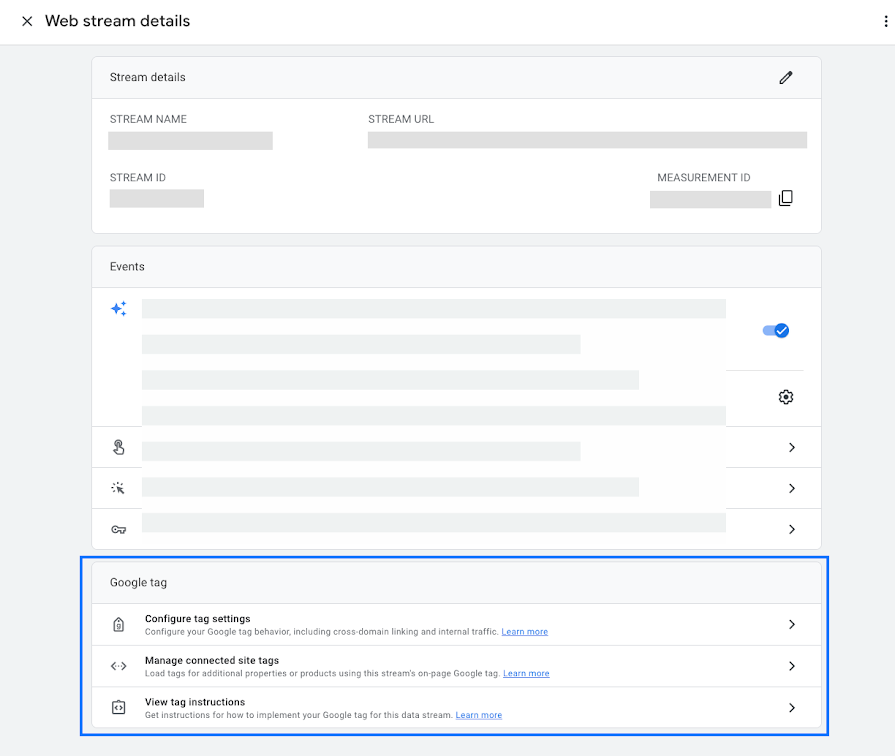

Optional settings
Global parameter settings
If you need to establish common context across several Google tags, you can specify global parameters using gtag.js directly on your website.
Learn how to reuse parameters across multiple tags, in the developer documentation.
Configuration settings
You can specify additional configuration parameters that influence the Google tag settings.
To reuse configuration across Google tags, create a configuration settings variable.
Shared event settings
You can specify additional parameters that are sent with every event, for example the currency of a price. Event parameters are only valid for the tag that you add them to.
To reuse event settings across Google tags, create an Google tag event settings variable. Use recommended event parameter names so that Google Analytics can populate dimensions and metrics for you.
Send data to a tagging server
Server-side tagging allows you to move some tags off of your website or app and onto a server instead, which allows you to improve performance. Learn more about server-side tagging.
To send all events to a Tag Manager server container instead of Google Analytics, you need to configure the following parameter:
- Open the Configuration settings menu.
- Set up the server container URL by adding a new configuration parameter:
- Name:
server_container_url - Value: Set to the server container URL of your Tag Manager server container
- Name:
Result: Your configuration parameters should look like this:

Set up user properties
User properties are attributes that describe groups of your user base, such as their language preferences or geographic locations. You can use user properties to define audiences.
For example, you can set a user property called favorite_food, which you can use to record each user's favorite food. You can use the data to segment users by their favourite food.
Analytics automatically collects some user dimensions so you don't have to define user properties for them. You can set up to 25 additional user properties per Google Analytics 4 property.
To measure custom user properties you need to create a new Google tag event settings variable and then assign it to the Google tag.
7. Save your Google tag.
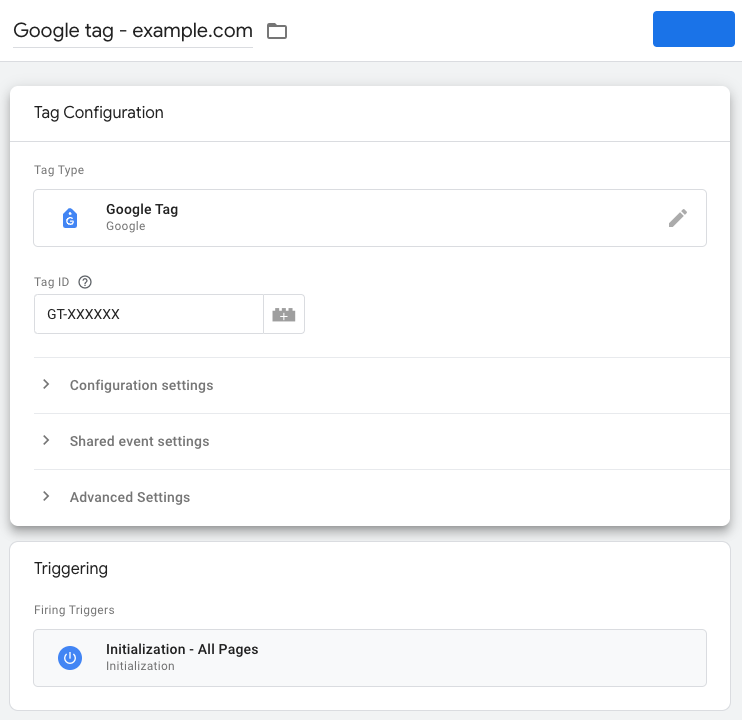
Step 2: Create a trigger
- To ensure that the Google tag fires before other triggers, click Triggering and use the Initialisation – All pages trigger. Learn more about Page triggers.
- Name the tag and Save the tag configuration.
Result
Your tag configuration should look like this:
Set up the conversion tracking tag
If you set up conversions manually, you need to set up the conversion tracking tag:
- Copy the Conversion ID and Conversion label (shown in Google Ads) for your conversion action.
- Follow the instructions to set up Google Ads conversion tracking in Google Tag Manager. Important: To ensure proper tracking in all browsers, make sure that you add a Conversion linker tag and configure it to fire on all of your webpages.
- Click Next.
- Click Done.
- If you’re tracking clicks on your website as conversions, you’ll need to complete additional setup steps in Google Tag Manager. This is required for conversion tracking to work. Choose one of the two options below:
- Basic: Set up a click trigger so the conversion tracking tag fires when the relevant click occurs.
- Advanced: Add a function call to the code for the link, button or button image. Then, set up a custom event trigger so the conversion tracking tag fires when the event (in this case, a click) occurs.
- Conversion ID
- Conversion label
TAG_ID stands for the conversion ID unique to your account, while AW-CONVERSION_LABEL stands for the conversion label, which is unique per conversion action.
<!-- Event snippet for Example conversion page --> <script>
gtag('event', 'conversion', {'send_to': 'AW-CONVERSION_ID/AW-CONVERSION_LABEL',
'value': 1.0,
'currency': 'GBP'
});
</script>
Advanced options
Disable the collection of personalised data
You can choose to disable the collection of personalised advertising data for users who do not wish to view personalised ads or for your own compliance reasons. You can modify the global site tag and disable the collection of personalised advertising data for particular users on your site, or choose to exclude all users from California in the Audience Manager section of your Google Ads account.
Not sure if your tag is set up correctly?
You can use Tag Assistant to check the implementation of your tag. For additional troubleshooting, visit Troubleshoot your sitewide tagging or Use Tag Assistant to troubleshoot your unverified or inactive conversion actions.
Informing your site visitors about data collection
As always, please ensure you're providing users with clear and comprehensive information about the data you collect on your websites, and getting consent for that collection where legally required.
Security and privacy for website tracking
Google's security standards are strict. Google Ads only collects data on pages where you have deployed the associated tags.
Please ensure you're providing users with clear and comprehensive information about the data that you collect on your websites, and getting consent for that collection where legally required.
