The Mesh Extender (GFEX310) is designed to be used along with your Multi-Gig Router (GFRG300) or Wi-Fi 6 Router (GRAX210T) to expand your Wi-Fi network to the furthest reaches of your home.
You may already have a Mesh Extender that was installed by one of our technicians or that you set up yourself through a self install kit. If you have a Mesh Extender that has not yet been installed, check out the section below about how to set up your Mesh Extender with Wi-Fi 6.
Your Mesh Extender's features, ports, and buttons
Ports
Your Mesh Extender comes with two gigabit Ethernet ports: one yellow LAN port, and one blue Ethernet port that can be used as either WAN or LAN connections.
It also includes a USB port you can plug your electronic devices into for charging.
The 12V DC power adapter port is where you’ll connect your power adapter when you’re plugging this device into an outlet.
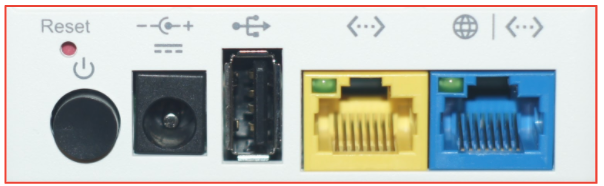
Buttons
You can use the power button to turn your Mesh Extender on and off.
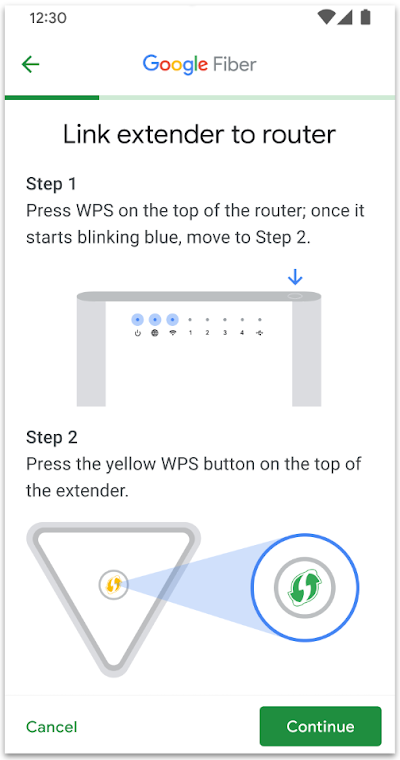
On the top of the Mesh Extender, you’ll find the Wi-Fi Protected Setup (WPS) button. You can use that button to pair it to (or connect it with) your router, following the steps below.
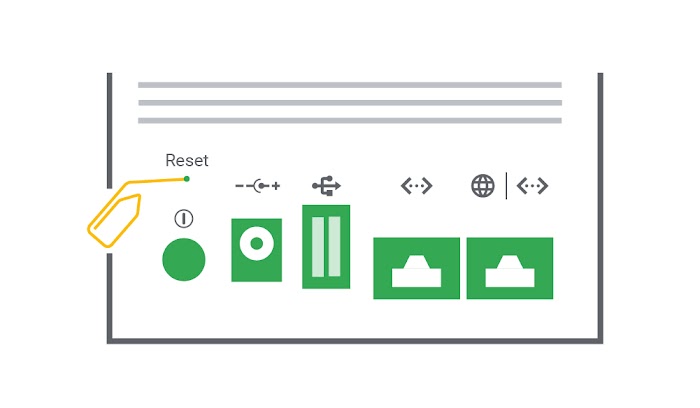
The reset button — located on the back of the device near the black power button — is used to reset your Mesh Extender when a GFiber rep suggests you do so or as needed for troubleshooting.
Features
Your Mesh Extender has Wi-Fi 6 (802.11ax) capabilities. Wi-Fi 6 allows for 30% faster speeds on Wi-Fi 6-enabled devices (such as phones, laptops, and tablets), and for more devices on a single network without slowing down Wi-Fi speeds as compared to Wi-Fi 5. Wi-Fi 6 also improves battery life and provides greater security with WPA3.
With one 2.4GHz (2x2), one 5GHz (2x2), and one 5GHz (4x4) band, your Mesh Extender automatically selects the best signal for your devices using a technique called band steering. In other words, it works to optimize your Wi-Fi without you needing to interact with it.
Finding the right spot in your home for your Mesh Extender
The technician who installs your internet service can help you determine the ideal placement for your Mesh Extender. As a general rule, you’ll want to place it about halfway between the router and an area in your home that doesn’t typically have a strong Wi-Fi connection. For example, if there’s a room or spot in the far end of your home that typically has a weak Wi-Fi signal, you’ll want to place your Mesh Extender halfway between your router’s location and that spot.
How many Mesh Extenders can I use?
We recommend up to two Mesh Extenders for a home network setup.
The process of setting up your Mesh Extender is referred to as pairing, since you’ll be connecting (or pairing) it to your router. You can do this either wirelessly, which we recommend, or you can use an Ethernet cable to connect to the router.
Set up your Mesh Extender with Wi-Fi 6
The process of setting up your Mesh Extender is referred to as pairing, since you’ll be connecting (or pairing) it to your router. You can do this either wirelessly, which we recommend, or you can use an Ethernet cable to connect to the router.
First, you'll need a few things to get connected:
- Your new Google Fiber Mesh Extender
- One power adapter cord
- One ethernet cable
- The Google Fiber app (recommended)
Here you’ll find step-by-step instructions for setting up your Mesh Extender. You can download the mobile app from the Google Play Store or the App Store.

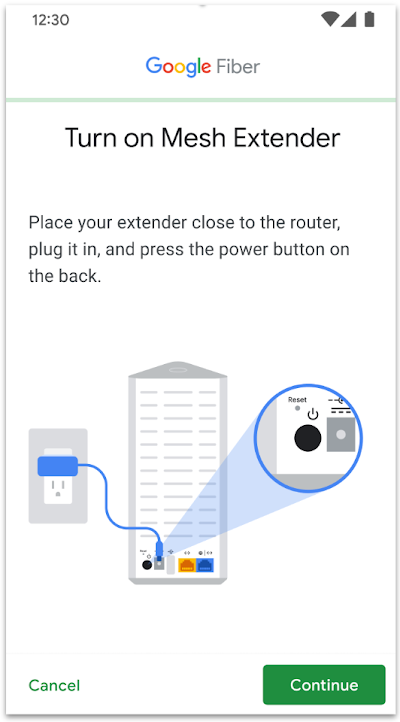
Step 1: Turn on your Mesh Extender

Step 2: Pair the Mesh Extender with your router

Step 3: Move your Mesh Extender to its new location
Once the connection has been established, unplug the Mesh Extender and place it in the location that you plan to use it — ideally, about halfway between the router and your devices. Plug it in, and turn the power on again.
The status light on the Mesh Extender will turn solid green, yellow, or red to let you know how strong your Wi-Fi connection is.
- Solid green? The link between the router and the Mesh Extender is great.
- Solid yellow? Your link is OK, but try moving the Mesh Extender closer to the router.
- Solid red? You’re not going to have a strong Wi-Fi connection. We recommend finding another spot for your Mesh Extender that’s closer to the router or has fewer walls in between the Mesh Extender and the router.
You can run a speed test using this speed test tool. To check upload speed on a mobile device, you can use the Speedtest.net app or visit fiber.google.com/speedtest.
Enjoy your mesh network
Connecting via Ethernet cable
Both of the Mesh Extender Ethernet ports can be used to connect devices to your network. To connect the Mesh Extender to the router using an Ethernet cable:
- Connect a CAT5e (or better) cable from an Ethernet LAN port on your Multi-Gig Router or Wi-Fi 6 router to the blue Ethernet WAN port on the back of the Mesh Extender.
- Plug your Mesh Extender into power using the power supply cord.
- Press the power button on the back of the Mesh Extender.
- When the Mesh Extender’s status LED turns solid green, it has connected (paired) successfully. The LED will automatically turn off after about three minutes.
To test upload speed on a mobile device, you can use the Speedtest.net app or visit fiber.google.com/speedtest.
Troubleshooting tips
What does it mean if the status light is blinking red after attempting to connect to my router?
- Wait until the red blinking light goes out, then try using WPS again.
- Turn the Mesh Extender slightly and then try again.
- Minimize the number of walls between the two devices and then try again.
- Move the Mesh Extender closer to the Multi-Gig Router or Wi-Fi 6 Router and then try again.
What should I do if the status light is solid red after establishing connection to my router?
You’ll need to reposition your Mesh Extender:
- Reposition the Mesh Extender so there aren’t large objects like walls, furniture and TV screens between it and your router. Wait up to 2 minutes to allow the Mesh Extender to re-evaluate the link quality.
- Repeat this until the status light turns solid yellow or green.
What should I do if my Mesh Extender is unresponsive?
If your Mesh Extender isn’t responding, you can use a pen or an unfolded paper clip to push the reset button for:
- Less than 5 seconds to force it to restart to your default settings.
or - At least 10 seconds to reset it to factory default settings.
Light statuses on the Mesh Extender
| Mesh Extender Light Statuses | Cause | Action |
|
WPS: Off (No Light) > Solid Yellow Off (No Light) > Solid Yellow > Solid Green (for 3 minutes) > Off (No Light) |
Mesh Extender is connected to power. | No action required. The light will stay off indicating the Mesh Extender is operational. |
|
WPS: Solid Yellow |
Mesh Extender is waiting to be paired. |
|
| WPS: Blinking Yellow | Mesh Extender is attempting to pair with the router. | No action required. |
|
WPS: Solid Green (for 3 minutes) > Off (No Light) |
Mesh Extender is successfully paired with the router. |
No action required. |
| WPS: Solid Red | Mesh Extender is disconnected or unable to connect with the router. This may also occur if the WiFi is turned off. |
|
| WPS: Blinking Yellow > Solid Red (15 seconds) > Solid Yellow | Mesh Extender isn't paired with the router. |
|
| WPS: Solid Red > Blinking Yellow > Solid Green (3 minutes) > Off (No Light) | Wi-Fi turned on |
No action required by the customer if the Mesh Extender is already paired with the Multi-Gig Router or Wi-Fi 6 Router. |
|
WPS: Blinking Red > Off (No Light) > Solid Yellow until the device is paired |
Factory Reset |
To reset Mesh Extender and restore the default settings:
|
| WPS: Off (No Light) > Solid Yellow > Off (No Light) > Solid Yellow > Solid Green (for 3 min) > Off (No Light). | Power cycle the Mesh Extender |
|
|
WPS: Off (No Light) > Device Reboot |
Firmware update | No action required. |