- Enable Chat apps with AppSheet
- Choose the configuration mode
- Use automatic configuration
- Use manual configuration
Enable Chat apps with AppSheet
To enable Chat apps with AppSheet:
- Open the app in the app editor.
- Click Chat apps
in the left navigation.
- Click Create.
The Enable Chat app setting is turned on.
The Enable section displays.
Next, you'll choose the configuration mode to use to configure your Chat app.
Choose the configuration mode
| Configuration mode | Description |
| Automatic configuration (Recommended) |
Automatically create, connect, and configure a Google Cloud project for use by Chat apps with AppSheet, all with one click. |
| Manual configuration |
Manually create and configure a Google Cloud project, enable and configure the Google Chat API, and optionally grant IAM access to run automations. |
See also About the Google Cloud projects used by Chat apps.
- Delete the Google Cloud project created in this step, copy the app, and start over
- Contact AppSheet Support for assistance
Use automatic configuration
To use automatic configuration, perform the following steps:
- Create a Google Chat app.
Note: In this step, AppSheet creates an associated Google Cloud project that operates in the background. You can't modify the Google Cloud project or its configuration using the Google Cloud console. For more information, see About the Google Cloud projects used by Chat apps.
- Customize your Chat app
Then, you test and share your Chat app.
To configure the Chat app using automatic configuration:
- Enable Chat apps with AppSheet (described above).
- In the Enable section, click Next to create a Google Chat app.
Note: Review the Google Workspace Marketplace Developer Agreement and the Google APIs Terms of Servicebefore proceeding.
After the Google Chat app is created, customize your Chat app.
Use manual configuration
To use manual configuration, perform the following steps:
- Manually create, connect, and configure a Google Cloud project
- Enable the Google Chat API
- Customize your Chat app
- Configure the Google Chat API
- Grant IAM access to run automations (optional)
Then, you test and share your Chat app.
resourcemanager.projects.create permission. For more information, see Creating a project and Manage access to projects, folders, and organizations.Manually create, connect and configure a Google Cloud project
To manually create, connect, and configure a Google Cloud project for use by Chat apps with AppSheet:
- Enable Chat apps with AppSheet (described above).
- In the Enable section, click Switch to manual configuration.
- To create a new Google Cloud project:
For best results, we don't recommend using an existing Google cloud project.
- Click Google Cloud Console > Project in the app editor to open the New Project page.
- Enter a name for your project.
This name is internal and isn't displayed in your Chat app. - Set your billing account, organization, and location.
For more information, see Creating a project. - Do not select the Create Googleplex internal App Engine project option.
- Click Create.
- In the Google Cloud Console, select Cloud overview > Dashboard in the navigation menu to display the project dashboard.
- Select the Google Cloud project in the project drop-down (if it's not already selected) and copy the Project number that is displayed in the Project info card.
- Return to the app editor and paste the project number in the Google Project Number field.
- Click Next.
Your app in now linked to the Google Cloud project. The Enable the Google Chat API section expands.
Next, you'll enable the Google Chat API.
Enable the Google Chat API
To enable the Google Chat API:
- In the Enable the Google Chat API section, lick Google Cloud Console > Chat API to open the Google Chat API page in the Google Cloud Console.
- In the console, click Enable on the Google Chat API page for the connect Google Cloud project.
- Return to the app editor and click Next.
The Customize section expands.
Next, you will customize Chat app actions in AppSheet (described above).
Customize your Chat app
Customize the following features in your Chat app:
- Chat app menu that displays when the Chat app installed or mentioned in a Google Chat space
- Search command that enables Chat app users to search your app using simple phrases
- Chat app actions that provide more ways to interact with your Chat app
For details, see Customize your Chat app.
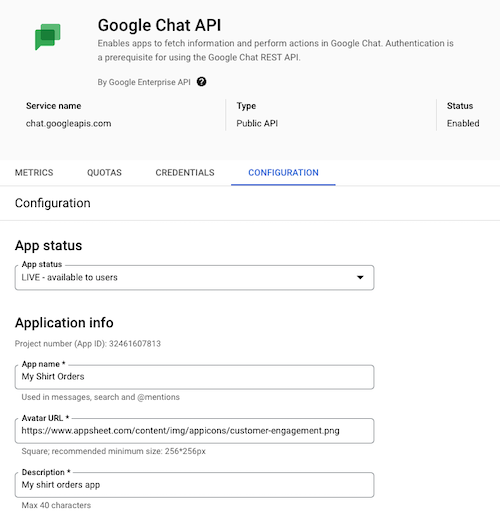
Configure the Google Chat API
When you configure an app using the Google Chat API, you need to provide the following information:
- App name
- Avatar image for the app
- Description of the app
- App URL
You can copy this information in the Configure the Google Chat API section on the Chat Setup page in the app editor.
To configure the Google Chat API:
- In the Configure the Google Chat API section, click Google Cloud Console > Google Chat API > Configuration to open the Configuration tab for the Google Chat API in the Google Cloud Console.
- To complete the fields under Application info, copy and paste the information from the app editor, as follows:
- Return to the app editor and copy the App name under Application Info in the Configure the Chat API section on the Chat Setup page.
- Paste the App name into the App name field under Application Info
- Repeat steps 3 and 4 to copy and paste the Avatar URL and Description fields.
- In the console, make sure Enable interactive features is turned on.
- Turn on (select) Receive 1:1 messages and Join spaces and group conversations under Functionality.
Note: You can enable the other options, though they are not required. - Return to the the app editor and copy the App URL under Connection Settings.
- In the console, under Connection settings select App URL and paste the copied URL into the App URL field.
-
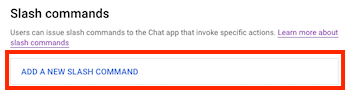
(Optional) To add slash commands for your Chat app in the Chat API:
- In the console, click Add a new slash command under Slash commands.
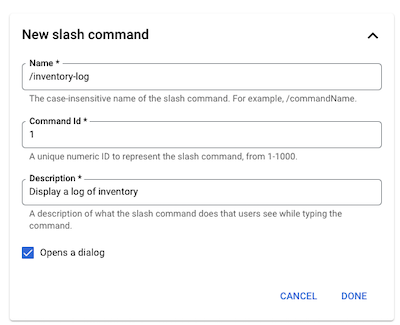
- In the app editor, copy the Name in the Configure slash commands section.
- Return to the console and paste the Name into the Name field.
- Repeat steps b and c to copy and paste the Description and Command Id fields.
- Enable the Opens a dialog option.
For more information, see Open interactive dialogs.
The following shows an example of the Slash command settings: - Click Done.
- Repeat to add additional slash commands.
- In the console, click Add a new slash command under Slash commands.
- Preview links are not required. You can skip the Link previews section.
- In the console, Under Visibility select Make this Chat app available to specific people and groups in your domain and add the email addresses for your test accounts in the email address field provided.
- Click Save.
- In the app editor, share the app with those same test accounts.
- Return to the Chat apps Setup page and click Next.
The Grant IAM access to run automations section expands.
Grant IAM access to run automations (optional)
To build automations using Chat apps, you must set the IAM policy. Otherwise, you can skip this step.
To grant IAM access to run automations:
- In the app editor, expand the Grant IAM access to run automations section on the Chat Setup page.
- Click Google Cloud Console > IAM & Admin > IAM to open the IAM & Admin page in the Google Cloud Console.
- Click Grant access.
The Grant access panel displays. - In the app editor, copy the New principals. In the console, paste it in the New principals field in the Add principals section.
- In the console, select Service Usage Consumer in the Role drop-down in the Assign roles section.
- Click Save.
- Return to the Chat apps Setup page in the app editor and click Next.
The Test section expands. - Deploy your app if it is not already deployed.
Next, you will test your Chat app.