Make and deploy an app with customized branding to the app store for iOS. See also What is a branded app?
To learn more about the different aspects of deploying your app, see Deploy.
- Restrictions
- Choose an app
- Create Apple developer account
- Creat an application ID
- Create the signing identity (certificate)
- Export the certificate
- Update device IDs
- Create provisioning profiles
- Build the app
- Test on your own device
- Publish to the iOS App Store
- Enterprise deployment
- Why is "Delete my account" available to iOS branded app users?
Restrictions
An Apple computer is required to create an iOS branded app. Also, any apps submitted to the Apple App Store are reviewed by Apple. AppSheet does not and cannot guarantee that an app will pass review or be available in the App Store.
Choose an app
Choose an app that you want to brand. For example, the Class Assignments app template is used in this example. Make sure the app has a high resolution icon that is perfectly square (check that the pixel count for height matches the pixel count for width). You will want to use an icon that is at least 1000 pixels by 1000 pixels. If the icon is not square, the branded app process will fail. You can try exporting and re-saving the icon file using a standard image editor (for example, Preview on MacOS) to make sure it is compliant.
Create Apple developer account
Create an Apple developer account. This is necessary because it is the only way to get the appropriate keys, signing identities, and provisioning profiles (all of which will be explained and described in later steps). Follow the instructions on how to create an Apple Developer account at this link: https://developer.apple.com/register. Keep in mind that an Apple developer account costs $99 USD per year. You need to complete this step before you can do anything else in this tutorial.
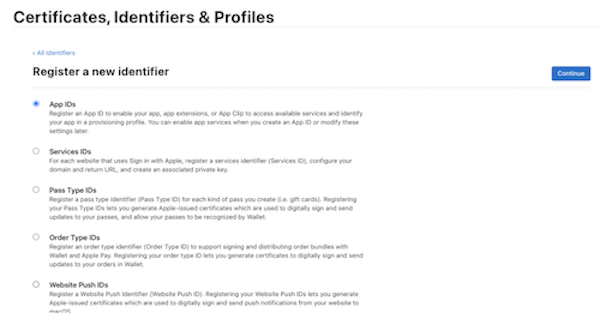
Create an application ID
You need to create an application ID for your application. An application ID is a unique identifier that Apple will use internally to identify your app. Follow this link: https://developer.apple.com/account/resources/identifiers/list, and click + icon to create a new identifier.
Select App IDs for the identifier type.
On the following page, select the App type and click Continue.

Next, let's enter the name of your app. You should fill the Description field with a name that will allow you to easily identify your app. It will only be shown to you. For example: Class Assignments
Following that, select Explicit App ID, and enter a unique identifier for your application in the Bundle ID field. For example: com.mycompanyname.classassignments
where mycompanyname is usually the name of your company. More information on selecting a Bundle ID for your app is noted at https://developer.apple.com/documentation/bundleresources/information_property_list/cfbundleidentifier?language=objc
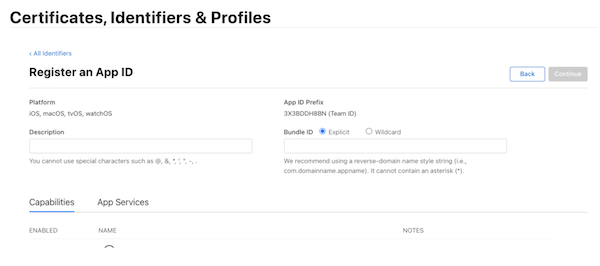
Next, scroll down to the Capabilities section and select Push Notifications if you want your app to receive push notifications. Note that this optional step requires extra configuration later. Click Register to register your new App ID.
Create the signing identity (Certificate)
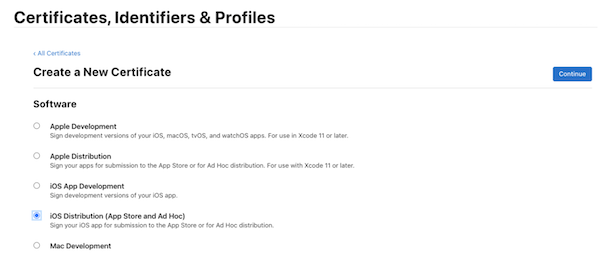
Now you need to create a signing identity for your application. A signing identity certifies that the app you upload to Apple, or install on an i-Device, is one made by you. Navigate to the following URL: https://developer.apple.com/account/ios/certificate/, and click the + sign to create a new certificate.

Select the App Store and Ad Hoc option.
Follow the instructions on the next page to create a Certificate Signing Request (CSR). This is a file that you will upload to the Apple developer website so that they can create a signing identity for you.
To create, this, open the Keychain Access application on your Mac and navigate to Certificate Assistant > Request a Certificate From a Certificate Authority as shown below. Follow the instructions at Request a certificate from a certificate authority in Keychain access on Mac on the Apple site to create a certificate file on disk. Take note of what you entered in the Common Name field so you will have access to it later because you will need it when you export the correct certificate in a later step. Note that when creating the CSR, you must use the email address of your Apple development account, and not any other personal email address. If you use the wrong email address at this step, you will get a red X when reimporting the generated certificate.

After you create the certificate signing request (CSR) on disk, upload your CSR in the Apple Developer website and download the generated certificate on the next page.
Export the certificate
Now that you have downloaded your certificate, you need to import it into your keychain (Keychain Access app on Mac). Double click on the downloaded .cer file. This will import it into your keychain. Then, open your keychain in the Keychain Access app on your Mac. Open the login keychain, and select the Certificates Category.
System Roots at this step you can try dragging the certificate into the login section of the keychain instead of double clicking it.Find the certificate that you imported. It should be called iPhone Distribution …. It should have a drop-down as well with the picture of a key and the corresponding name should contain the name that you entered into the CSR in the previous step. You need to export this certificate-key pair, so that AppSheet can use it to build and sign a branded app for you. Right click on the certificate (the item called iPhone Distribution ...), and click Export. Make sure that you export in the .p12 format, which includes both the certificate and the signing key. Name the file whatever you like, and save it somewhere you will be able to find it. Before exporting can complete, you will have to input a password to encrypt the exported certificate-key pair. Keep in mind that you will be sharing this password with us, so make sure not to reuse any of your other passwords for this step.
After you click OK, you will be prompted for the password of your computer (this will not be put into the exported certificate-key pair). You have now successfully exported your signing identity.
Upload device IDs
In order to be able to test your branded app on your phone before submitting it to the app store, you first need to tell Apple which devices your application is allowed to run on in test mode. Collect all the i-devices you want your app to be able to run on before you distribute your app. For each of the devices, you need to find their UDID. You can find this using the Finder app on your mac. Connect your iDevice to your computer using a USB cable. Navigate to the Finder app and locate your device in the left hand side menu. In the 'General' tab, the UDID will be displayed in the top of the page. You can click and copy the UDID.
After you collect all your UDIDs for each of the devices that you need to test your app on, you need to upload them into the Apple Developer Console. Follow this link: https://developer.apple.com/account/resources/devices/list and enter information for a single device or multiple devices together as shown.
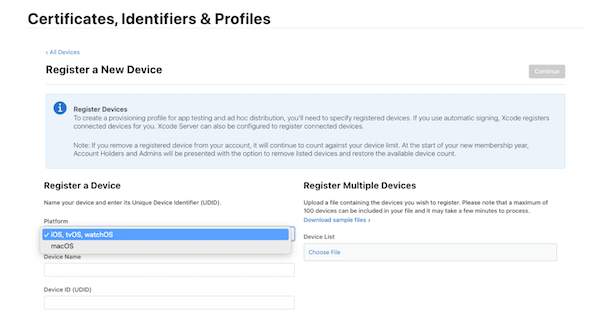
Keep in mind that you cannot add more than 100 devices.
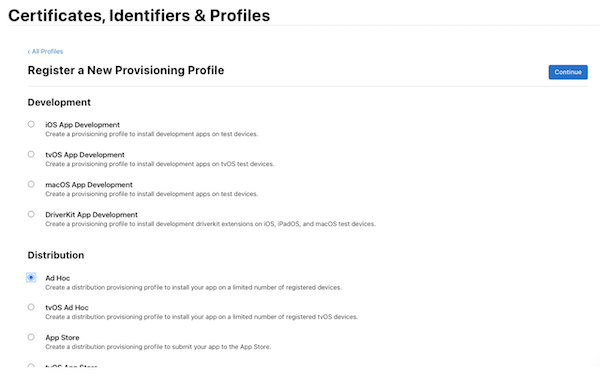
Create provisioning profiles
Now that you have both an app ID and a signing identity, you need to create two mobile provisioning profiles. There are 2 kinds of profiles you will need to create: An App Store profile and an ad-hoc profile. To create the appropriate profiles, navigate to the following page, and again, click + in the top right of the page: https://developer.apple.com/account/resources/profiles/list. The first profile you will create is called an Ad-Hoc provision. This type of provisioning profile allows your app to be installed on a small number of predefined devices.
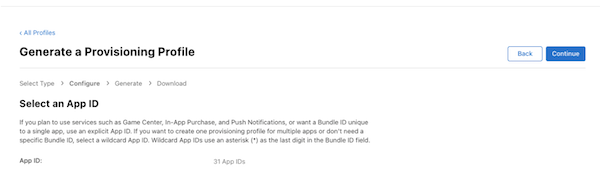
Click Continue. On the next page, select the application ID that you want to use for this provisioning profile. This will be the same ID you created a few steps ago.
On the following page, you will have to select the signing identity you want to use for this provision. This will be the signing identity you created a few steps ago (the one that expires the latest in your list if you have multiple).
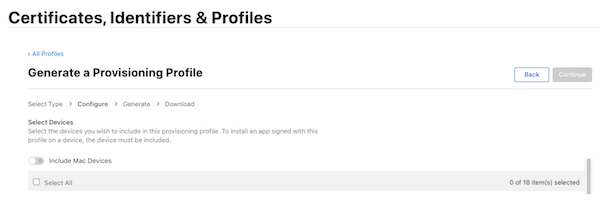
Then, you will be prompted to select the devices on which you want the app to be able to run. Choose all devices that you would like to test your app before submitting to the app store. Click Continue.
Next, select a name for your provisioning profile (only you will be able to see it).
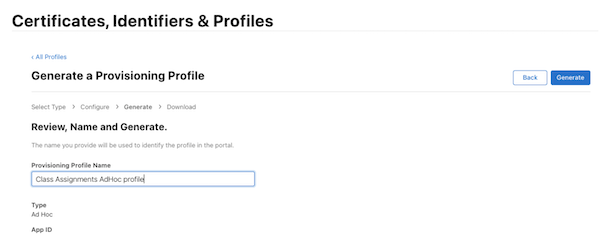
When you are finished with the configuration, download the generated provisioning profile. Repeat this same process to create and download a provisioning profile for App Store release. Choose App Store instead of Ad Hoc in the Register a new profile page.
Build the app
Now that you have all four items required to create a branded app (the two provisioning profiles, the signing identity, and the application ID), you can proceed to appsheet.com to actually create the app.
Go to Manage > Deploy > Branded Apps section of the editor for you app. You will have to configure the app using the information generated during the previous steps so that AppSheet can generate a branded app for you. Optionally, configure the settings if you want to enable push notifications.
After you enter all the required information, click Create a branded version of this app for iOS devices at the bottom of the iOS section. Within 24 hours you will receive an email with links to download your application. One link will contain an app bundle that you can upload directly to the App Store, and the other will contain a bundle that you can use on one of your own devices to see what it is like. Congratulations! You’ve just created your first branded app.
Test on your own device
You will want to test your branded app before you distribute it. One of the links in the email that you received points to a Test IPA. This is the version of the app that you will be able to install on your i-device. Download this IPA, connect your iDevice using a USB cable and in Finder, drag and drop it to your iDevice icon seen in the left sidebar.
Publish to the iOS App Store
To publish your newly created app on the app store, you will first need to create an entry for your app in iTunes. Follow the instructions in the following link to do this: https://developer.apple.com/library/content/documentation/LanguagesUtilities/Conceptual/iTunesConnect_Guide/Chapters/CreatingiTunesConnectRecord.html. Be sure to enter all the required information, like description, age restriction, and screenshots during this step. If you do not do this, you will not be able to upload your app to the App Store.
After you've created an entry for your app, you will need to upload a build, which refers to the application binary, the .ipa file that we provide you with during the iOS branded app process. Download the 'Transporter' app from the Mac appstore to upload your build. https://apps.apple.com/us/app/transporter/id1450874784?mt=12Note that it can take several hours between uploading the build, and that build being available in App Store Connect. You can check the status in App Store Connect by going into your app and clicking the Testflight tab. You can also test the app store build of the app using "Testflight" iOS app on your iDevices.
Finally, you will need to submit your app for review. Since the iOS App Store is a curated store, all apps are subject to the mandatory review process, during which Apple decides whether or not your app is fit to be on the App Store. We make no guarantees that your app will pass this review stage. To submit your app for review, follow the instructions on this page: https://developer.apple.com/library/content/documentation/LanguagesUtilities/Conceptual/iTunesConnect_Guide/Chapters/SubmittingTheApp.html#//apple_ref/doc/uid/TP40011225-CH33
Enterprise deployment
The final deployment option for larger organizations is called Enterprise Deployment. If you have an Apple Enterprise account, you will be able to generate an application in the same way as ad-hoc and App Store deployments. Replace the App Store signing identity with your Enterprise signing identity, and the App Store provisioning profile with your Enterprise provisioning profile. At this point, the generated app should be able to be deployed with Apple's Enterprise Deployment.
Why is "Delete my account" available to iOS branded app users?
Apple requires that apps that enable account creation also provide the ability to delete an account. For more information, see Offering account deletion in your app on the Apple Developer site.