Filter verification lets you preview the effects of a filter on incoming traffic before the filter is actually created. There are a number of reasons why verifying your filters is beneficial:
- It takes time (as much as 24 hours) before filter effects become visible in your data. Filter verification lets you see the possible effects of your filter in the present moment.
- Filter effects are permanent: filtered data cannot be restored to its original, unfiltered state. Filter verification can help you catch errors or problems before you save the filter and possibly impact real data in undesirable ways.
- Filter verification makes trying out variations of your filters much more convenient than without the verification feature.
For these reasons, it's good idea to always verify a filter before saving it.
In this article:Video overview
In a hurry? Watch this short (~3 minute) overview video.
Filter verification overviewTo verify a filter
- Follow the steps described in Create and manage view filters to create your filter and apply it to a view.
- Before saving the filter, click the Verify this filter link.
- If necessary, make any refinements to your filter and click the Verify again link until the sample "after" data appears the way you expect.
- If your filter returns no results and instead displays the message,
"This filter would not have changed your data."
either modify your filter or click Verify using a larger set of data. - When you are satisfied with your filter, click the Save button to save the filter.
How filter verification works
Filter verification works by applying the new, unsaved filter to a 7-day sample of the actual data for the selected view. It then compares the results of the new filter to the original data sample, to produce a list of changed rows. This is similar to the way a text editor's Compare files feature or the command line diff program works.
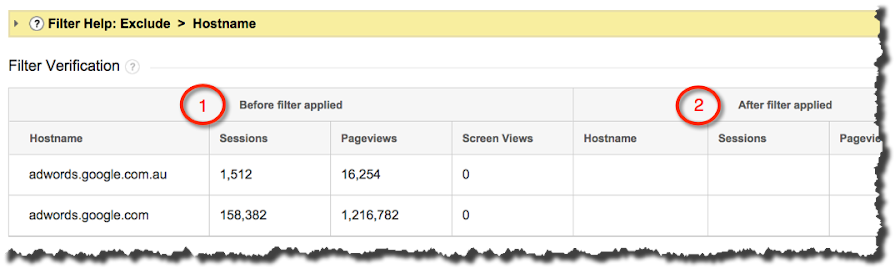
Filter verification displays the changed rows in a preview table, containing Before filter applied and After filter applied columns. The Before filter applied column displays the original data rows that would have been changed by the proposed filter, if that filter had been in place last week. The After filter applied column shows you how those same rows would look with the new filter applied. The difference between the before and after columns is the effect your new filter would have had if it had been in effect 7 days ago. (It's like having your own Analytics time machine!)
The image below shows an example of a preview table. The filter used excludes hits where the Hostname field contains "ads.google.com." The "before" table (marked as item 1) shows the rows in your data before the filter is applied. The "after" table (marked as item 2 in the image) shows those rows would be removed by the filter.
Sometimes, the initial sample data will not contain any rows that match your filter criteria. In this case, you won't see a preview table. Instead, you'll have the option to either adjust your filter (perhaps you didn't configure it properly) or apply the current filter to a larger set of sample rows. When you select this option, Analytics runs the same sample query as before, but increases the number of rows returned.
What if I still don't see a preview table?
If Analytics still can't find any rows that would be affected by the proposed filter, then it's possible the current view simply doesn't collect the data being targeted by the proposed filter. You should consider working from a different view or examining the other filters that might be in place for the current view to see if they are causing the issue.
Filter verification example
Let's say you are currently collecting hits for 3 hostnames: support.mycompany.com, sales.mycompany.com and ads.mycompany.com. You want to create a view that only shows hits for your support domain. So you create a new view and define a custom filter that includes the hostname field matching the filter pattern support\.mycompany\.com.
To verify this filter, Analytics calculates a sampling rate and selects a base set of rows of actual data for this view, going back 7 days. The resulting data might look like this:
| Hostname | Sessions | Pageviews |
|---|---|---|
| service.mycompany.com | 337 | 1,011 |
| support.mycompany.com | 3,707 | 35,722 |
| sales.mycompany.com | 148,280 | 1,357,773 |
| ... |
Analytics then applies the new filter you are creating to the original sampled data and notes which rows would be changed by this filter. This is the Before filter applied set of rows. Only those records that would have been included, excluded or changed by the new filter appear in the before view.
The After filter applied set of rows shows what the filter actually would have done to affected rows (i.e., either included them, excluded them or changed them).
In this example, we are filtering on support\.mycompany\.com. The Before filter applied column contains all the rows where the hostname contains that domain (in this case, there's just one). The After filter applied column shows the results of applying the include filter to all the sample data: it includes only the one matching row.
|
|
Limitations of filter verification
- Because filter verification uses a calculated sampling of your data, the results cannot be guaranteed to be accurate in all cases. You should always maintain an unfiltered view of your data as a back up.
- Due to privacy constraints, you cannot verify filters using Geo-based fields.
- You cannot verify advanced filters.
