Both Google Sheets and Microsoft Excel support a built-in mechanism called data validation rules. Data validation rules allow you to constrain the values that can be entered into a worksheet cell. You can define one or more data validation rules for your worksheet. Typically, you define a separate data validation rule for each column in your worksheet where you need to constrain user entered values.
When you create an AppSheet application from a worksheet having data validation rules, AppSheet will automatically detect these data validation rules and apply them to your AppSheet application. This ensures that data values entered through your AppSheet application conform to the same rules as data values entered directly into your worksheet.
Define a Google Sheets data validation rule
You can define a data validation rule in Google Sheets in two ways.
- Manually type in the allowed values into the validation list.
- Create a new worksheet containing a predefined set of cells that contain the allowed values.
When you have a lot of allowed values, we recommend the second approach. The first approach, manually typing the allowed values, imposes a limit of 256 characters for the entire list.
You can follow the steps listed below to define a data validation rule for your Google worksheet. We refer to the original worksheet containing your application data as the DataSheet. We refer to the new worksheet contained the allowed values as the EnumSheet.
- Add a new worksheet to your Google workbook to contain the allowed values.
.
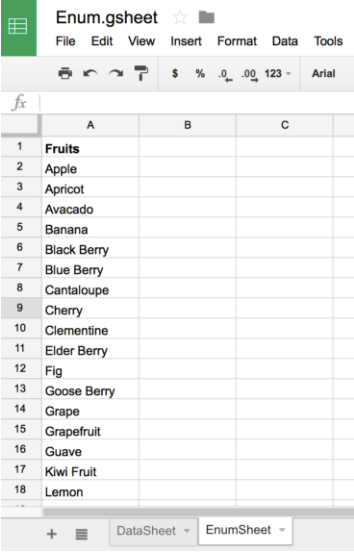
- Open the EnumSheet and allocate a column for your first set of allowed values.
- Enter a column header value. For example, Fruits in cell
A1. - Enter all of the allowed values into this column. For example:
- In the DataSheet go the column that will contain the data values and select all of the cells in the column, excluding the first row that contains the header.
- Go to the Data menu and select Data Validation.
The Data validation rules pane displays. - Click + Add rule.
- In the Criteria row select Dropdown (from a range).
- In the text field, click
Select data range.
The Select a data range dialog opens. - With the Select a data range dialog window open, click the EnumSheet tab to open the EnumSheet.
- Select the range of cells in the column that contains the allowed values. For example, select Apple, Apricot, Avocado, and so on.
The Select a data range dialog should now contain something like EnumSheet!A2:A15. The EnumSheet name appears to the left of the ! and the selected allowed values cell range appears to the right. - Click OK in the dialog.
The Data validation rules pane will now reflect the EnumSheet name and cell range you just selected above. These are the allowed values that will be used for validation. - Click Done in the Data validation rules pane.
- Optionally, you can additional columns in the EnumSheet for additional sets of allowed values. For example, you might add a column for Vegetable allowed values, another for Animal allowed values, and so forth. Repeat steps 2 through 13 for each of your allowed values.
- Ensure that at least one row in the
DataSheetcontains data values. For each data column, choose one of the legal allowed values as the data value. - Generate your AppSheet application from the workbook (for example, use the AppSheet add-on).
- Only the DataSheet will be added to the app initially. You'll need to manually add the EnumSheet table to the app.
It should show up as a suggestion in the Add data dialog, as shown in the following figure.
 .
.
AppSheet will read the DataSheet to get your data values and the EnumSheet to get your allowed values. Once you have created your app, view the columns to ensure all of the allowed values have been set correctly by AppSheet.
Define a Microsoft Excel data validation rule
You can specify enum values in another sheet when working with Excel worksheets. However, one additional step is required to do this. You must use the Excel Define Name feature to name the enum values contained in the other worksheet. Do this as follows:
- Enter the enum values in a dedicated column on a separate Excel worksheet as described in steps 1 through 4 above.
- On the Excel Formulas tab, click Define Name to define a new Name that refers to the worksheet and cells you created in step 1. When the New Name dialogue is displayed, enter a value such as FruitEnum in the Name attribute. Click the icon to the right of the Refers to attribute. Select the worksheet containing the enum values, and select the range of cells containing the enum values. Click OK.
- In the Excel
DataSheetgo to the column that will contain the enum values and select all of the cells in the column. On the Excel Data tab, click Data Validation and select Data Validation from the drop-down. In the Data Validation dialog, select List from the Allow drop-down. In the Source field, enter = followed by the Name you defined in the previous step. Click OK. - Ensure that at least one row in the
DataSheetcontains data values. For each enum column, choose one of the legal enum values as the data value. - Regenerate the AppSheet application and it will extract the enum values from the enum values column you created in step 1.
-
Once you have created your app, open the Data >Columns pane to ensure all of the enum values have been picked up by AppSheet.